Short answer: To screen record with OBS, install OBS Studio, allow Screen Recording and Microphone access in macOS System Settings, add a macOS Screen Capture source to a scene, check your audio levels, then click Start Recording. Click Stop Recording when you're done, and choose File → Show Recordings to find the file.
This guide walks through every step of an OBS screen record on a Mac, including the parts most OBS tutorials skip: macOS permissions, system audio, Retina resolution, and the MKV vs MP4 question. At the end, there's an honest look at when a simpler recorder fits better.
What Is OBS Studio?
OBS Studio (Open Broadcaster Software) is a free, open-source app for screen recording and live streaming. It runs on macOS, Windows, and Linux, with no watermark, no time limit, and no account. You build scenes out of sources (displays, windows, webcams, images, audio inputs) and record or stream whatever the scene shows.
That flexibility is why people search for an "OBS screen recorder": it can do almost anything. It's also why the first setup takes a while. OBS only records, so trimming, zooms, and captions happen in another app.
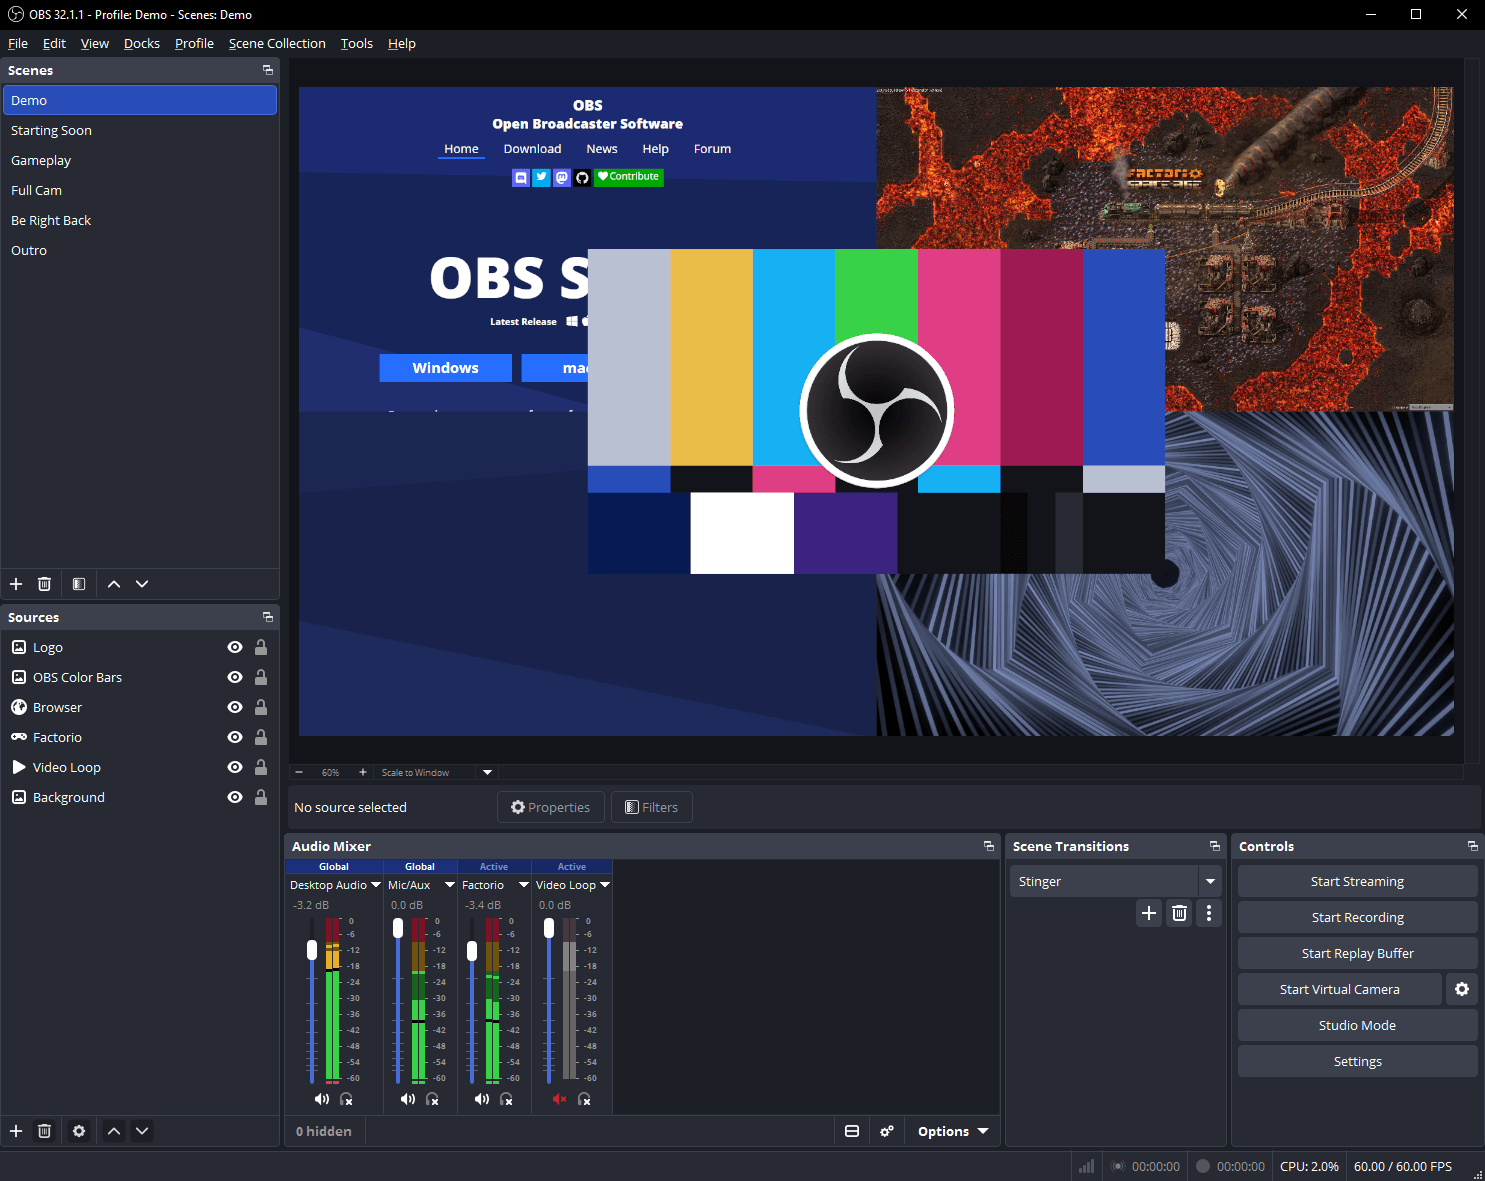
How to Screen Record with OBS (Quick Answer in 5 Steps)
- Install OBS Studio from obsproject.com and open it.
- Grant permissions for Screen Recording and Microphone in System Settings → Privacy & Security, then restart OBS.
- Add a source: in the Sources panel, click + and choose macOS Screen Capture, then pick your display or a window.
- Check audio: make sure your mic shows movement in the Audio Mixer, and add app audio if you need it.
- Record: click Start Recording in the Controls panel, then Stop Recording. Open the file with File → Show Recordings.
The rest of this guide covers each step in detail.
Sponsored by the makers
Tired of boring screen recordings?
Try Screen Charm.
Auto-zoom, captions, motion blur, camera overlay and a vertical layout for Shorts. Record once, export a polished video.
Screen Charm is a native macOS app.
Step 1: Install OBS on Mac
- Go to obsproject.com and download the macOS version. Pick the build for your Mac's chip (Apple Silicon or Intel) if the site asks.
- Open the downloaded
.dmgand drag OBS into your Applications folder. - Launch OBS. If macOS warns that it was downloaded from the internet, click Open.
- The Auto-Configuration Wizard may appear. Choose Optimize just for recording, I will not be streaming. It picks sensible video and encoder settings for your Mac. You can change everything later.
Step 2: Grant Screen Recording and Microphone Permissions
macOS blocks screen capture until you allow it, and this is the most common reason a new OBS screen recording comes out black.
Recent versions of OBS show a permissions window on first launch with buttons for each permission. If you missed it, set them manually:
- Open System Settings → Privacy & Security.
- Click Screen & System Audio Recording (called Screen Recording on older macOS versions) and turn on OBS.
- Go back and open Microphone, and turn on OBS.
- If you'll use a webcam, open Camera and turn on OBS.
- Quit and reopen OBS. macOS only applies the Screen Recording permission after a restart.
On recent macOS versions, you may also see a periodic prompt asking you to confirm that OBS can keep recording your screen. That's a macOS feature, not an OBS bug. Click Allow to continue.
Step 3: Set Up a Scene and Add a Screen Source
OBS starts with one empty scene. The scene is your canvas; sources are what you put on it.
- In the Sources panel at the bottom, click +.
- Pick a capture source (see the table below). For most Mac users, choose macOS Screen Capture.
- Name it (for example, "Screen") and click OK.
- In the properties window, set Method to Display Capture to record a whole screen, or Window Capture / Application Capture to record one window or app. Pick the display or window, then click OK.
- If the capture doesn't fill the canvas, right-click the source and choose Transform → Fit to screen.
Display Capture vs Window Capture vs macOS Screen Capture
| Source | What it records | When to use it |
|---|---|---|
| macOS Screen Capture | A display, a single window, or all windows of one app. Uses Apple's ScreenCaptureKit. | The default choice on current OBS and macOS versions. It's efficient and can capture app audio. |
| Display Capture | An entire monitor. | Older OBS or macOS setups. Newer OBS versions mark it as deprecated on macOS in favor of macOS Screen Capture. |
| Window Capture | One window. | Older setups. Same idea as the Window method in macOS Screen Capture. |
The exact names and which sources appear depend on your OBS and macOS versions. ScreenCaptureKit requires macOS 12.5 or later, so on an older Mac you'll only see Display Capture and Window Capture.
Want your webcam in the recording? Click + again, choose Video Capture Device, and pick your camera. Drag and resize it into a corner of the canvas. Sources higher in the list sit on top.
Step 4: Record Your Mic and System Audio on Mac
Audio is where OBS on a Mac differs most from Windows.
Your microphone
- Open OBS → Settings → Audio (on macOS, Settings lives under the OBS menu).
- Under Global Audio Devices, set Mic/Auxiliary Audio to your microphone.
- Click OK and speak. The Mic/Aux bar in the Audio Mixer should move. Aim for peaks in the yellow range, not constantly in the red.
System audio (sound from apps and videos)
macOS doesn't expose system sound as a normal input, so on Windows-style guides "Desktop Audio" often won't work on a Mac. You have two options:
- Use ScreenCaptureKit (recent OBS and macOS): open the macOS Screen Capture source's properties and enable its audio capture option, if your version shows one. Newer OBS versions also include a separate macOS Audio Capture source for desktop or app audio. Both need macOS 13 or later. Option names vary between OBS releases, so check what your version offers.
- Use a virtual audio driver (any version): install a free driver such as BlackHole, route your Mac's output through it with a Multi-Output Device, and set Desktop Audio in OBS to BlackHole. Our guide to recording internal audio on Mac walks through this setup.
Play a video and watch the mixer. If the system audio bar moves, you're set.
Step 5: Set Format, Resolution, FPS, and Save Location
Open OBS → Settings. Three tabs matter for recording.
Output: format, quality, and where files save
In Settings → Output, the default Simple output mode is fine for most screen recordings:
- Recording Path: where your files go. By default, it's your Movies folder. Click Browse to change it.
- Recording Quality: High Quality, Medium File Size is a good default. Indistinguishable Quality makes much larger files.
- Recording Format: this is the MKV vs MP4 decision (below).
- Encoder: on a Mac, choose a Hardware encoder (Apple VT H.264 or HEVC) if listed. It uses the Mac's media engine and keeps the CPU free.
If you want direct control over bitrate, switch Output Mode to Advanced. In the Recording tab you can set the encoder, rate control, and bitrate yourself. Higher bitrates mean sharper text and bigger files.
MKV vs MP4: why it matters
A plain MP4 file is only finalized when the recording stops cleanly. If OBS crashes or your Mac loses power mid-recording, a plain MP4 can be unreadable. MKV survives a crash, because everything recorded up to that point stays playable. The catch: QuickTime and many editors don't open MKV.
You have three ways to handle it:
- Record in MKV, then remux. Choose File → Remux Recordings, drop in the MKV, and click Remux. OBS converts it to MP4 in seconds without re-encoding, so there's no quality loss.
- Turn on automatic remuxing. In Settings → Advanced, under Recording, enable Automatically remux to MP4 (the wording may differ by version). OBS records MKV and saves an MP4 copy when you stop.
- Use Hybrid MP4 or fragmented MP4, if your OBS version offers them in the format list. They're designed to be crash-resistant while still producing MP4 files.
For a full comparison of formats, see the best video format for screen recording.
Video: resolution and frame rate
In Settings → Video:
- Base (Canvas) Resolution: match your display. On a Retina Mac, OBS may suggest a very high resolution, because it sees the screen's full pixel count rather than the "looks like" size.
- Output (Scaled) Resolution: what's actually recorded. 1920×1080 keeps files manageable; use 2560×1440 or 3840×2160 if your audience needs pixel-sharp text and your Mac can keep up.
- Common FPS Values: 30 is plenty for tutorials and demos. Use 60 for gameplay or fast motion.
If recordings stutter, lower the output resolution or FPS first.
Step 6: Start, Stop, and Find Your OBS Recording
- Click Start Recording in the Controls panel (bottom right). A timer appears in the status bar.
- Do your thing. You can hide or minimize the OBS window; it keeps recording.
- Click Stop Recording. With MKV plus automatic remux, wait a moment for the MP4 to appear.
- Choose File → Show Recordings to open the folder in Finder. Files are named by date and time.
Tip: set keyboard shortcuts in Settings → Hotkeys for Start Recording and Stop Recording, so you don't need to switch back to OBS to stop. Some versions also offer a Pause button in Advanced output mode.
Still can't find a file? Our guide on where screen recordings go on Mac covers OBS and every other common recorder.
Common OBS Screen Recording Problems on Mac
Black screen in the preview or recording
Almost always a permissions issue. Open System Settings → Privacy & Security → Screen & System Audio Recording, turn OBS off and on again, then quit and reopen OBS. If it persists, remove the source and add a fresh macOS Screen Capture source, and make sure you picked the right display.
No system audio
Your source isn't capturing app audio. Enable audio in the macOS Screen Capture source (or add a macOS Audio Capture source) on supported versions, or set up BlackHole. Check that the bar for that source moves in the Audio Mixer and isn't muted.
No microphone audio
Check that OBS is allowed under Privacy & Security → Microphone, and that Mic/Auxiliary Audio in Settings → Audio points at the right device.
The recording won't open in QuickTime
It's probably MKV. Use File → Remux Recordings to convert it to MP4.
Laggy or choppy recording
Switch to a hardware encoder, lower the output resolution to 1080p, set FPS to 30, and close heavy apps. The Stats window (View → Stats) shows skipped and dropped frames.
Huge files
Lower the recording quality or bitrate, or record at 1080p instead of 4K. See how to reduce video file size for more options.
What OBS Doesn't Do: Zoom, Captions, Cursor Polish, and Editing
OBS is excellent at capturing exactly what's on screen. What it hands you is a raw file. There's no built-in:
- Zoom on clicks: viewers watching on a phone or in a small window can't read a full 4K desktop.
- Cursor smoothing or highlighting: jittery mouse movements stay jittery.
- Captions: you'll need another tool to transcribe and burn them in.
- Editing: no trimming, cutting mistakes, or layouts after the fact.
- Share links: you upload the file yourself.
For live streaming, multi-camera setups, and long unattended recordings, that's the right trade-off. For product demos and tutorials, it usually means a second app and a lot of time on the timeline.
When a Simpler Tool Fits Better: Screen Charm
If what you actually want is a polished demo or tutorial, not a broadcast setup, Screen Charm is a native Mac screen recorder built for that job:
- Auto-zoom on clicks: the video zooms into where you click, so text stays readable.
- Cursor smoothing: shaky mouse movement becomes smooth.
- Webcam layouts: record your camera and switch layouts in the editor.
- Captions: generated from your voice.
- System audio and mic recorded without a virtual driver.
- 4K export to MP4, or a share link when you just need to send it.
Recording and editing happen in one app, so there's no OBS → editor round trip. Screen Charm costs $19/month or $89/year. OBS is free, so if you need streaming, scenes, or a zero-cost tool, OBS remains a great choice.
For a broader look, compare the best OBS alternatives for Mac, read Loom vs OBS if you mostly send quick async videos, or browse the best screen recording software for Mac.
FAQ: OBS Screen Recording
How do I screen record with OBS?
Add a macOS Screen Capture (Mac) or Display Capture (Windows) source to a scene, check your audio in the Audio Mixer, and click Start Recording. Click Stop Recording when you're finished, then use File → Show Recordings to find the file.
Is OBS a good screen recorder?
Yes. OBS Studio is a free, open-source screen recorder with no watermark or time limit, and it handles multiple sources, webcams, and live streaming. The trade-offs are a longer setup and no built-in editor.
Is the OBS Studio screen recorder free?
Yes. OBS Studio (Open Broadcaster Software) is completely free and open source on macOS, Windows, and Linux, with no paid tier.
Why is my OBS screen recording black on Mac?
OBS usually doesn't have Screen Recording permission. Turn it on in System Settings → Privacy & Security → Screen & System Audio Recording, then quit and reopen OBS.
Can OBS record system audio on Mac?
Yes, on recent versions. With macOS 13 or later and a recent OBS release, you can capture app audio through the macOS Screen Capture source or a macOS Audio Capture source. On older setups, use a virtual audio driver such as BlackHole.
Should I record in MKV or MP4 in OBS?
MKV is safer, because the file stays usable if OBS crashes. Turn on automatic remux to MP4 or use File → Remux Recordings to get an MP4 for QuickTime and editors.
Where does OBS save screen recordings on Mac?
To your Movies folder by default. You can change it in Settings → Output → Recording Path, and open it anytime with File → Show Recordings.
Can OBS record just one window?
Yes. In the macOS Screen Capture source, set the method to Window Capture and pick the window. Only that window is recorded, even if others overlap it.