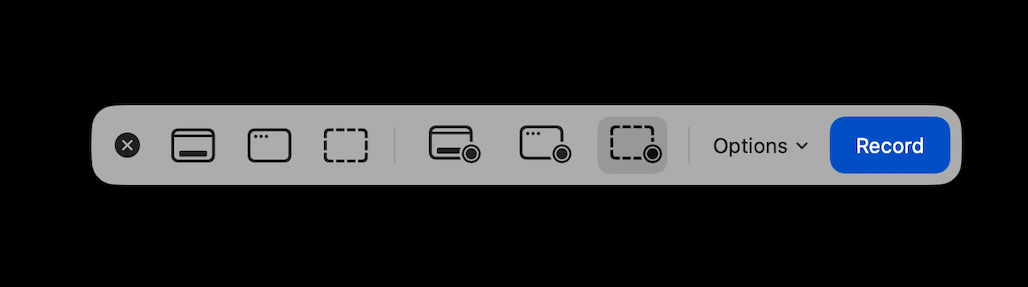
To record internal audio on a Mac, press Shift + Command + 5, open Options, and… you'll notice there's no "System Audio" option. That's the problem. This guide covers every method to fix it: free virtual drivers, paid routing apps, OBS, DAW integration, and all-in-one recorders — plus troubleshooting for every common failure.
Quick Answer: Record System Audio on Mac in 3 Steps
- Install BlackHole — a free virtual audio driver
- Create a Multi-Output Device in Audio MIDI Setup that combines BlackHole and your speakers
- Select BlackHole as the microphone input in QuickTime or OBS, then hit Record
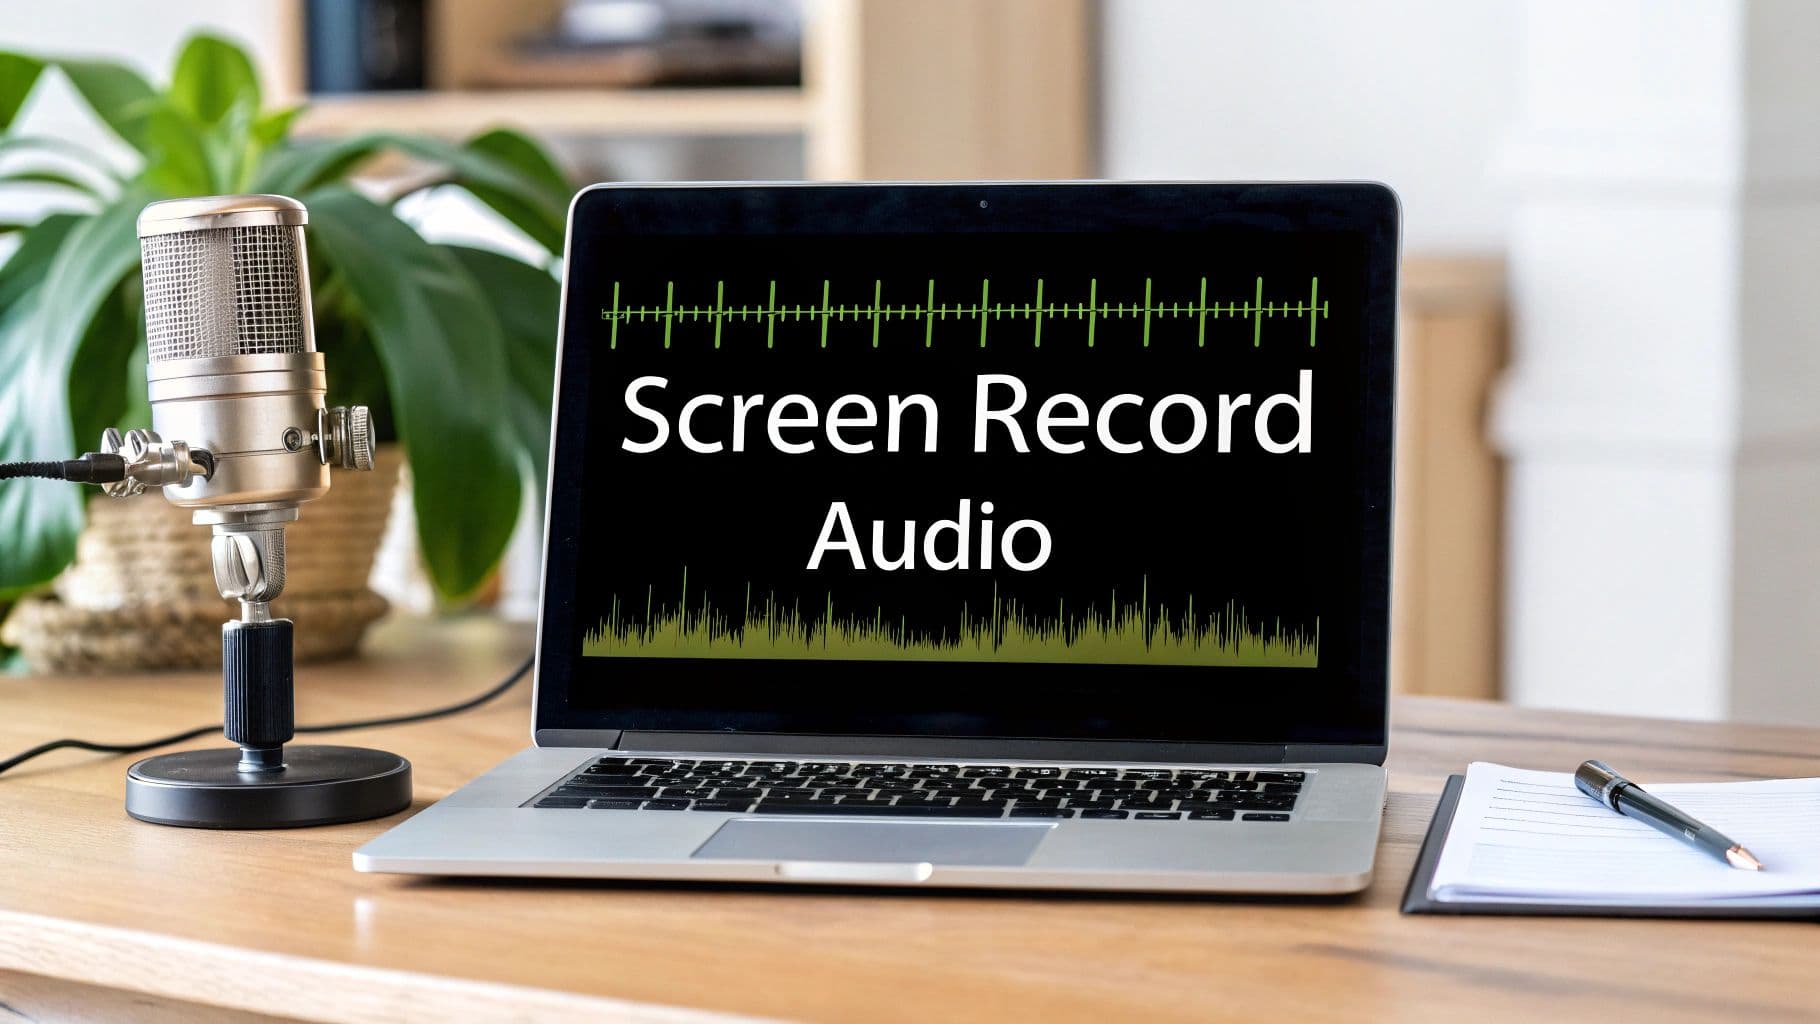
If you want system audio without driver setup, Screen Charm is a Mac screen recorder that records your screen, microphone, webcam, and Mac system audio in one session. Full step-by-step instructions, paid alternatives, and troubleshooting are below.
Related Mac Recording Guides
- How to screen record on a Mac
- Fix Mac screen recording no sound
- Mac screen recording shortcut guide
- Fix Mac screen recording not working
- Best screen recording software for Mac
How to Record System Audio on Mac (Quick Summary)
macOS doesn't have a built-in option to record system audio — the sound coming from apps, videos, games, or calls. The standard fix is to install a virtual audio driver (BlackHole is free) that creates a software audio cable between your Mac's output and your recording app's input. Once routed, any screen recorder can capture it. If you'd rather skip the setup entirely, an all-in-one app like Screen Charm handles system audio natively with no driver required.
This guide covers all five methods: BlackHole + QuickTime, BlackHole + OBS, Loopback, Audio Hijack, and Screen Charm. For the broader screen recording workflow, see our complete guide to screen recording on Mac.
Sponsored by the makers
Tired of boring screen recordings?
Try Screen Charm.
Auto-zoom, motion blur, camera overlay, and background music. All built in. Record once, export a polished video.
See what it doesWhy macOS Doesn't Record System Audio by Default
macOS doesn't let its built-in tools capture system audio by default. This is a deliberate design choice, not an oversight.
Apple sandboxes applications so each one runs in isolation — an app can't tap into another app's audio stream. This prevents malicious software from silently recording your private calls, in-app audio, or system notifications. The downside for creators is that there's no "Stereo Mix" option like Windows has. Your Mac's audio output and any recording input are kept strictly separate.
This means QuickTime Player, the Screenshot toolbar (Shift + Command + 5), and iMovie all record microphone audio only. To capture the sound coming from your Mac — a game, browser video, Zoom call, or app interface sounds — you need to route that audio through a virtual device.
What a virtual audio driver actually does
A virtual audio driver creates a software-based audio device that appears alongside your real speakers in System Settings. You set your Mac's output to route through this virtual device, which then acts as a recordable input. Your recording app "hears" the system audio through this virtual cable, while a Multi-Output Device ensures you can still hear the audio through your speakers at the same time.
This is the foundation of every free and paid method below.
Choosing a Virtual Audio Driver
All free methods on this page require a virtual audio driver. Here's how the main options compare:
| Driver | Cost | macOS Support | Best For |
|---|---|---|---|
| BlackHole | Free (open-source) | Actively maintained, Apple Silicon + Intel | General recording, tutorials, most users |
| Soundflower | Free (legacy) | Unmaintained — compatibility issues on modern macOS | Old macOS installs only |
| Loopback | Paid | Excellent, always up-to-date | Per-app routing, podcasting, complex setups |
Verdict: Use BlackHole for free. Use Loopback if you need to isolate audio from specific apps (e.g. capture Chrome but not Slack).
BlackHole 2ch vs 16ch vs 64ch — which to install?
BlackHole comes in three channel counts. Install 2ch unless you know you need more: it carries standard stereo, which is what screen recordings, tutorials, and call recordings use. The 16ch and 64ch builds exist for multi-channel audio production in DAWs — routing many separate stems between apps. Installing a higher channel count "just in case" makes device menus longer and confuses some recording apps that expect stereo input.
Method 1: BlackHole + QuickTime (Free)
BlackHole is an open-source virtual audio driver from Existential Audio. It's the modern replacement for Soundflower (which launched in 2004 and racked up 500,000+ downloads before going unmaintained). BlackHole is actively maintained, works on Apple Silicon and Intel, and costs nothing.
Step 1: Install BlackHole
Download BlackHole from the official Existential Audio website — always use the official source. The BlackHole 2ch version is sufficient for most use cases. Installation is a standard .pkg file. BlackHole runs silently in the background with no dock icon.
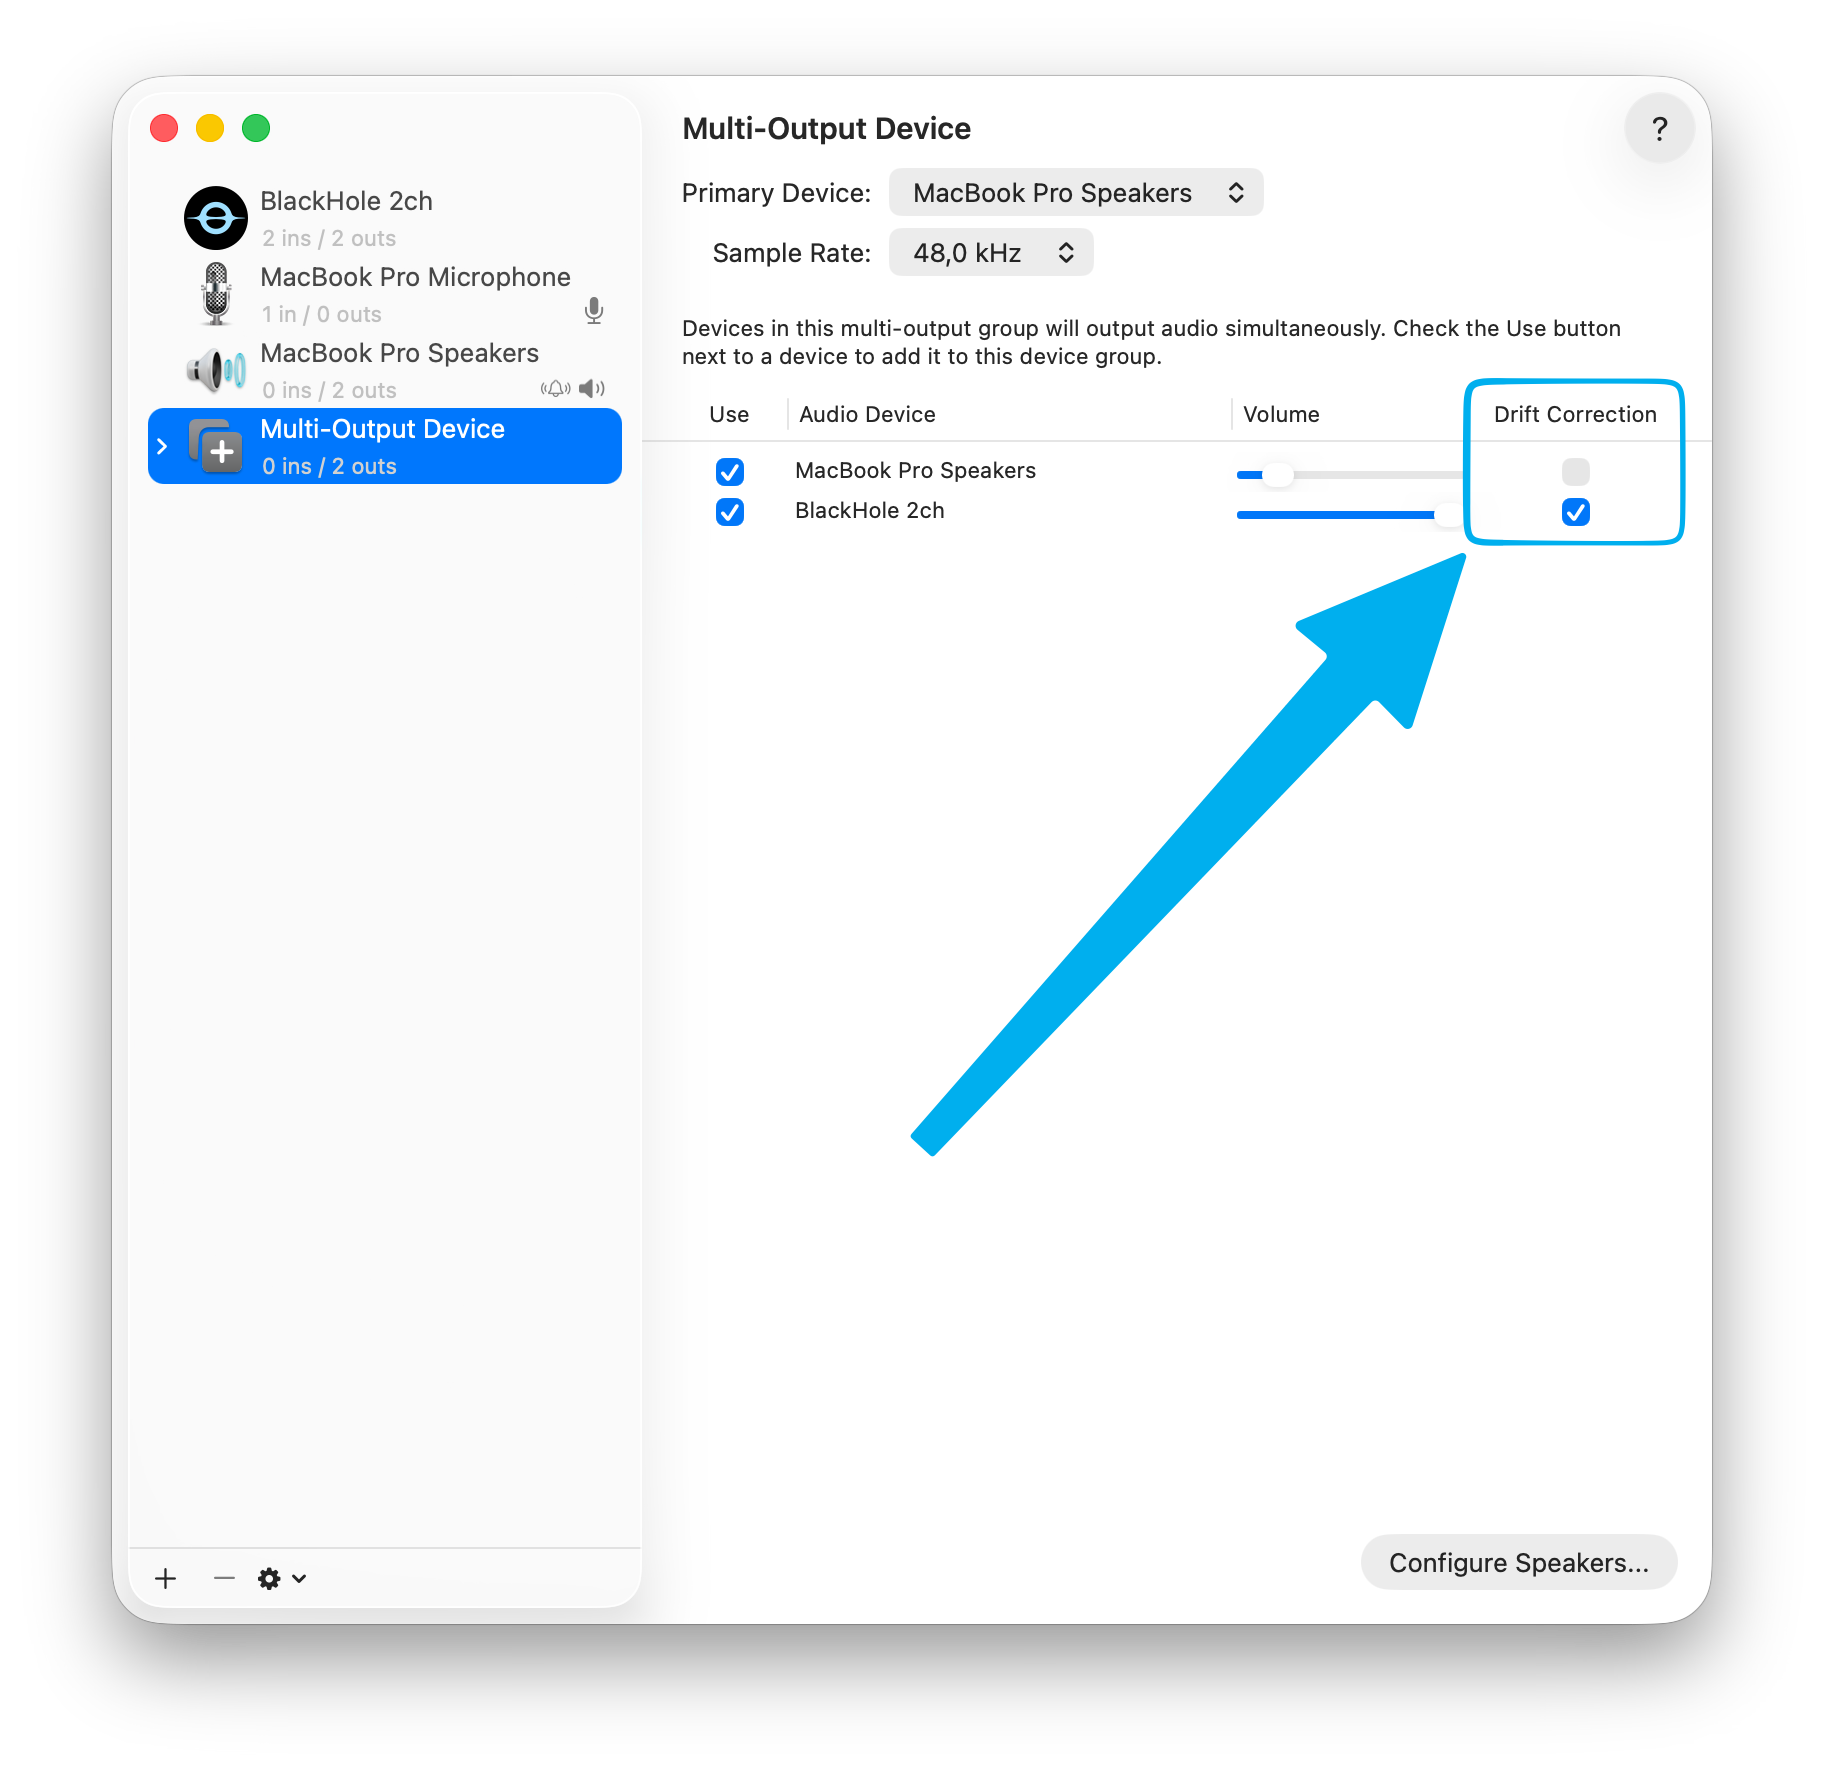
Step 2: Create a Multi-Output Device in Audio MIDI Setup
This step lets you hear audio through your speakers and send it to BlackHole simultaneously.
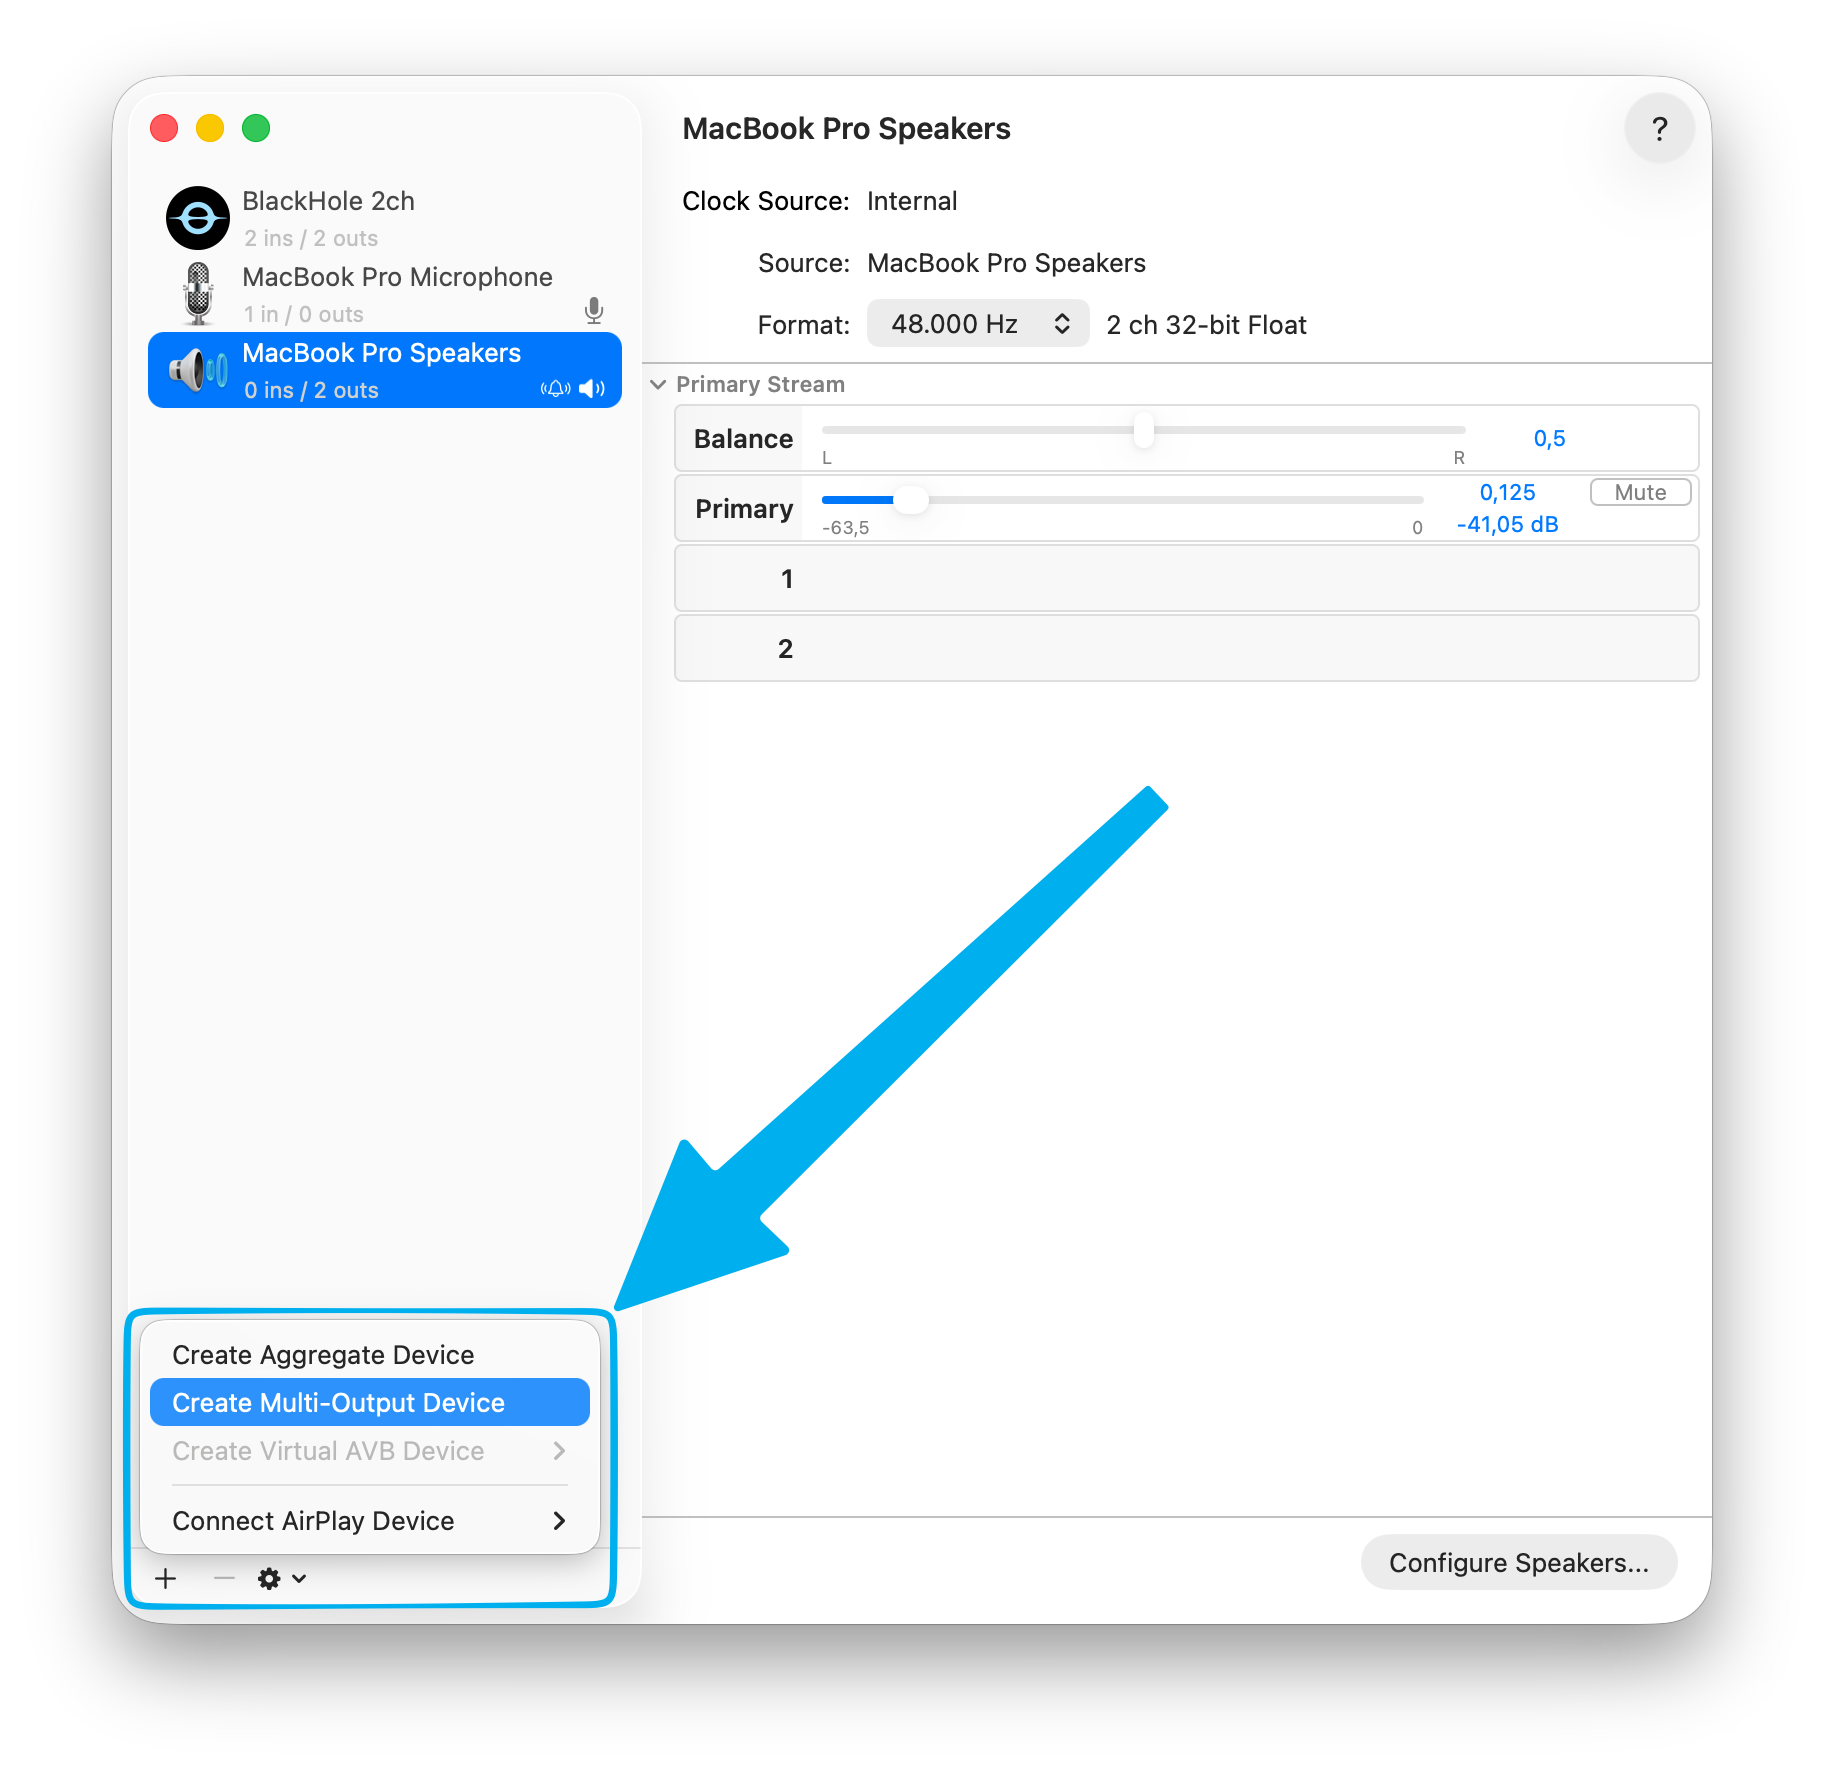
- Open Audio MIDI Setup (find it in
/Applications/Utilities/or via Spotlight)
- Click the + button in the bottom-left corner → Create Multi-Output Device
- In the new device panel, check both BlackHole 2ch and your regular output (e.g. "MacBook Pro Speakers" or your headphones)
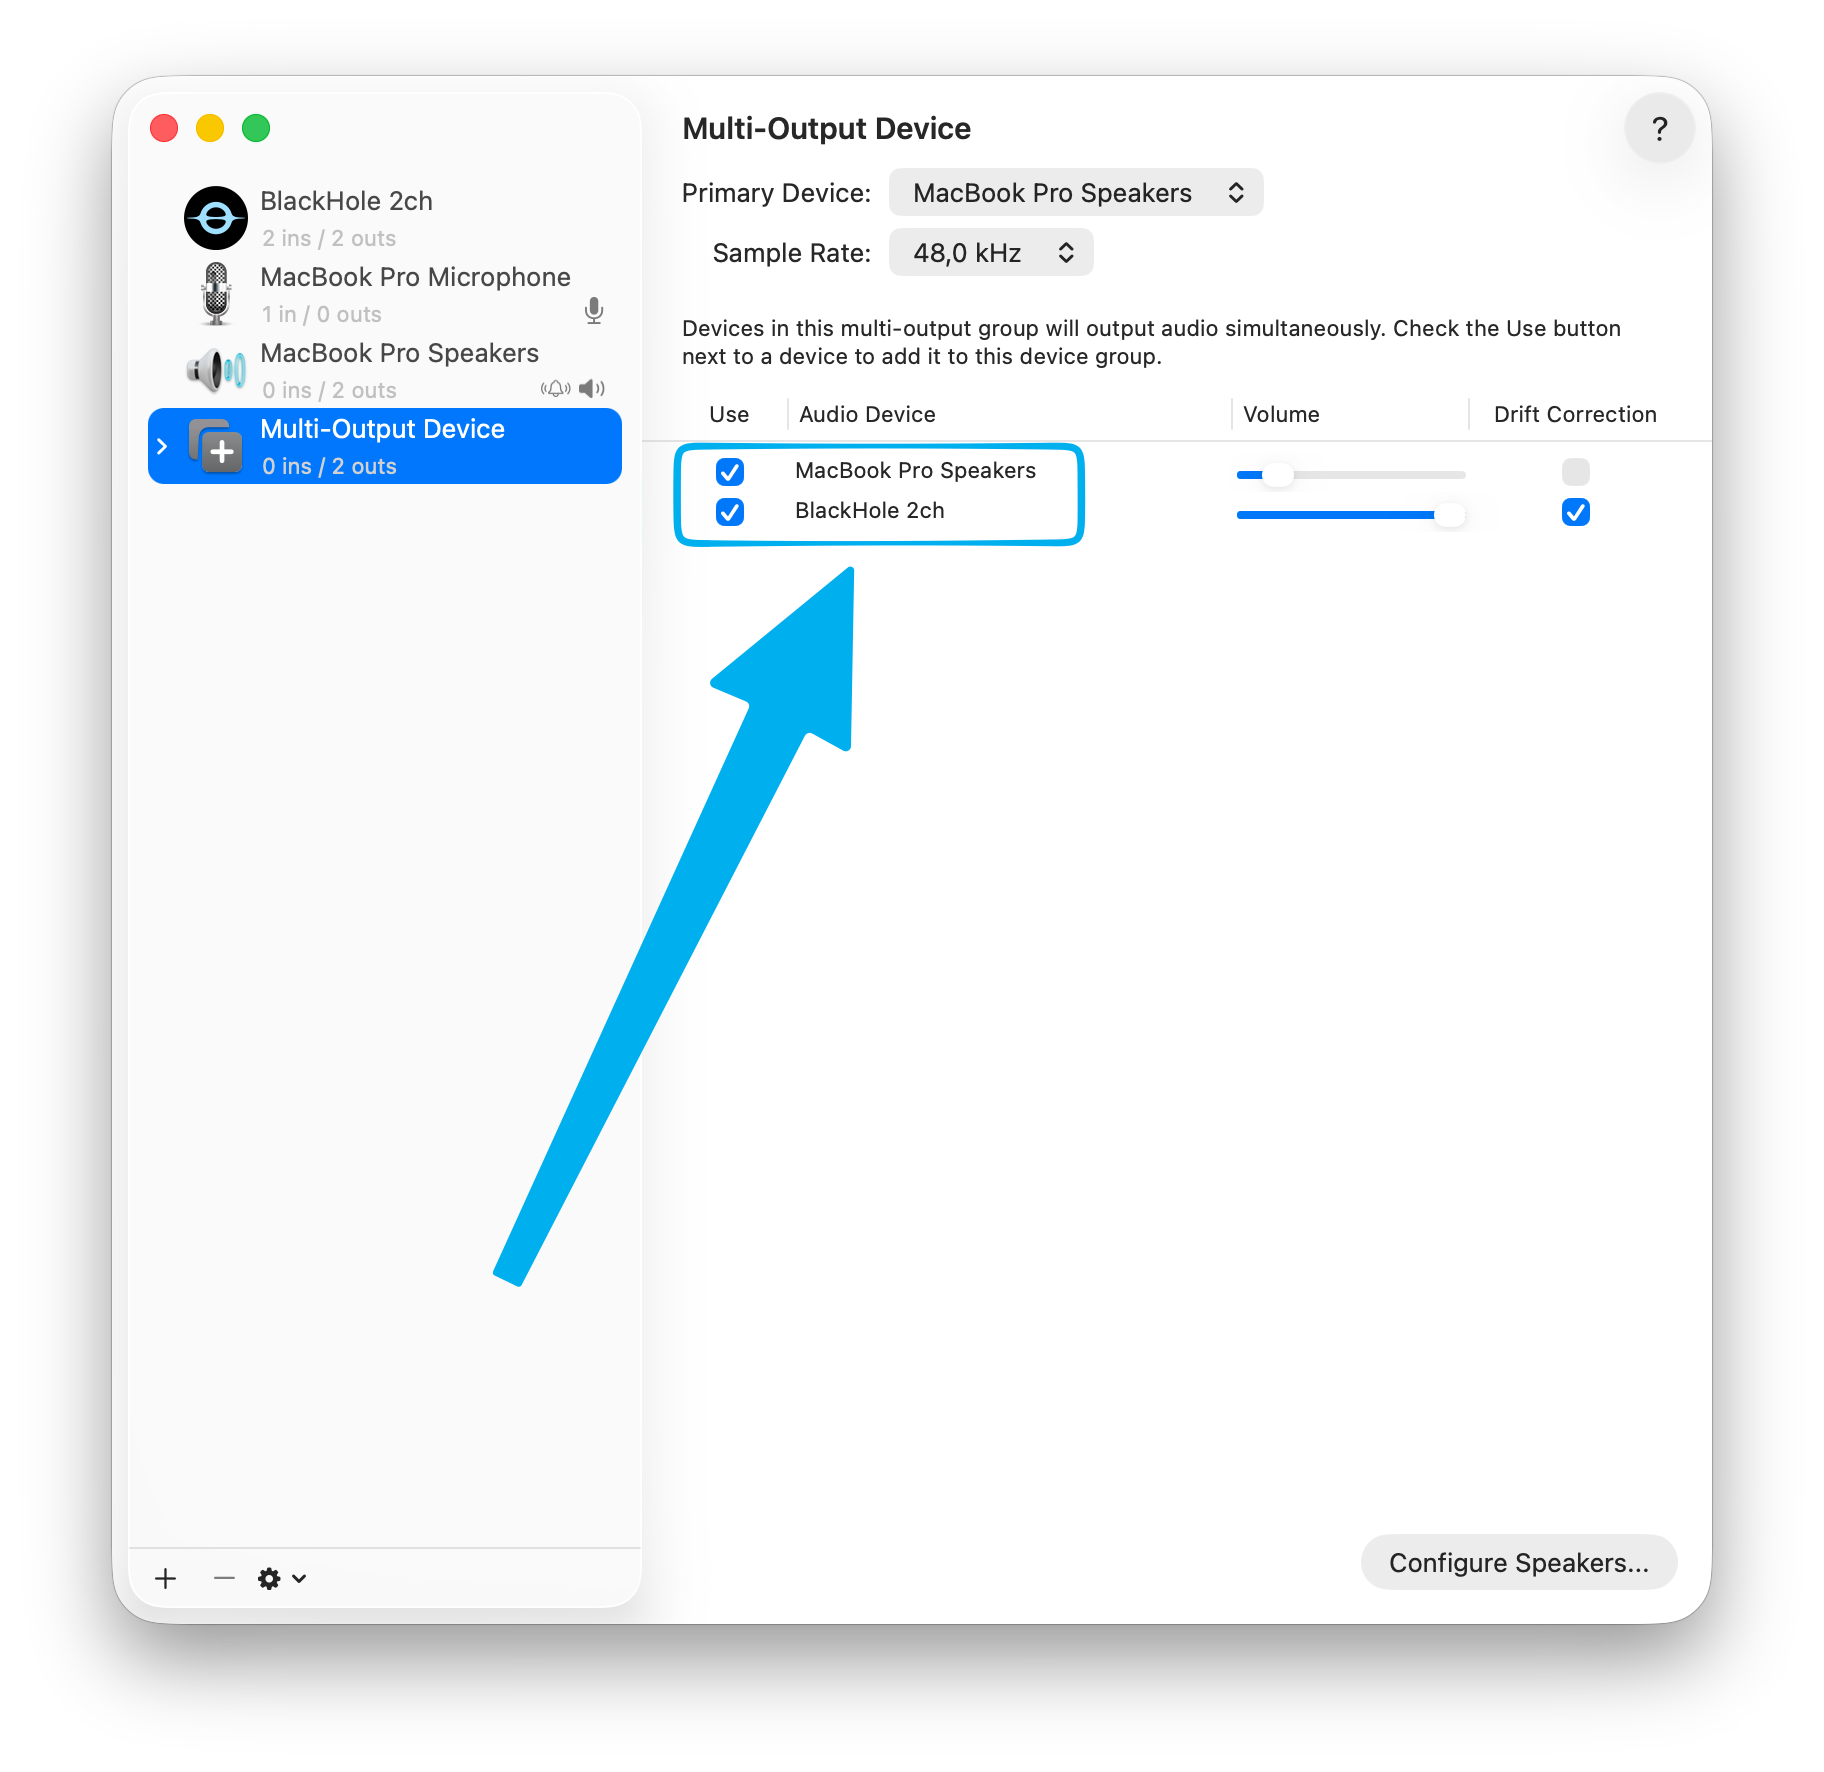
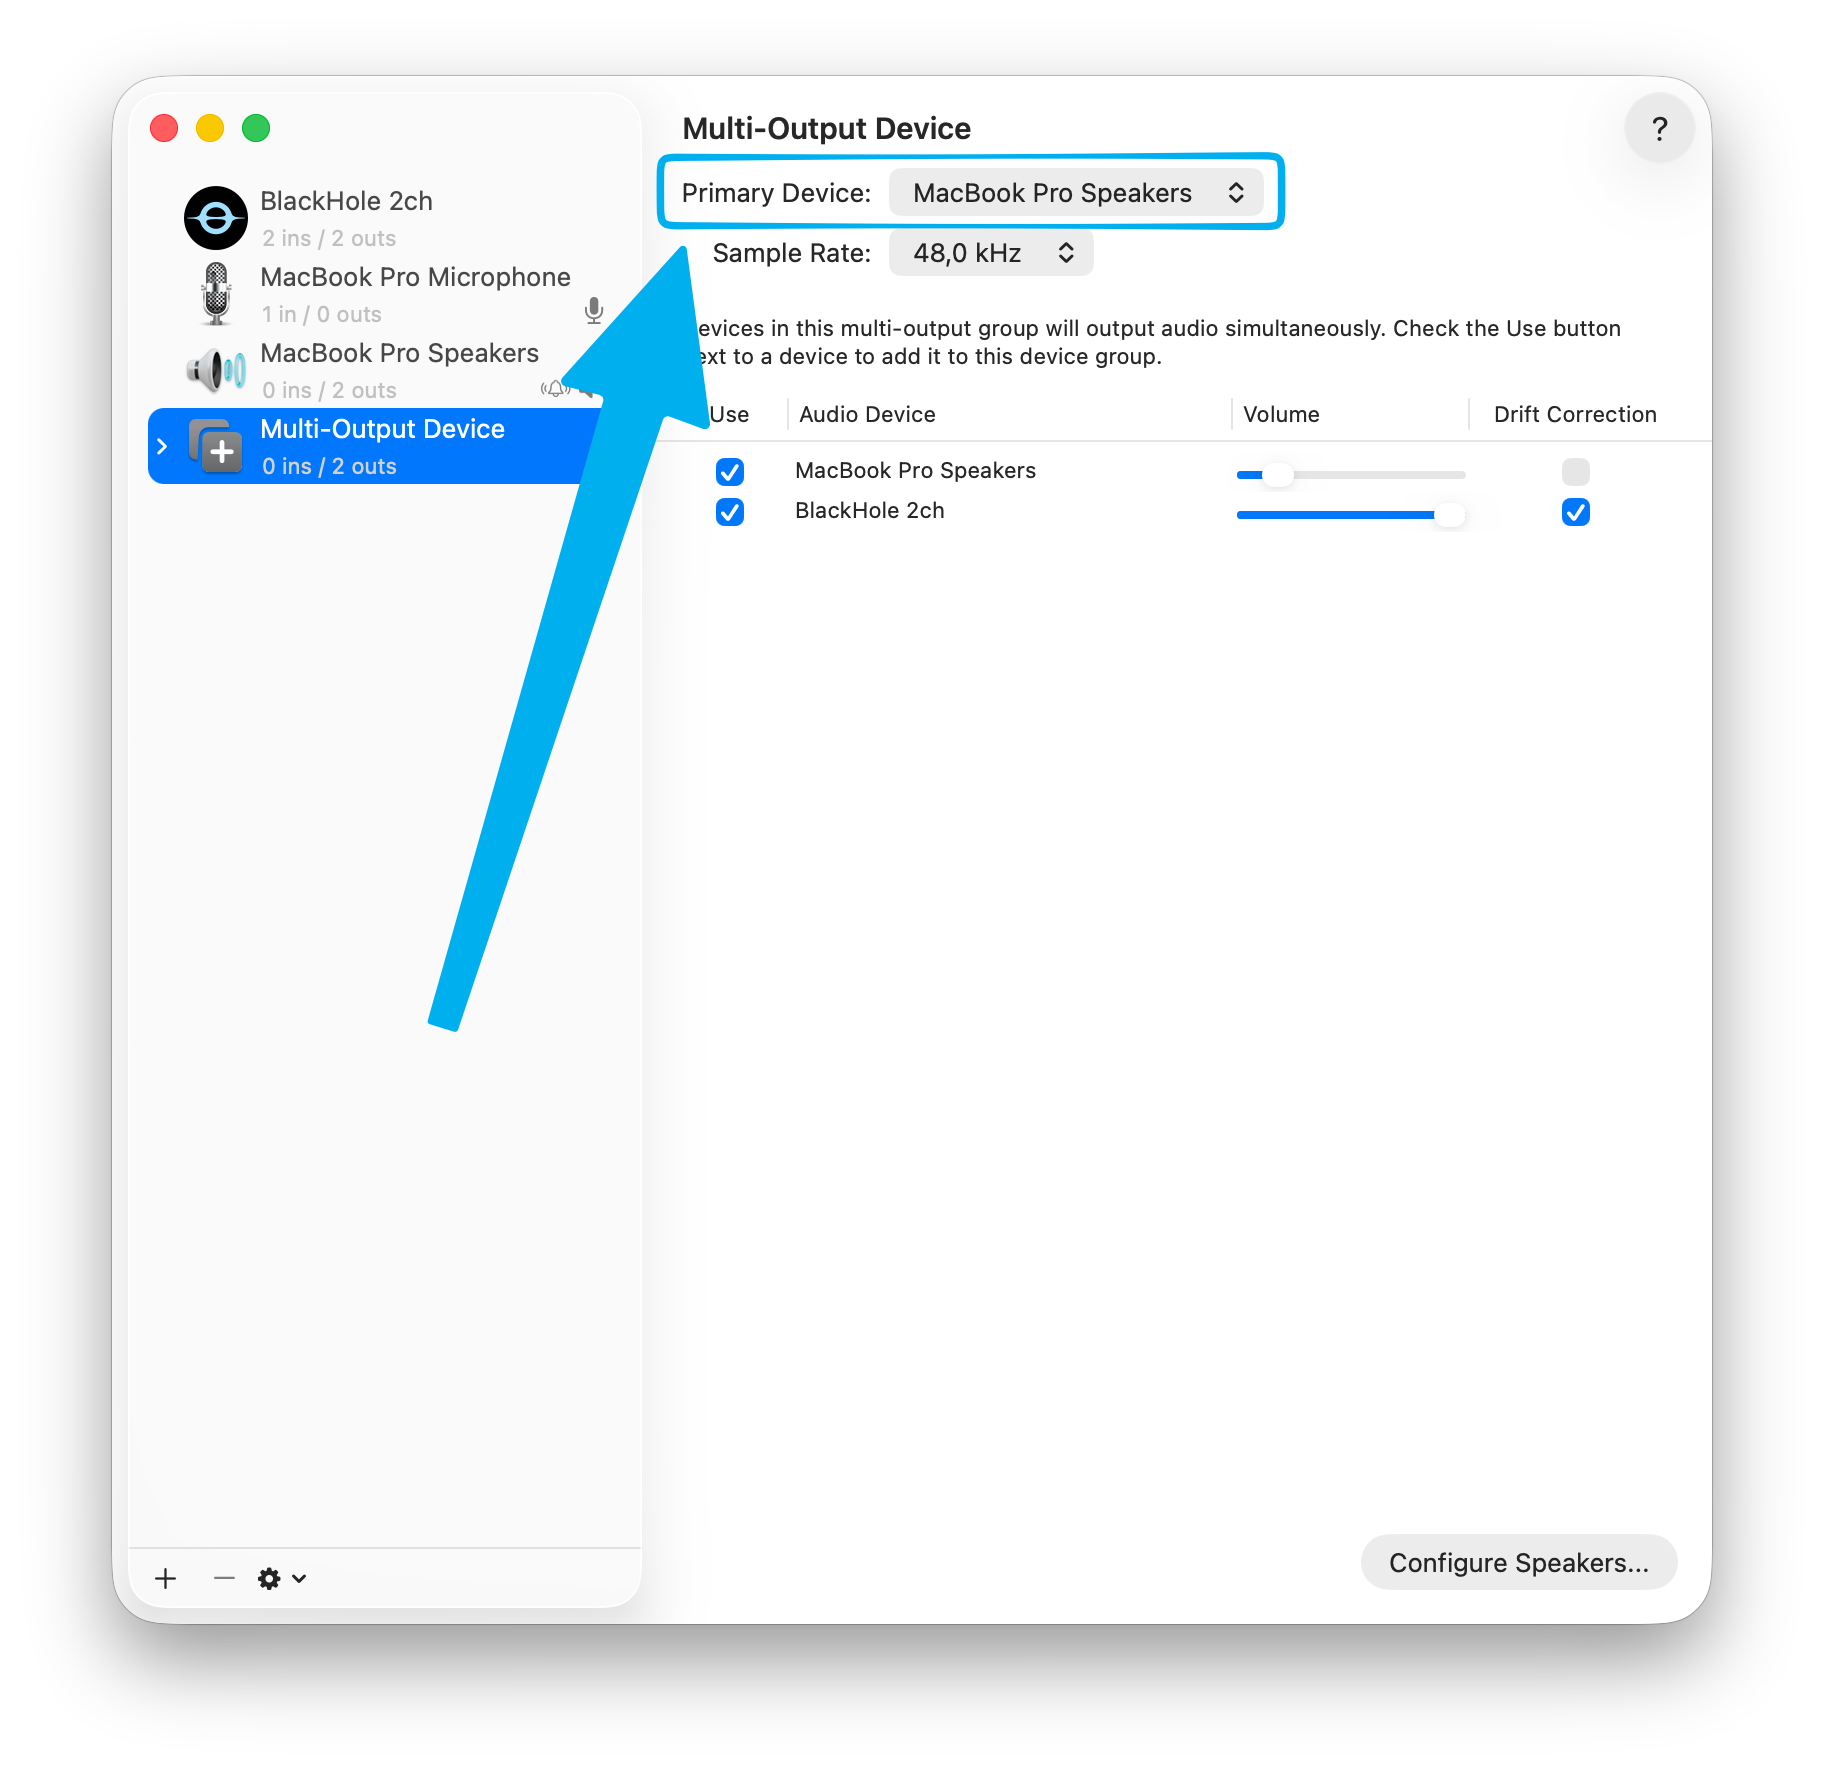
- Set your regular speakers as the Primary Device
- Check the Drift Correction box for BlackHole — this is critical for preventing audio drift in recordings longer than a few minutes
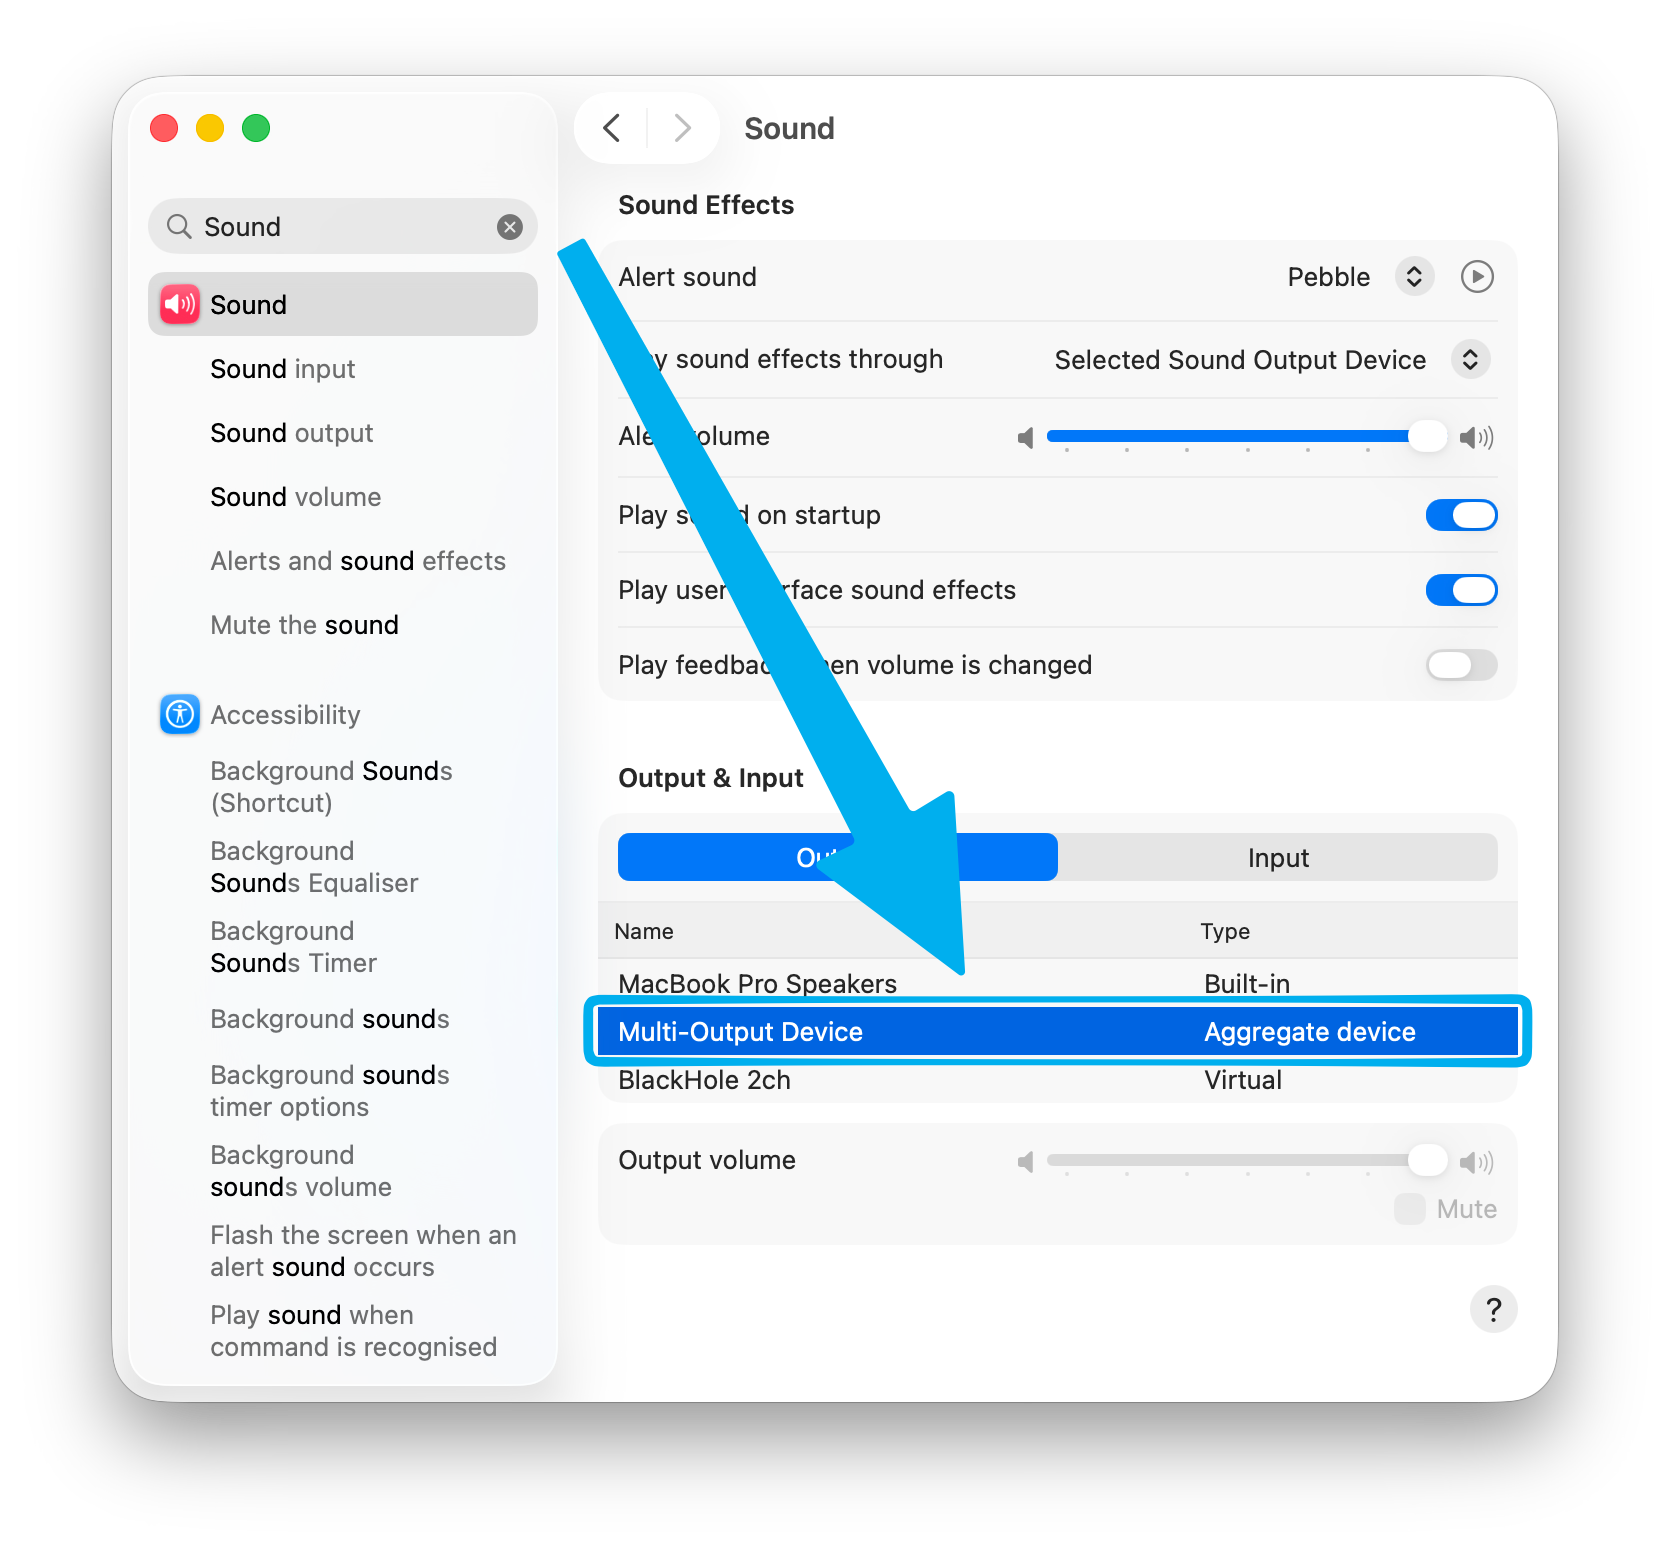
Step 3: Set the Multi-Output Device as your system output
Go to System Settings → Sound → Output and select the Multi-Output Device you just created. Your Mac will now route all audio to both your speakers and BlackHole.
Step 4: Record with QuickTime
Open QuickTime Player → File → New Screen Recording.
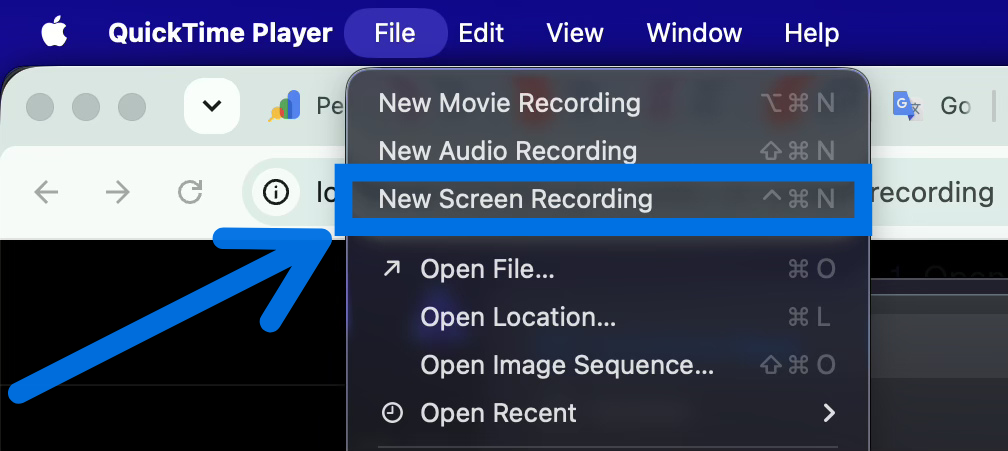
Click Options and select BlackHole 2ch as the microphone source. Hit Record. QuickTime will now capture your screen with all system audio included.
When you're done recording, go back to System Settings → Sound and switch your output back to your regular speakers.
The most common mistake: Setting your system output directly to BlackHole instead of the Multi-Output Device. If you do that, audio goes to the virtual driver but never reaches your speakers — you'll be recording blind with no monitoring.
Drift Correction: why it matters
When you combine two audio devices in a Multi-Output Device, each runs on its own internal clock. Over time — especially in recordings longer than 5–10 minutes — tiny clock mismatches accumulate and cause audio to slowly fall out of sync with video. Enabling Drift Correction in Audio MIDI Setup forces BlackHole to synchronize its clock with the master device, eliminating this drift entirely.
Quirks while the Multi-Output Device is active
Two side effects catch almost everyone the first time:
- Your volume keys stop working. macOS can't control the volume of a multi-output device, so the F11/F12 keys show a "no entry" symbol. To change volume mid-recording, adjust it inside the app that's playing the sound, or open Audio MIDI Setup and change the speaker device's level directly. This is normal — switching back to your regular output restores the keys.
- The output doesn't switch back automatically. After you finish recording, your Mac keeps routing audio through the Multi-Output Device until you change it. If your volume keys are "broken" a day later, this is why — go to System Settings → Sound → Output and reselect your speakers.
How to undo the setup (or uninstall BlackHole)
Nothing here permanently changes your Mac. To go back to normal after a recording, just set System Settings → Sound → Output to your regular speakers — the Multi-Output Device sits unused until next time.
To remove everything completely:
- In Audio MIDI Setup, select the Multi-Output Device and click – to delete it
- Uninstall the BlackHole driver — the easiest way is Terminal:
sudo rm -rf /Library/Audio/Plug-Ins/HAL/BlackHole2ch.driver
sudo killall coreaudiod
Core Audio restarts instantly (your sound cuts out for a second) and BlackHole disappears from every device list. No reboot needed.
Method 2: BlackHole + OBS (Free, More Control)
If you're recording gameplay, streaming, or need more control over audio mixing, OBS Studio works well with BlackHole.
- Install BlackHole and create the Multi-Output Device as above
- Download OBS Studio (free, open source)
- In OBS, go to Settings → Audio and set Desktop Audio to BlackHole 2ch
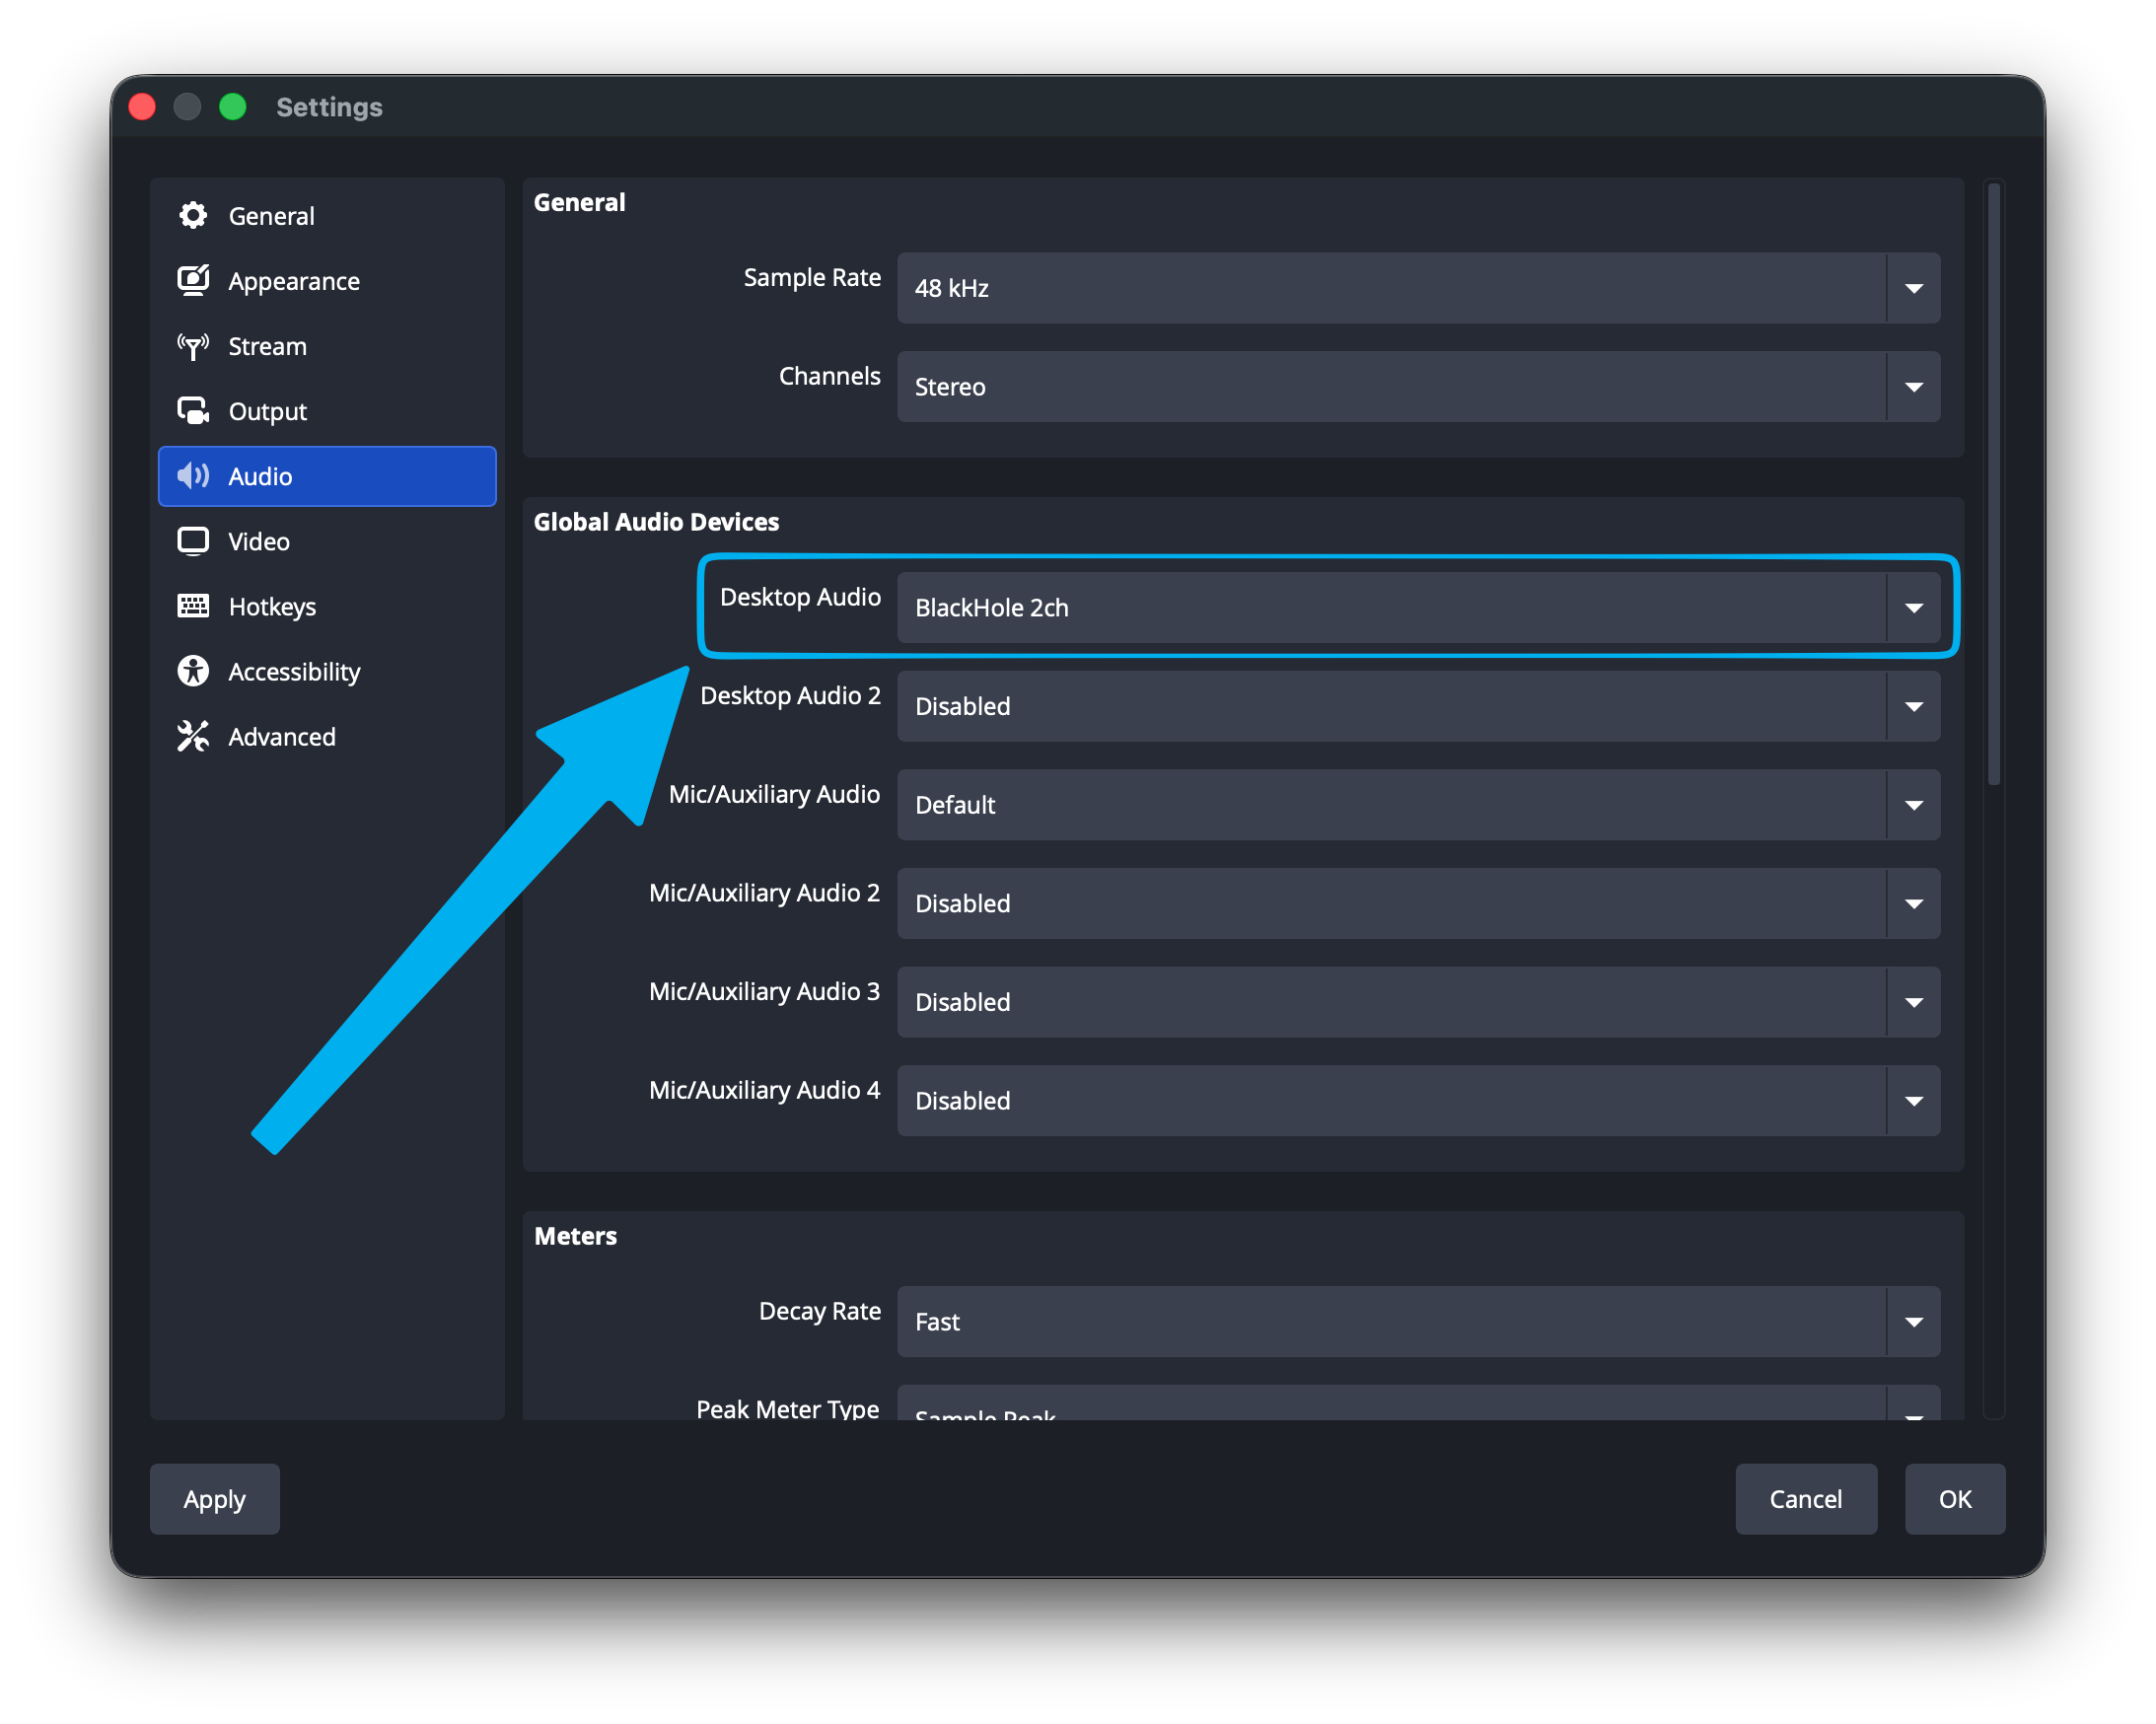
- Add a Display Capture or Window Capture source
- You now have separate audio faders for system audio and your microphone, with real-time level monitoring
OBS also allows you to set per-scene audio mixing, add noise suppression filters, and record in multiple formats — advantages the QuickTime method doesn't offer.
Method 3: Loopback — Visual Audio Routing (Paid)
Loopback by Rogue Amoeba replaces the manual Audio MIDI Setup workflow with a drag-and-drop visual interface. Where BlackHole is a manual transmission, Loopback is a luxury automatic.
You create virtual audio devices by literally drawing connections between audio sources. For example: drag Chrome, drag Zoom, drag your microphone — combine them into a single virtual device. That device then appears as an input in any recording app.
Why creators choose Loopback over BlackHole:
- No Audio MIDI Setup configuration required
- Per-application audio routing (record only Chrome, ignoring Slack notifications)
- Multiple virtual devices for different recording configurations
- Visual level meters and routing preview
- Stays working reliably across macOS updates
Cost: One-time purchase from Rogue Amoeba.
Method 4: Audio Hijack — Per-App Recording (Paid)
Audio Hijack (also by Rogue Amoeba) goes further than routing — it actively captures and saves audio using a visual block-based pipeline.
Use case example: recording a podcast interview. You drag in your microphone as one source, Zoom as another. Each goes to a separate track. You can apply live effects (noise gate, EQ, compression) to each source independently before the recording saves. The result is a multi-track file you can edit in Logic Pro or GarageBand without any bleed between tracks.
When to use Audio Hijack over Loopback:
- You need to record each audio source to its own separate file
- You need live effects processing during recording
- You're producing podcasts, interviews, or any multi-source content
Method 5: Screen Charm — No Setup Required
All of the methods above require installing and configuring third-party audio software before you can record. Unlike BlackHole or Loopback, Screen Charm captures system audio natively — no driver installation, no Audio MIDI Setup configuration, no manual routing.
Open Screen Charm, enable System Audio, and record. The app captures your screen, webcam, microphone, and system audio in a single synchronized session. Auto-zoom and cursor tracking are handled automatically. If you want to compare all Mac screen recording options, our best screen recording software for Mac guide covers the full landscape. For recording with a webcam overlay alongside your screen, see our screen recorder with facecam guide.
When this approach makes sense:
- You're creating tutorials, demos, or product walkthroughs
- You want to skip the setup entirely
- You're recording regularly and the manual setup is friction in your workflow
- You need the audio and video in one polished, pre-edited output
How to Record Microphone and System Audio Together
Recording both your voice and system audio simultaneously requires routing both streams into a single device your recording app can see.
With BlackHole (free):
Note the difference from the earlier setup: for output routing you created a Multi-Output Device; to combine two inputs (your mic + BlackHole) into one recordable source, you create an Aggregate Device.
- Open Audio MIDI Setup
- Click + in the bottom-left corner → Create Aggregate Device
- Check both BlackHole 2ch and your microphone (e.g. Built-in Microphone or your USB mic). If you're unsure your mic is working correctly, run a microphone test online before configuring the Aggregate Device.
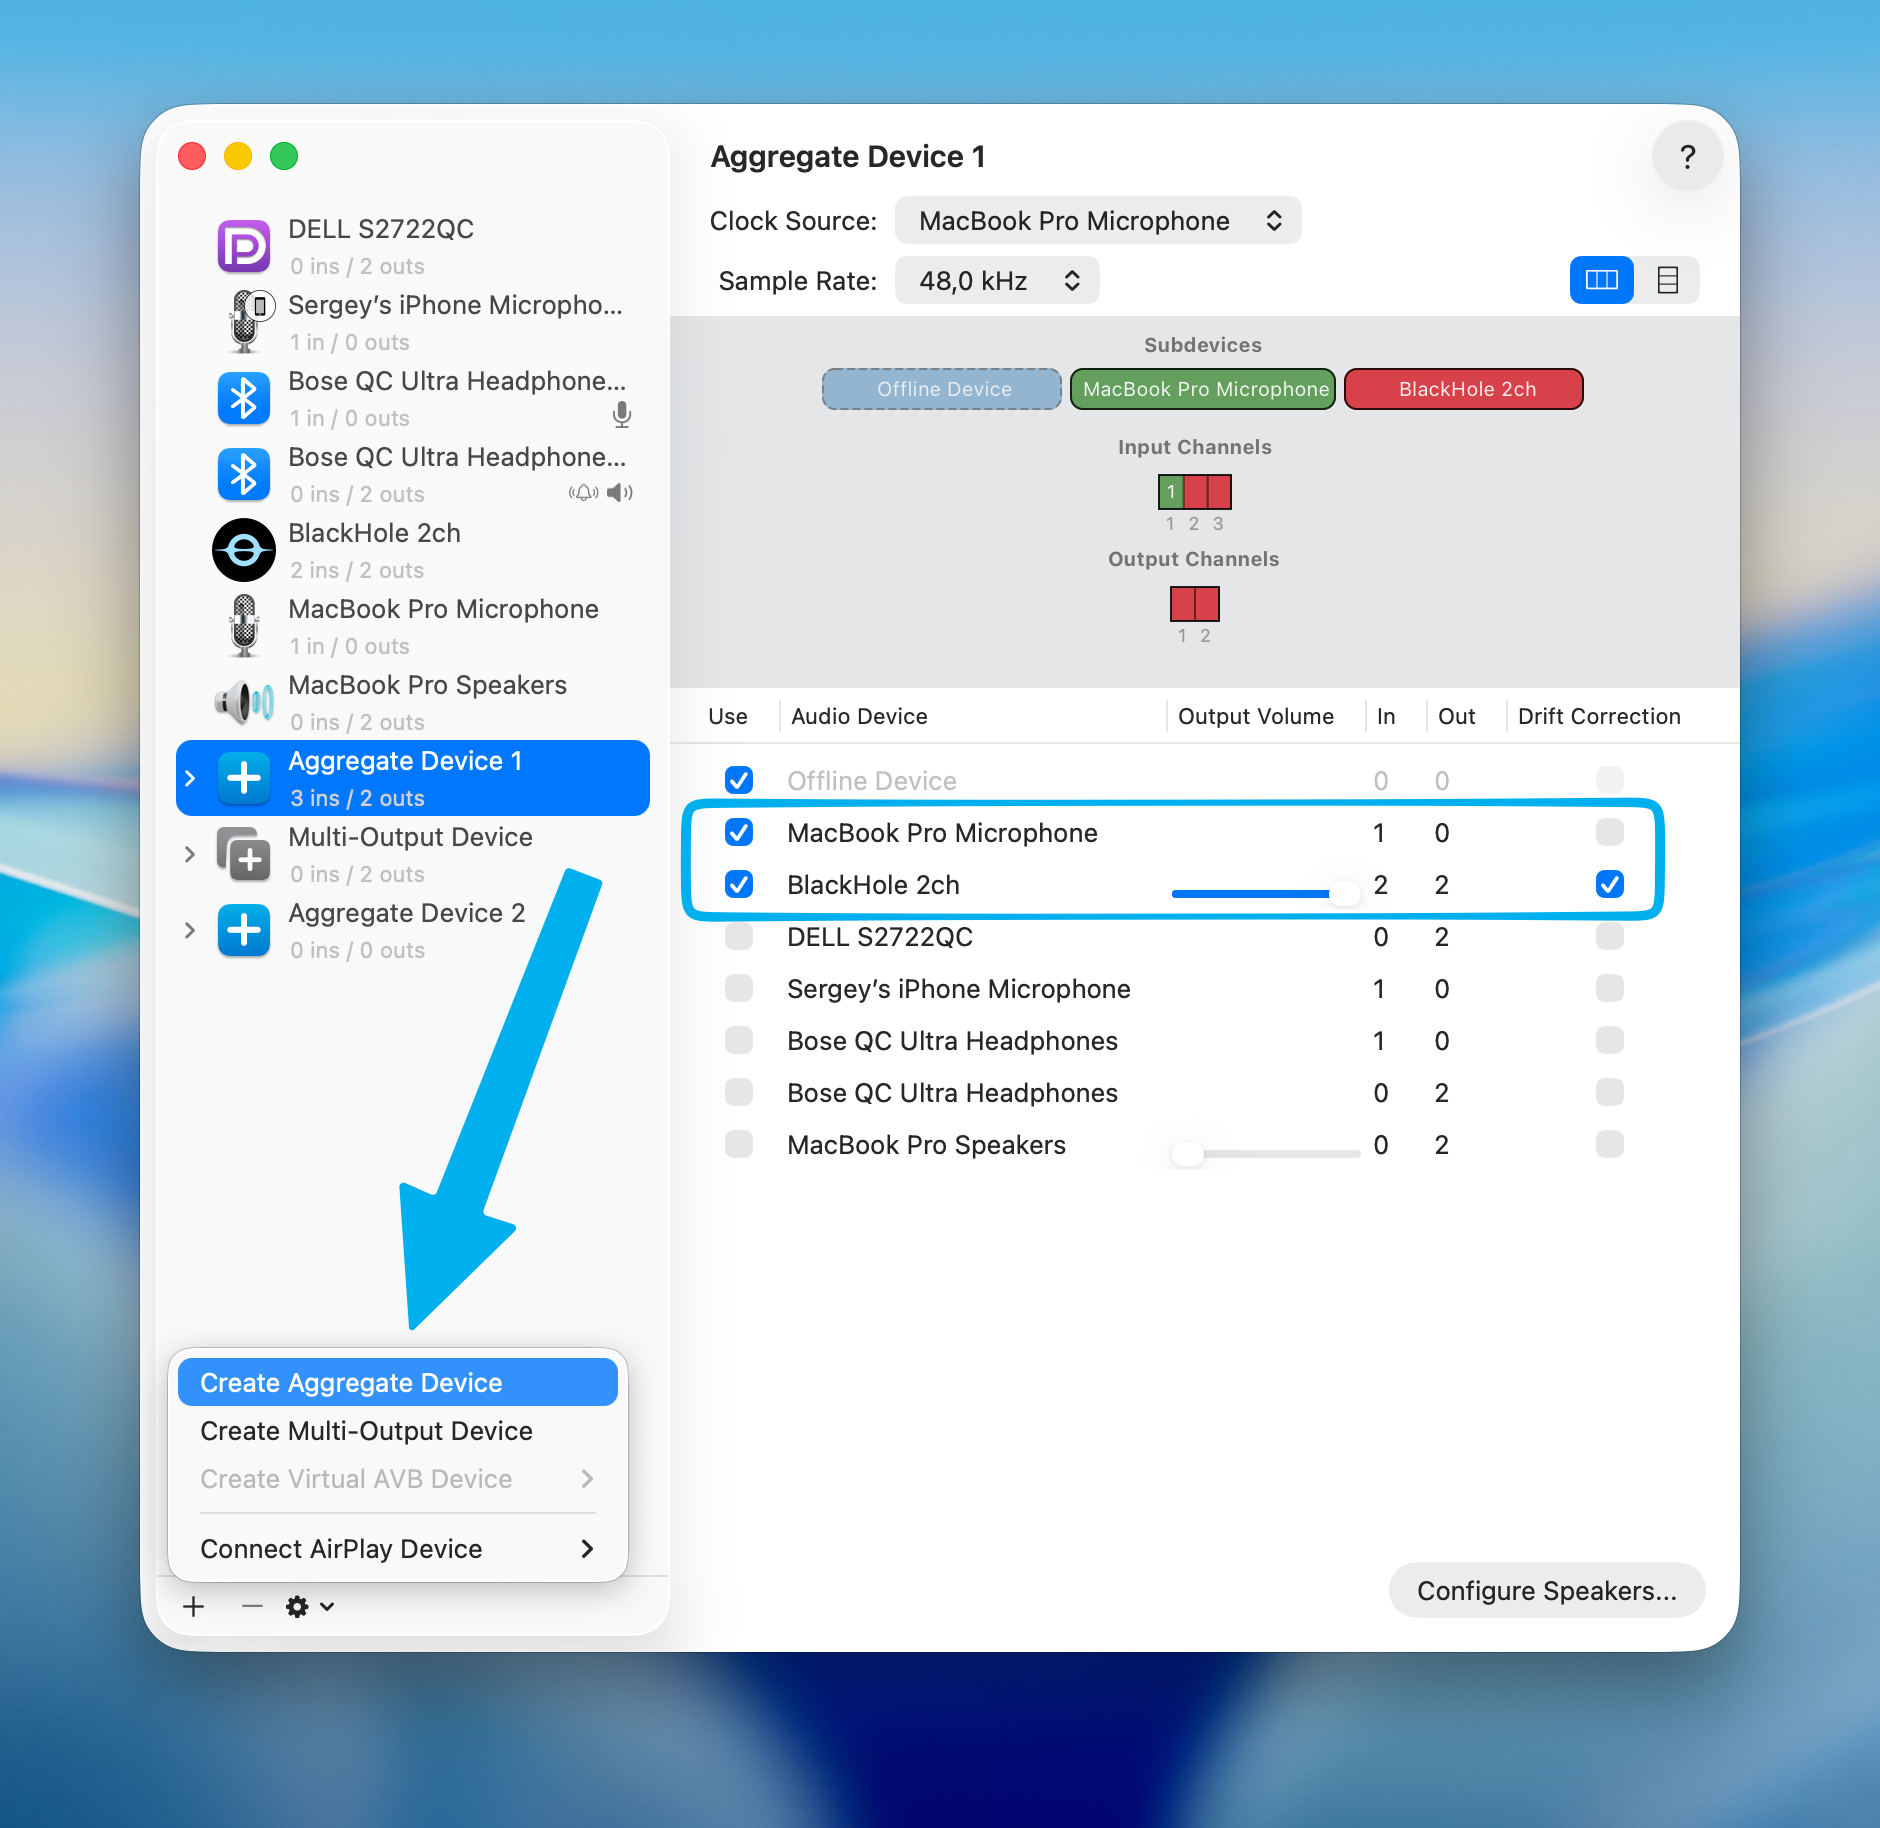
- Check Drift Correction for BlackHole
- In your recording app, select this Aggregate Device as the input
Your recording app will now receive both your voice and the system audio as a single combined input.
With Loopback (paid): Create a virtual device, add your mic and BlackHole (or a specific app) as sources. Simpler.
With Screen Charm: Both mic and system audio are captured automatically in the same session without any configuration.
How to Record Internal Audio with GarageBand or Logic Pro
If you're working in a DAW, the same virtual driver principle applies.
- Install BlackHole and set up the Multi-Output Device as above
- Open GarageBand (free, pre-installed on every Mac) or Logic Pro
- Create a new track → choose Audio → set the input to BlackHole 2ch
- Press record
This gives you multi-track recording: system audio on one track, your microphone on another. You can adjust levels, add effects, and export individual stems — a much more powerful workflow than QuickTime for audio-heavy projects.
Comparison: All Methods Side by Side
Here's what each method can and can't do, so you can pick the right one for your situation:
| Method | Cost | Ease of Setup | Per-App Isolation | Screen + Audio Together | Mac Updates Safe |
|---|---|---|---|---|---|
| BlackHole + QuickTime | Free | Moderate | ✗ All-system only | ✓ | Usually |
| BlackHole + OBS | Free | Moderate | ✗ All-system only | ✓ | Usually |
| Loopback | Paid | Easy | ✓ | ✓ | ✓ |
| Audio Hijack | Paid | Easy | ✓ | ✓ | ✓ |
| Screen Charm | Paid | Zero setup | ✗ All-system only | ✓ | ✓ |
Troubleshooting: Common Internal Audio Problems
Silent recording — no audio captured at all
The most common cause: your system output is set to BlackHole directly instead of the Multi-Output Device. Go to System Settings → Sound → Output and make sure the Multi-Output Device is selected. Also verify that BlackHole is selected as the microphone input in your recording app.
If it's still silent, restart your Mac after installing BlackHole. macOS sometimes needs a full reboot to register a new kernel extension or audio driver. For a full checklist of audio-related recording failures, see our Mac screen recording no sound troubleshooting guide.
I can't hear audio while recording
You're monitoring through BlackHole only. Go back to Audio MIDI Setup, open your Multi-Output Device, and make sure both your speakers/headphones and BlackHole are checked. Your speakers need to be in the device for you to hear anything.
Audio drifts out of sync with video
Drift Correction isn't enabled. Open Audio MIDI Setup → Multi-Output Device and check the Drift Correction box for BlackHole. This syncs BlackHole's clock to your master output device. Without it, recordings longer than a few minutes will gradually desync.
Crackly, distorted, or clicking audio
This is usually a sample rate mismatch. Open Audio MIDI Setup and make sure every device in your Multi-Output Device is set to the same sample rate — 48000 Hz for most use cases, or 44100 Hz for music. If one device is at 44.1 kHz and another at 48 kHz, you'll get audible distortion.
BlackHole stopped working after a macOS update
macOS updates occasionally reset security permissions for kernel extensions. Go to System Settings → Privacy & Security → General — if you see a blocked system extension from Existential Audio, click Allow. Then restart. In rare cases you may need to reinstall BlackHole.
Recording a Zoom call but capturing everyone's audio
Zoom's audio output goes through your system like any other app when you use a virtual driver. By default, BlackHole captures everything including notification sounds. To isolate only Zoom audio, use Loopback or Audio Hijack to create a device with only Zoom as its source.
Frequently Asked Questions
Does QuickTime record system audio on its own?
No. QuickTime's audio input only accepts microphones — internal or external. It has no native option for system audio. You must pair it with a virtual driver like BlackHole for QuickTime to capture internal sound.
Is recording internal audio on Mac legal?
The tools themselves are legal. What matters is what you record. Capturing system audio for your own tutorials, demos, or personal recordings is fine. Recording and distributing copyrighted music, movies, or private calls without consent is not. The same rules that apply to any recording apply here.
Will BlackHole slow down my Mac?
No. BlackHole is a lightweight audio routing driver — it passes audio between software components without processing it. The performance impact is negligible on any modern Mac.
Can I record audio from just one app, not the whole system?
Not with BlackHole — it routes all system audio as a single stream. For per-app recording you need Loopback or Audio Hijack, which let you select specific applications as audio sources.
Why does my Mac system output sound different after installing BlackHole?
Probably because your output was changed to the Multi-Output Device or directly to BlackHole during setup, which may use different sample rates or volume curves than your speakers. Go to System Settings → Sound → Output, switch back to your normal output, and adjust as needed.
Do I need to reinstall BlackHole after every macOS update?
Not usually. BlackHole generally survives macOS updates. However, major version upgrades (e.g. Ventura → Sonoma, Sonoma → Sequoia, or later) occasionally reset driver permissions. Check System Settings → Privacy & Security and re-approve if needed.
Can I record microphone and system audio on separate tracks?
Yes, but not with QuickTime alone. Use Audio Hijack (which supports multi-track output natively), OBS (separate audio sources per scene), a DAW like GarageBand or Logic Pro (separate input tracks), or Screen Charm (which syncs mic and system audio in one session, though not to separate stems).
Why don't my volume keys work after setting up BlackHole?
Because your output is still set to the Multi-Output Device, and macOS can't adjust the volume of combined devices. Switch back to your regular speakers in System Settings → Sound → Output and the keys work again. This is the single most common "BlackHole broke my Mac" complaint — nothing is broken.
Can I record audio-only (no video) from my Mac?
Yes. Once BlackHole is routed, open QuickTime → File → New Audio Recording and pick BlackHole 2ch as the input — you get an audio file with no screen capture. GarageBand with a BlackHole input track works too and gives you editing on top.
Does macOS Sequoia or Sonoma change any of this?
The core limitation is unchanged through macOS Sequoia: no built-in system audio recording for the Screenshot toolbar or QuickTime. macOS does have a native "system audio recording" permission category (used by apps like Screen Charm via ScreenCaptureKit), which is why modern all-in-one recorders can capture internal audio without a virtual driver — but Apple's own bundled tools still don't expose it.
Will this work with Bluetooth headphones (AirPods)?
Yes — include your AirPods in the Multi-Output Device instead of the built-in speakers. One caveat: Bluetooth devices are more prone to clock drift and sample rate quirks, so keep Drift Correction enabled and expect occasional latency in what you hear (the recording itself stays in sync).
Ready to skip the driver setup entirely? Screen Charm captures your screen, system audio, microphone, and webcam in one click — no Audio MIDI Setup required. Start recording with system audio today.