You've got the MP4. The demo looks clean in QuickTime, the cursor movement is sharp, and now you need the whole thing to loop inside Slack, a README, or a support doc without dragging in a huge video file. That's where create animated gif from mp4 gets tricky on macOS, because the “easy” export often turns into washed-out colors, choppy motion, or a file that's too large to share.
The best results usually come from treating the MP4 as raw material, not the final asset. Trim hard, keep the motion readable, and respect the GIF format's older limits instead of fighting them.
Why Converting MP4 to GIF Is Harder Than It Looks

You record a crisp product tour, open the file, and think the rest will be automatic. Then the GIF export comes out bloated, the text looks muddy, and the platform you wanted to share it on complains anyway. That gap between “good MP4” and “good GIF” is the whole problem.
The format is older than the workflow people expect
GIF was introduced by CompuServe in 1987, and it's an 8-bit format that supports a palette of up to 256 colors per frame. That's fine for short animations and UI loops, but it collides badly with modern screen recordings full of gradients, antialiasing, and crisp interface text. Adobe's MP4-to-GIF guidance makes the same technical point indirectly, because GIF export workflows have to reduce color depth and often trim duration or resolution just to stay manageable (Adobe Express).
That constraint is why a short MP4 can feel strangely “expensive” once it becomes a GIF. Every extra second adds frames, every frame carries its own color mapping burden, and every extra pixel raises the file size. The practical result is simple, if the clip isn't edited first, the conversion process is doing damage control instead of creation.
What shareable actually means
A shareable GIF isn't just one that exports successfully. It's one that still reads fast in a README, loads quickly in chat, and preserves the one thing you wanted people to notice. That's why modern converters expose clip length, aspect ratio, and file size controls, and at least one major converter limits uploads to clips up to 1 minute long (Adobe Express).
Practical rule: if the interaction only needs three seconds to make sense, don't export twelve.
The biggest mistake I see is leaving too much of the source video intact because it “looks better” in MP4. GIFs punish that decision immediately. Duration, resolution, and frame rate aren't polish settings, they're the difference between something people can consume and something they'll skip.
Recording a Demo-Ready MP4 With Screen Charm
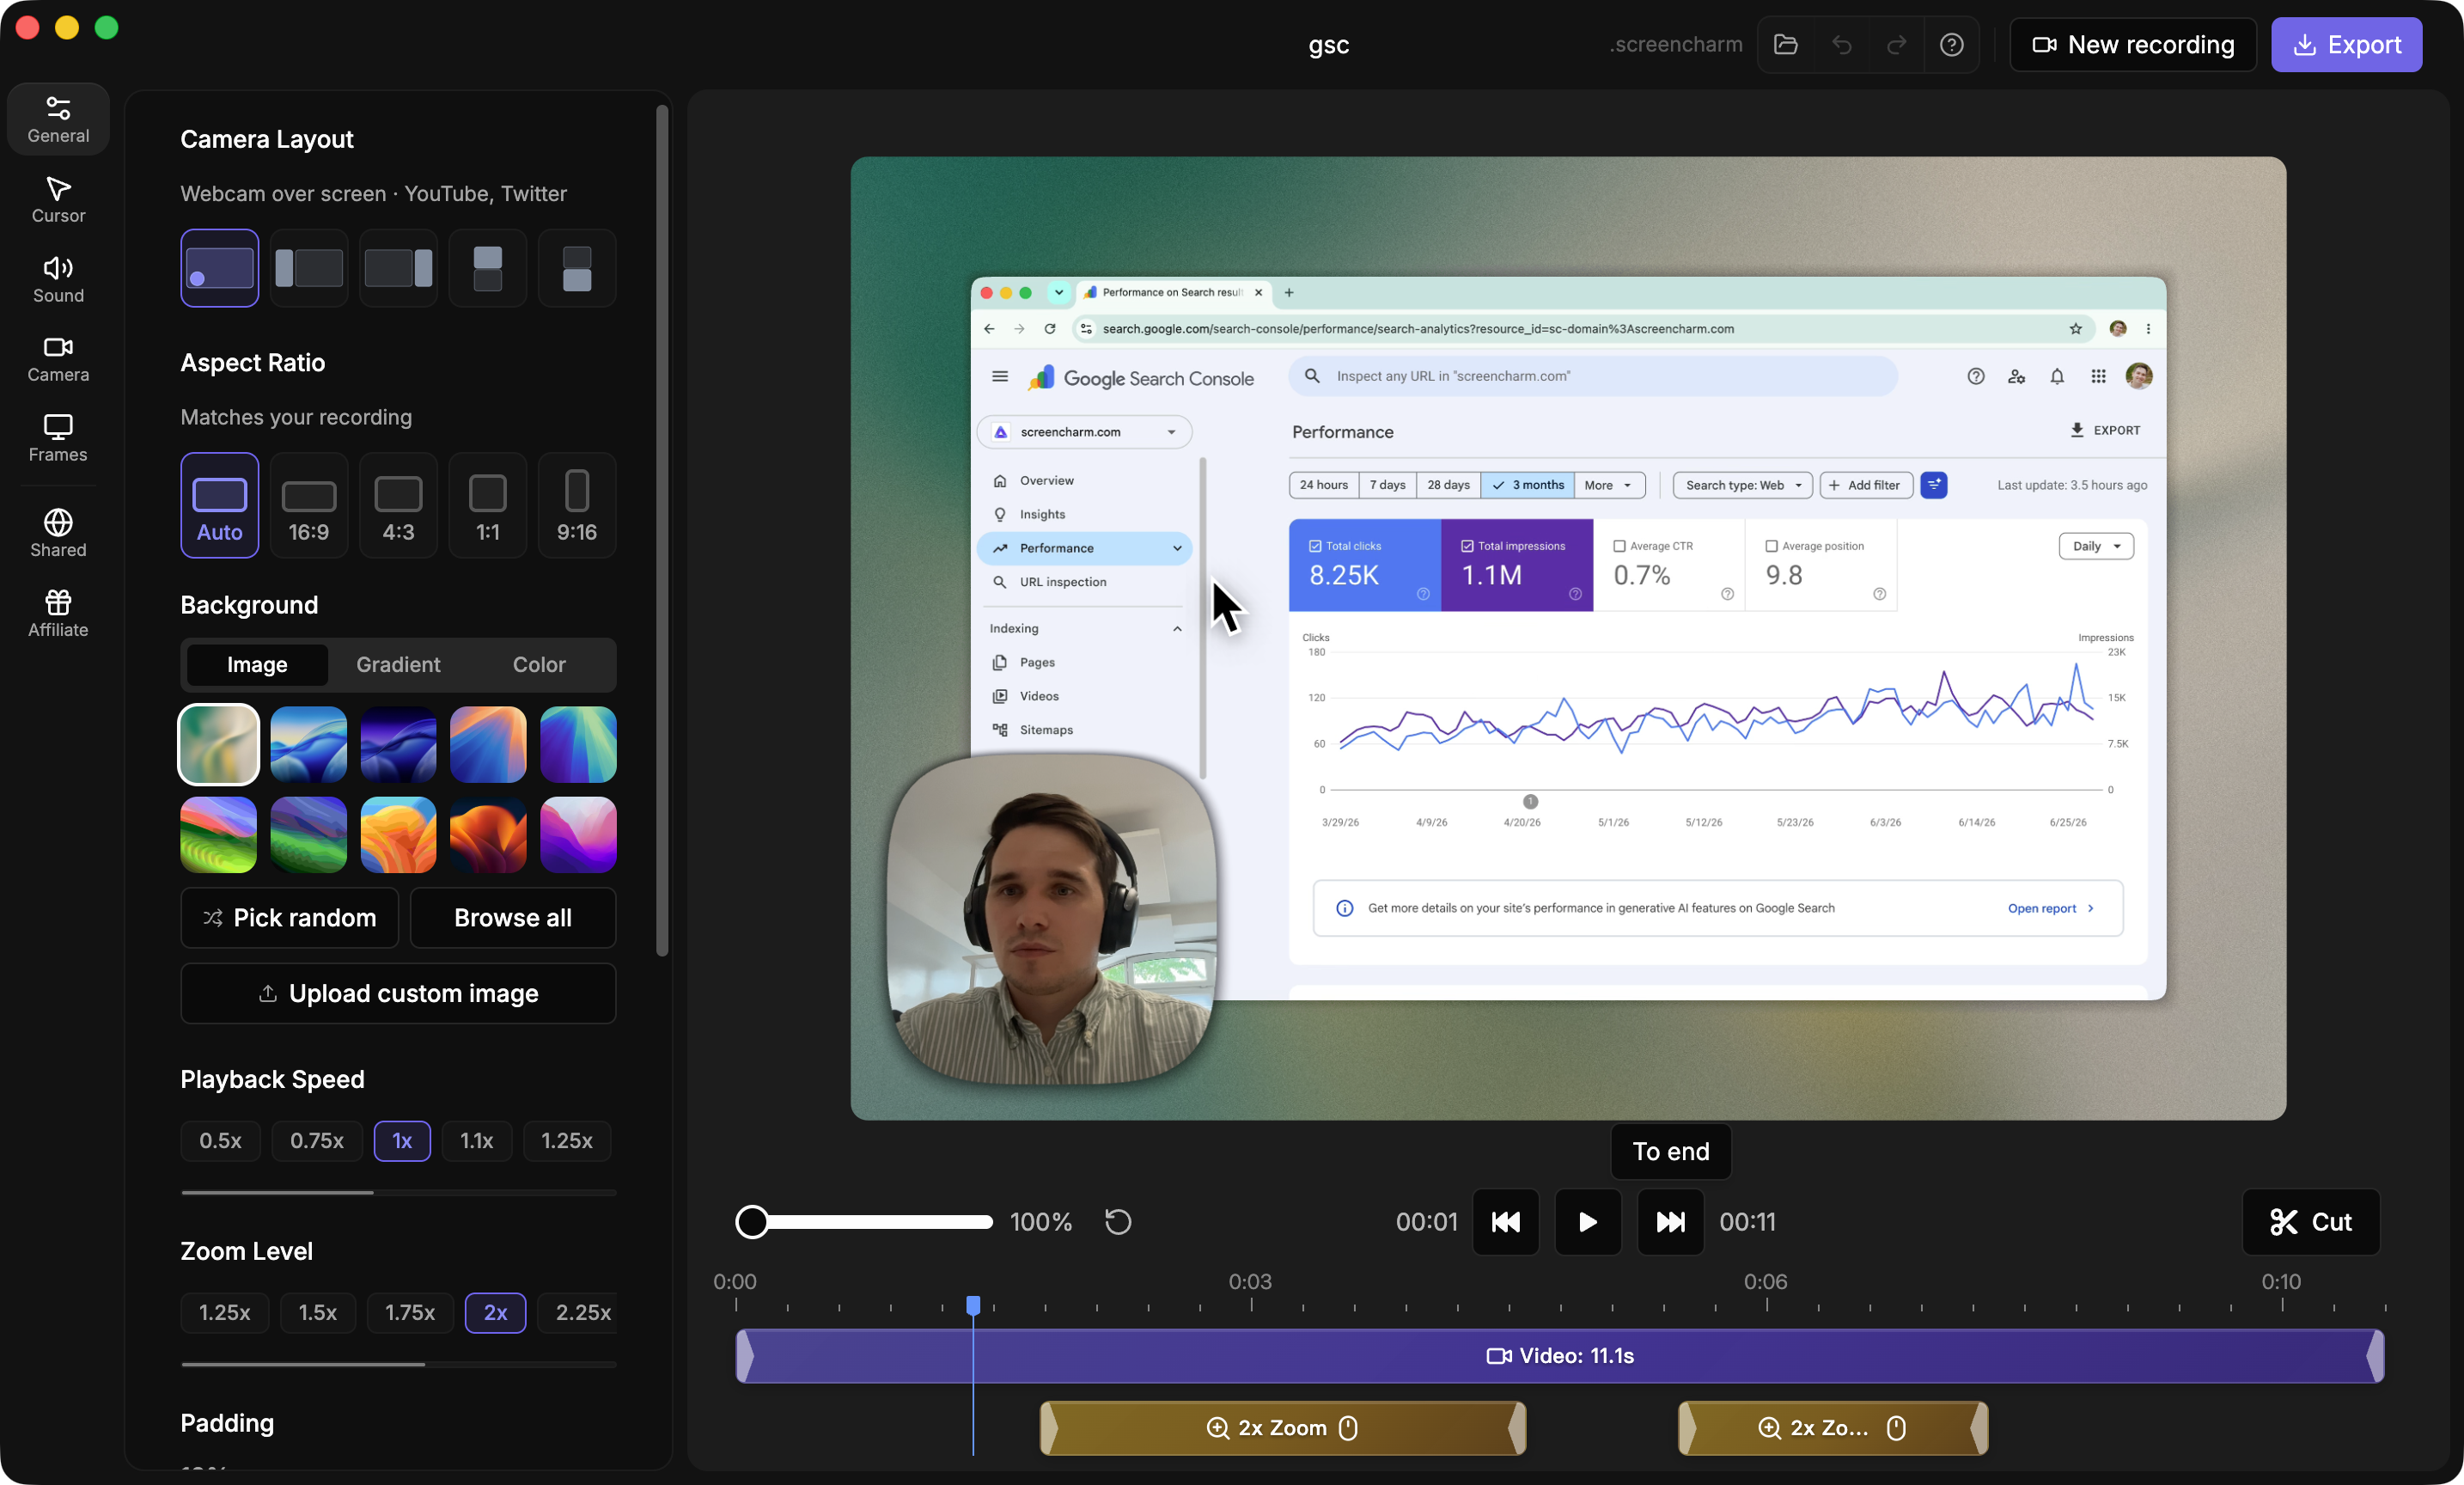
The cleanest GIFs start with a clean MP4, and on macOS that means recording with the conversion in mind. Screen Charm is built for that workflow, with auto-zoom that follows the cursor, plus controls for cursor icon, size, and movement speed, webcam capture, and custom backgrounds for branded demos. Its own product page explains the app in more detail at what Screen Charm is, and the technical side of that kind of capture is worth understanding if you want the final GIF to feel intentional.
Record for the loop, not for the archive
GIF viewers don't want every moment of your demo. They want the one action that proves the point. That's why the Screen Charm workflow is strongest when you use it to focus attention while recording, then trim the source clip down to the smallest segment that still tells the story. The app's integrated editor lets you fine-tune zoom effects and trim without bouncing into a second tool, which matters when you're preparing dozens of short walkthroughs.
If you care about the mechanics behind that kind of motion capture, technical insights for video creators is a useful reference point for thinking about timing, pacing, and how viewers read motion on screen. The important part here is practical. When the source MP4 already guides the eye, the GIF exporter has less work to do.
Build the MP4 as if GIF export is the destination
A raw screen recording usually contains dead time, stray cursor movement, and interface clutter that turns into file weight later. A demo-ready MP4 does the opposite. It keeps the cursor deliberate, the background consistent, and the action centered on the few interface elements that matter.
Screen Charm's workflow is useful because it helps you make those decisions before export, not after. In practice, that means you can record a polished MP4, export it in 4K UHD if you need that source quality, and still trim down to the tiny segment that will eventually become the GIF. For teams making product docs or marketing snippets, that separation between capture and final asset saves a lot of cleanup later.
A good GIF is usually a small slice of a better MP4, not a full recording with the volume turned down.
Sponsored by the makers
Tired of boring screen recordings?
Try Screen Charm.
Auto-zoom, captions, motion blur, camera overlay and a vertical layout for Shorts. Record once, export a polished video.
Screen Charm is a native macOS app.
macOS Native Methods for MP4 to GIF Conversion

macOS gives you a few local paths that don't require uploading anything to a browser. That matters when the MP4 includes unreleased UI, a private customer workflow, or just a lot of editing overhead you'd rather keep on your machine. The trade-off is control. The more control you want, the more hands-on the workflow gets.
Shortcuts is the lightest native option
Apple's Shortcuts app is the easiest local starting point because it lives in the ecosystem and can save the result to Photos or Files after conversion (Atlassian). For Mac users, the big win is that you're not handing the clip to a web uploader just to get a looping image back. You trim first, choose the clip, and keep the file where you want it.
That same Atlassian guide also points out the core idea, trim the video before conversion. That advice matters more than the app choice itself. If the source is too long, no native workflow magically fixes that.
ffmpeg gives you the real knobs
For precise work, ffmpeg is the tool that exposes the actual mechanics. A direct conversion looks like this, ffmpeg -i input.mp4 output.gif, which reads the input MP4 and writes a GIF. The source also shows how adding -vf "fps=10" changes the number of frames per second, which makes motion smoother but increases file size (Conroy).
The stronger approach is the palette workflow, because GIF quality depends heavily on color handling. First generate a palette, ffmpeg -i input.mp4 -vf palettegen palette.png, then apply it with ffmpeg -i input.mp4 -i palette.png -filter_complex paletteuse -r 10 output.gif (Conroy). That two-step process reduces color artifacting, which is exactly what you want when your demo includes UI gradients or subtle interface shading.
Photoshop still fits for design-heavy teams
If your team already uses Adobe Creative Cloud, Photoshop's Video Frames to Layers import path followed by Save for Web is still a viable route. It's not the fastest path, but it gives designers a familiar environment for checking visual issues before export. That can matter when the GIF needs to survive close inspection in documentation or a polished product launch deck.
The key advantage of native methods is file control. You keep the source on your Mac, you choose the trim, and you decide whether quality or size wins. For private demos, that's often enough reason to stay local.
Optimizing GIF File Size and Visual Quality
The four levers that matter are duration, frame rate, resolution, and palette handling. Change one and the file changes right away. Adjust all four with intent, and the GIF becomes shareable instead of merely valid.
Start by shrinking the clip, then tune motion
A short clip usually beats a long one. One tutorial recommends 12 to 15 fps and 640×360 for smaller GIFs, which is a practical starting point for screen demos that need to stay readable without getting huge (YouTube tutorial). The trade-off is simple. More frames and more pixels mean more data, and GIF has no efficient way to hide that cost.
That is why trimming comes first. If the feature reveal happens in the first five seconds, exporting the next twenty only adds noise. For messaging use, one guide suggests limiting a GIF to 6 to 30 seconds depending on the workflow, which matches the need to keep loops short (wikiHow).
Frame rate settings deserve the same attention in macOS workflows, especially if you are converting screen recordings for docs or product demos. A frame rate converter helps you test lower playback rates before you commit to a full export, which is useful when you want the motion to stay readable without blowing up file size.
Pick settings based on where the GIF will live
| Use Case | Frame Rate | Resolution | Max Duration |
|---|---|---|---|
| Slack demo | 12 to 15 fps | 640×360 | Very short |
| GitHub README animation | 12 to 15 fps | Moderate and readable | Short |
| Support article loop | Moderate | Fits the UI text clearly | Short |
| Internal review clip | Flexible | As needed for clarity | Short |
The table is a check, not a rulebook. If the GIF needs to show interface text, resolution matters more than smoothness. If it only needs to signal movement, you can usually reduce frame rate without hurting comprehension.
For desktop workflows that borrow motion from video, enhance your Mac desktop with video is a useful reminder that motion assets behave differently once they leave their source environment. GIFs are even less forgiving, so export settings have to do more of the work.
File size rule: if the viewer can read the text at 12 fps, do not chase smoother playback just because the source MP4 looks prettier.
Online Converters and Their Duration Limits

Online converters are handy until the clip runs into a limit you did not plan for. That usually shows up after upload, which is the worst time to discover that your demo is too long, too wide, or too limited in its export controls.
The limit is often duration, not upload friction
Some web tools cap GIF conversion very early, while others only handle short loops cleanly. Adobe Express allows uploads up to 1 minute, and a Clipchamp tutorial notes that GIF export is not available for clips longer than 15 seconds (Adobe Express, Clipchamp tutorial). That spread matters. It shows that two converters can look similar on the surface and still behave very differently once you try to turn a longer walkthrough into something shareable.
Vivideo makes the trim decision explicit by exposing start time, duration, and width before you create the GIF (Vivideo). That kind of control is useful because it forces you to decide what stays in the clip instead of hiding the cut behind a single upload button. For screen recordings, that usually means fewer surprises and less cleanup after export.
Granular tools are better when the output has to be readable
MConverter surfaces the settings that matter in real work, including framerate, resolution, loop count, color mode, and output presets (MConverter). Those controls are the difference between a GIF that looks fine in one app and a GIF that still reads well in a README, chat thread, or support article. If the interface has text, the wrong preset can make the result soft fast.
Mac users usually have to weigh convenience against control. Uploading an internal demo to a browser is acceptable for low-risk clips. For unreleased product work, I keep the file local and use a native path, because the source stays on the machine and the settings stay visible.
Screen Charm's free MP4 to GIF converter sits in that same practical category of tools that keep the workflow simple, but the same duration and size trade-offs still apply. The tool can help, but it does not change the basics, short clips, readable text, and conservative sizing are still what make a GIF worth sharing.
Troubleshooting Common GIF Conversion Problems
Bad GIFs usually fail in predictable ways. The file is too big, the motion stutters, the text gets soft, or the colors turn muddy. Once you know which symptom you're looking at, the fix is usually obvious.
Match the symptom to the cause
- Muddy colors: the palette is the problem. Regenerate a custom palette with ffmpeg instead of relying on a blunt default mapping, especially if the source MP4 has gradients or UI shading.
- Unreadable text: the resolution is too low for the amount of interface detail. Keep the frame large enough that labels and buttons still separate cleanly.
- Choppy playback: the frame rate fell too far. Raise it slightly and test whether the motion still feels readable without becoming bloated.
- Oversized file: the clip is too long, too wide, or both. Trim harder before touching anything else.
The most important part is to change one variable at a time. If you lower the frame rate, shrink the resolution, and trim duration all at once, you won't know which setting fixed the issue.
Looping problems usually come from platform behavior
Some GIFs play properly in a browser but don't loop the way you expect in chat tools or message apps. That's usually a loop count interpretation issue, not a broken file. When a converter exposes loop settings, use them deliberately and check the result in the destination platform instead of assuming the browser preview tells the full story.
If the loop works in preview but fails in Slack or another messaging app, test the exported file there before you redo the whole conversion.
There's also a practical size threshold problem on sharing platforms, especially when the GIF is meant to live in documentation or chat. The exact threshold depends on the destination, so the safest habit is to keep the export small enough that it doesn't feel borderline in the first place. That's why trimming first is still the fastest fix.
Choosing the Right Conversion Method for Your Workflow
If the clip is short and disposable, an online converter is enough. If the GIF needs privacy, predictable quality, or repeatable settings, stay on macOS and use Shortcuts or ffmpeg. If the source MP4 itself needs serious cleanup before conversion, start with a recording workflow that gives you strong trim and zoom control first.
The cleanest path for repeated product demos is still a two-stage workflow, record a deliberate MP4, then convert it with settings that match the destination. Screen Charm fits that approach because it lets macOS users record, zoom, trim, and export polished source video before the GIF step, which is exactly where most bad exports start going wrong.
For a quick Slack demo, trim aggressively and use the fastest local or online path. For a GitHub README animation, keep text readable and favor Shortcuts or ffmpeg. For support clips that need consistency, local editing and palette control usually win.
If you want a smoother way to turn screen recordings into clean source clips before GIF export, take a look at Screen Charm. It gives macOS creators the recording, zoom, and trimming tools that make MP4-to-GIF conversion far less painful, especially when you need the final loop to stay small, readable, and ready to share.