Your Mac is already doing enough. You're on a live coding demo, the cursor's moving, the webcam preview is live, Slack is still open in the background, and the screen recorder you picked because it looked “full-featured” is now the thing making everything feel heavy. The app window lags when you switch scenes, the machine runs hotter than it should, and the recording session that was supposed to save time starts demanding attention you don't have.
That's the reason lightweight video recorder tools matter on macOS. The problem isn't just file size or install size, it's the hidden cost of software that keeps too many processes alive while you're trying to teach, sell, or explain something clearly. Mac users need tools that capture clean video without stealing focus from the actual work being recorded.
Why Your Recording Software Might Be Slowing You Down
A developer opens a recorder to capture a product walkthrough, then spends the first five minutes closing panels, muting notifications, and hunting for the right capture mode. The interface feels like a command center built for editors, not a simple screen grab. By the time the recording starts, the energy is gone, and the demo already feels harder than it should.
That friction is exactly what lightweight tools are supposed to remove. The earliest video recorders were anything but light, the Ampex VR-1000 arrived in 1956 as the first commercially successful videotape recorder, and even the VR-1500 from 1963 weighed over 100 pounds (Beverly Boy). The lesson carries forward on macOS, because bloated software recreates the same old trade-off in a new form, more capability on paper, more drag in practice.
Practical rule: if your recorder makes you think about the recorder while you're trying to explain a workflow, it's already too heavy.
The hidden cost shows up during the recording itself
The biggest problem isn't always startup time. It's what happens when the recorder competes with the thing you're capturing. A live coding session needs the machine to stay responsive. A tutorial needs the cursor to move smoothly. A product walkthrough needs the presenter to stay in rhythm instead of wrestling with controls.
Lightweight software preserves that headroom. That's why the best macOS options feel almost invisible once they're set up. Apple's built-in workflow, opened with Shift-Command-5, reflects that same idea, because the recording controls live inside the screenshot tool and let you choose the whole screen or a selected portion before you start (Apple workflow reference). The less you need to manage during capture, the more the recording feels like a byproduct of work instead of a separate job.
A lot of “all-in-one” tools miss that point. They bundle editing timelines, overlays, and export presets into one window, then ask your Mac to keep all of it ready at once. That's fine when you're polishing a final cut. It's a poor fit when you just need to capture a clean explanation without dropping frames or breaking concentration. For a broader comparison of Mac options, this screen recording guide for Mac is a useful reference point.
What Makes a Video Recorder Truly Lightweight
Lightweight doesn't mean bare-bones. It means the recorder uses fewer resources to do the same job, and it avoids doing extra work while you're trying to capture. On macOS, that usually means compact code, efficient encoding, and a workflow that keeps the interface out of the way.
Hardware design taught the same lesson before software did
Video recording got lighter by shrinking the machine, not by adding more menus. In the 1970s, Portapaks reduced portable recording weight to about 30 pounds, but they could only record 3 minutes of video on reels (Beverly Boy). That old trade-off still matters conceptually. Smaller tools are easier to carry and launch, but if they compromise too much on duration or output, they become annoying in a different way.
Modern lightweight recorders solve that by using smarter storage and smarter processing. One industrial recorder is described as a “lightweight, DZUS mounted video recorder” that uses FLASH disk recording technology, which cuts mechanical complexity and fits better in constrained environments (datasheet). That same logic applies to macOS software. Less moving machinery, even in software form, usually means fewer things that can stutter, block, or overheat.

Efficiency is design, not deprivation
A lightweight recorder looks more like a sports car than a moving van. It's built to do one job fast and cleanly, not to haul around every possible feature in case someone wants them later. That usually means hardware acceleration, codec efficiency, and a minimal resident footprint.
Software projects can prove the point. LightNVR is written in C and was designed to run on devices with only 256 MB of RAM, which shows how much low-memory performance depends on disciplined implementation (LightNVR). The exact use case is different from screen capture, but the principle is the same, good engineering keeps the recorder from eating the machine alive. Industry guidance for low-end systems also recommends hardware acceleration and H.264 because they reduce processing overhead while keeping quality acceptable for capture workflows (LightNVR).
That's why “lightweight” shouldn't be shorthand for missing features. A recorder can be small, fast, and capable at once. A portable handheld class of recorder described in the datasheet above weighs about 590 g and supports 4K UHD capture at 29.97p, which is a reminder that compact form factor and professional output don't have to fight each other (datasheet). On macOS, the same idea should apply in software. The point is not to strip the tool down until it's weak. The point is to make sure every feature earns its place.
Build for the task, not for the showroom
The best lightweight recorders don't chase visual clutter or complex project management. They protect CPU headroom, keep memory usage sane, and export without forcing you into a separate editor for basic fixes. That's the difference between a recorder that supports your workflow and one that becomes the workflow.
Sponsored by the makers
Tired of boring screen recordings?
Try Screen Charm.
Auto-zoom, captions, motion blur, camera overlay and a vertical layout for Shorts. Record once, export a polished video.
Screen Charm is a native macOS app.
Essential Features Every Lightweight Recorder Should Have
A good lightweight recorder still has to do the job well. Speed alone isn't enough if the final video is awkward, blurry, or hard to follow. For Mac users, the useful tools are the ones that balance low overhead with enough polish to publish without extra cleanup.
Auto-zoom and cursor tracking matter more than people admit
Product demos and tutorials live or die on attention. If your audience can't easily follow what you click, they start rewinding or dropping off. That's why auto-zoom, cursor tracking, and movement-aware framing are so valuable in software walkthroughs.
These features save editing time because the recorder helps direct attention during capture. Instead of manually keyframing every zoom in post, you get a clip that already points the viewer at the relevant button, field, or menu. For educators, that's a practical win. For founders, it keeps the product story moving. For support teams, it makes instructions easier to follow without turning every walkthrough into a mini film project.
A recorder that handles attention for you during capture is often worth more than one that promises fancy post-production later.
Webcam, export, and editing should stay simple
A face-cam can make a tutorial feel more personal, especially when you're teaching software or walking through a launch. The recorder should let you bring in webcam footage without turning setup into a puzzle. The same goes for export, because a lightweight tool shouldn't trap you in low-resolution output when the source material is clean.
That's why 4K UHD support still matters in a compact recorder. The hardware can stay small while the output remains sharp enough for product UI, typography, and interface detail. One portable recorder class explicitly supports 4K UHD capture at 29.97p, which shows that small size doesn't automatically mean small output (datasheet). In software, the same principle shows up as clean export options and a simple editor for trimming or repositioning rather than a full post suite.
The right mix looks like this:
- Auto-Zoom Tracking: Follows cursor action automatically, so viewers never lose the thread.
- High-Quality Output: Keeps text and interface details crisp after export.
- Minimal Interface: Shows only the controls you use while recording.
- Efficient Encoding: Renders faster and keeps file sizes manageable.

Low CPU usage is not optional on macOS
The recorder should leave enough room for the app or browser you're showing. That matters most on older Macs, fanless Macs, and any machine already running browser tabs, design tools, or local dev servers. A low-resource recorder helps keep the session stable when the workload is already high.
Community discussions reflect that priority directly. People ask for a recorder that doesn't use much CPU, and the recommendations keep circling back to minimal-resource tools rather than bulky suites (Reddit discussion). That's an important clue. Buyers don't just want “good enough” capture. They want a recorder that leaves the rest of the machine usable.
Who Benefits Most from Lightweight Recording Tools
Software developers feel the pain first because demos are often recorded in environments already under load. You've got a code editor open, a browser running the app, maybe a local backend, and a recorder that's supposed to stay invisible. When the tool adds friction, you end up performing for the software instead of for the audience.
Indie makers have a similar problem, but with a different pressure. They often need polished product clips for landing pages, waitlists, or launch posts, and they rarely want to spend half a day learning an editor just to make a simple walkthrough look intentional. A lightweight recorder gives them a cleaner path from idea to publishable clip. It helps them ship demos while the product is still moving fast.
Educators and support teams need repetition without reinvention
Teachers and online instructors repeat workflows constantly. They show the same steps, answer the same questions, and update the same tutorials when an interface changes. A lightweight recorder matters here because the setup has to be fast enough to disappear into the teaching rhythm.
Customer support and onboarding teams get the same benefit. A walkthrough shouldn't require a production calendar. When the recorder is easy to launch and easy to trim, teams can update help content without starting over in a separate editor every time a menu changes. That keeps documentation closer to the product, which is where it belongs.
Marketing teams also win, but for a different reason. They need fast promotional clips that feel polished without waiting on design resources or agency cycles. A compact recorder with clean output gives them more room to react to launches, feature updates, and campaign deadlines. The result is less time spent assembling a video and more time spent getting the message right.
Creators care about speed because they publish often
Content creators and social media influencers work on a tighter loop than most teams. They need tools that can keep up with frequent recording sessions, quick revisions, and rapid posting. A lightweight recorder is useful here because it lowers the activation energy for making the next clip.
The common thread across all of these groups is not “video quality” in the abstract. It's usable quality under real constraints. If the tool slows the Mac down, interrupts the teaching flow, or requires too many steps to get something presentable, it starts costing more than it saves.
Screen Charm as the Ideal macOS Solution
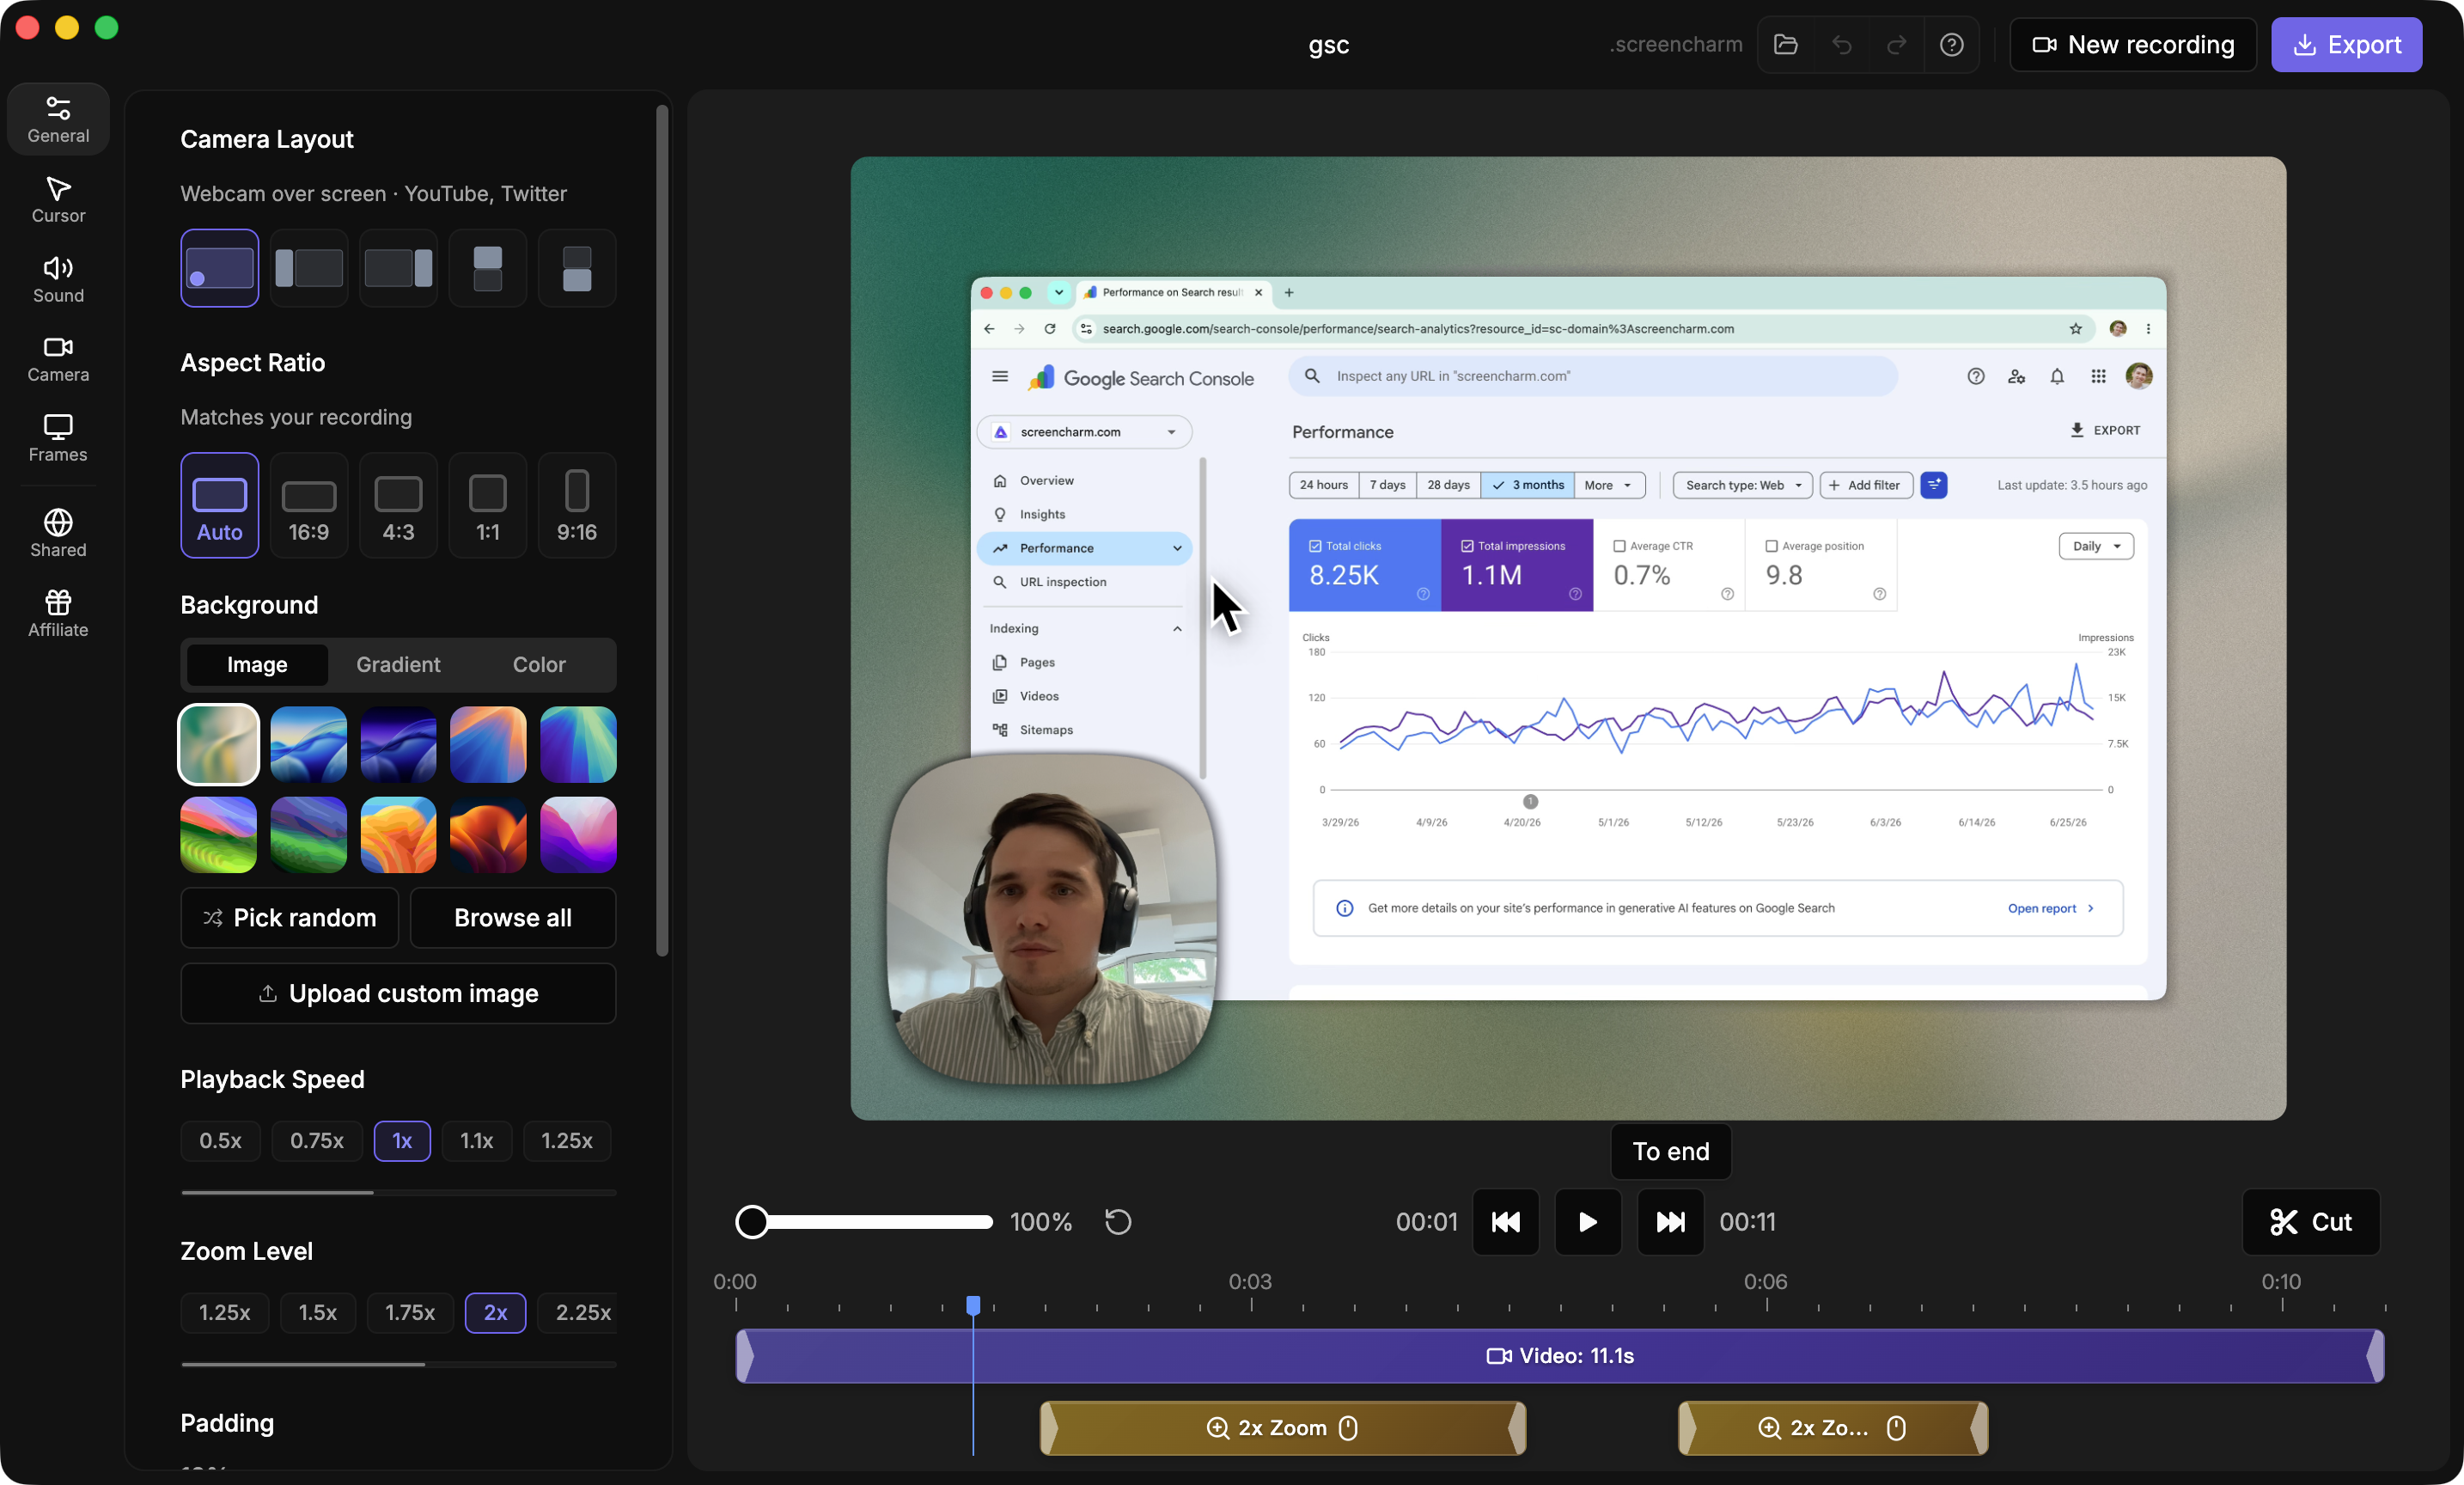
Screen Charm fits the macOS use case because it focuses on the specific things lightweight recording should do well, screen capture, webcam capture, cursor effects, built-in editing, and clean export. It's built for people who want a polished product demo or tutorial without living inside a full editor afterward. The app also offers automatic zoom, which tracks cursor movement and scales attention to the relevant interface elements during the recording.
That matters because macOS already gives users a baseline with Shift-Command-5, where the built-in tools can record the whole screen or a selected portion and let the user choose where to save the recording before starting (Apple workflow reference). Native capture is useful when you want low friction. Third-party software earns its place when it removes the need for manual editing and makes the result feel more intentional.
Where Screen Charm sits in the Mac workflow
Screen Charm adds the pieces that native capture leaves out. Users can customize the cursor's icon, size, and movement speed, record webcam footage alongside the screen, and choose preset or custom backgrounds for branding. The integrated editor keeps zoom adjustments and trimming inside the same app, which is the part many heavier tools still make clumsy.
The pricing also follows a lightweight philosophy. Screen Charm is offered at a one-time price of $49.90, includes unlimited 4K UHD exports, a 30-day money-back guarantee, and direct support from founder Sergey Nazarov (Screen Charm product details). That combination is useful for users who don't want to keep paying for a large suite just to publish recurring screen recordings.
If your workflow is mostly demos, tutorials, and walkthroughs, the best tool is usually the one that gets you from capture to publish without a separate cleanup session.
For teams that want a lighter option without giving up the essentials, Screen Charm also sits alongside other macOS recording tools rather than replacing the native workflow outright. It's more aligned with users who care about cursor-guided narration, quick edits, and a lower-friction finish. The app's free screen recorder tools page is another useful place to compare what a lightweight capture-first workflow looks like in practice.
Your Evaluation Checklist and Setup Workflow
A good trial starts with your own machine, not a spec sheet. Open the recorder on the Mac you use, then watch what happens when you start capturing the apps you normally run. If the fan spins up, the cursor trails, or window switching feels sticky, that's the signal you need.
Test the parts that matter during real work
Use the same setup you'd use for a real demo. Record a coding session, a tutorial, or a product walkthrough, then review four things: interface responsiveness, audio sync, cursor visibility, and how much cleanup the clip needs afterward. The best recorder is the one that stays out of the way while you work.
A useful checklist looks like this:
- Start Fast: Open the tool and begin recording without digging through multiple dialogs.
- Stay Responsive: Move between apps and see whether the Mac still feels smooth.
- Check Attention Tools: Confirm whether cursor tracking or zoom helps the viewer follow the action.
- Review Output: Look for readable text, clean motion, and usable audio.
- Measure Cleanup Time: Notice whether you can publish the clip after light trimming, or whether you need a separate editor.
- Watch File Handling: Make sure recordings save where you expect and are easy to organize.
- Repeat on a Busy System: Test while your real apps are open, because that's when lightweight matters most.

Build a workflow that keeps recordings moving
Once you pick a recorder, keep the setup simple. Use a fixed save location, a consistent naming pattern, and one default capture preset for most sessions. That alone cuts a lot of friction, especially if you record often.
For lighter workflows on macOS, the main goal is to reduce the number of decisions you make before hitting record. A compact tool should make it easy to open, capture, trim, and export without bouncing between apps. If you want a reference point for a minimal capture-first setup, the free screen recorder tools page is a useful benchmark for how simple and direct that path can be.
The final filter is simple. If the recorder leaves your Mac usable, gives you clean output, and doesn't force you into a bigger editing project than the recording itself, it's doing the job.
Making the Shift to Lightweight Recording
The case for a lightweight video recorder on macOS comes down to respect for your machine and your attention. Heavy tools promise more, but in day-to-day use, what matters is whether you can record a demo, tutorial, or walkthrough without the software becoming the obstacle. The tools that win are usually the ones that keep the interface small, the processing efficient, and the output polished enough to publish.
That's why the right checklist is so useful. Look for auto-zoom, clean export, low CPU usage, and a workflow that doesn't force you into a separate editor for basic fixes. If a recorder can handle those things while staying comfortable on your Mac, it's meeting the standard.
Screen Charm is one option built around that idea. It combines screen capture, webcam support, cursor effects, and built-in editing in a macOS app that's meant to keep the process simple from start to finish.
If you're recording product demos, tutorials, or walkthroughs on a Mac, try a tool that keeps the capture process light and the editing contained. Visit Screen Charm to see how its auto-zoom, webcam support, and built-in editing fit a low-friction macOS workflow, then compare it against the way you record today.