How to Screen Record on a Mac (With Audio & Webcam) — 2026 Guide
To screen record on a Mac, press Shift + Command + 5, choose your recording area, select a microphone in Options, and click Record. This guide covers every method: the built-in shortcut, QuickTime Player, recording internal audio, adding a webcam, troubleshooting, and exporting in 4K. On Windows? See our best free screen recorders for Windows guide instead.
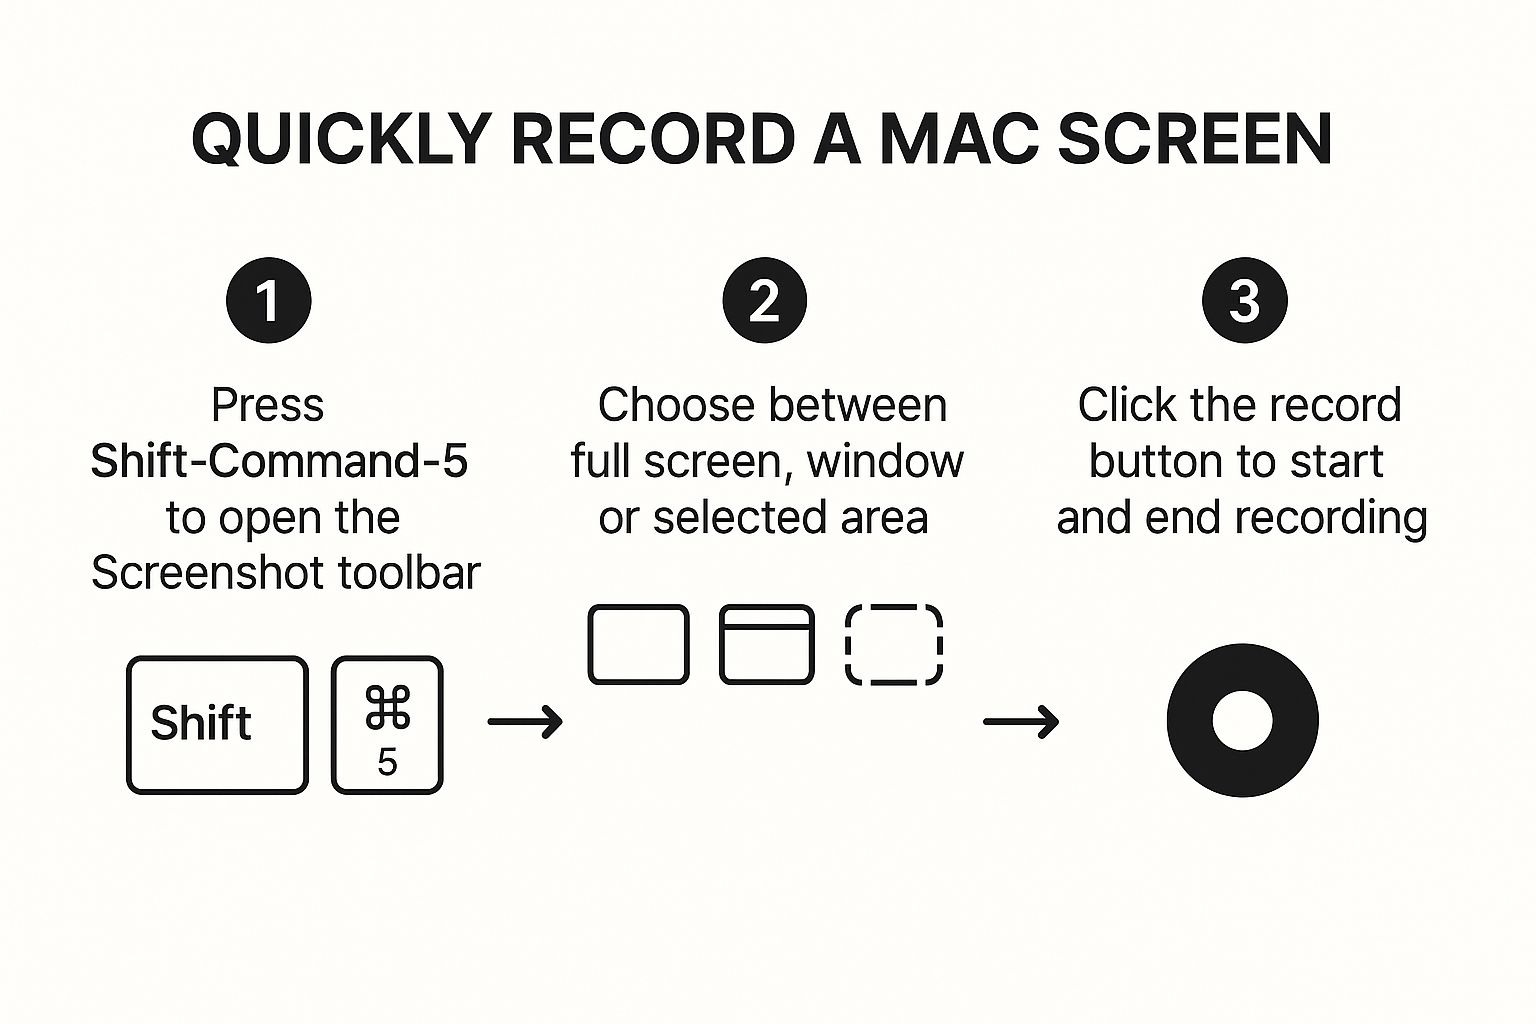
The Fastest Way to Screen Record (Shift + Command + 5)
For any spontaneous recording — a bug report, a quick walkthrough, something you want to show a colleague — Shift + Command + 5 is the fastest path. Apple introduced this shortcut with macOS Mojave (2018), replacing the need to open QuickTime every time. It's been the default ever since, and it works identically on every current Mac model.
When the toolbar appears, you'll see five icons:
- Three icons on the left — screenshots (full screen, window, selection)
- Two icons on the right — video recording (full screen, selection area)
Click the recording icon that matches what you want to capture, then press Record.
If you want to record just a single app window rather than your full screen or a selection, use Shift + Command + 5, then click on any app window — it will highlight automatically. For an even deeper look at the shortcut options, see our dedicated screen record Mac shortcut guide.
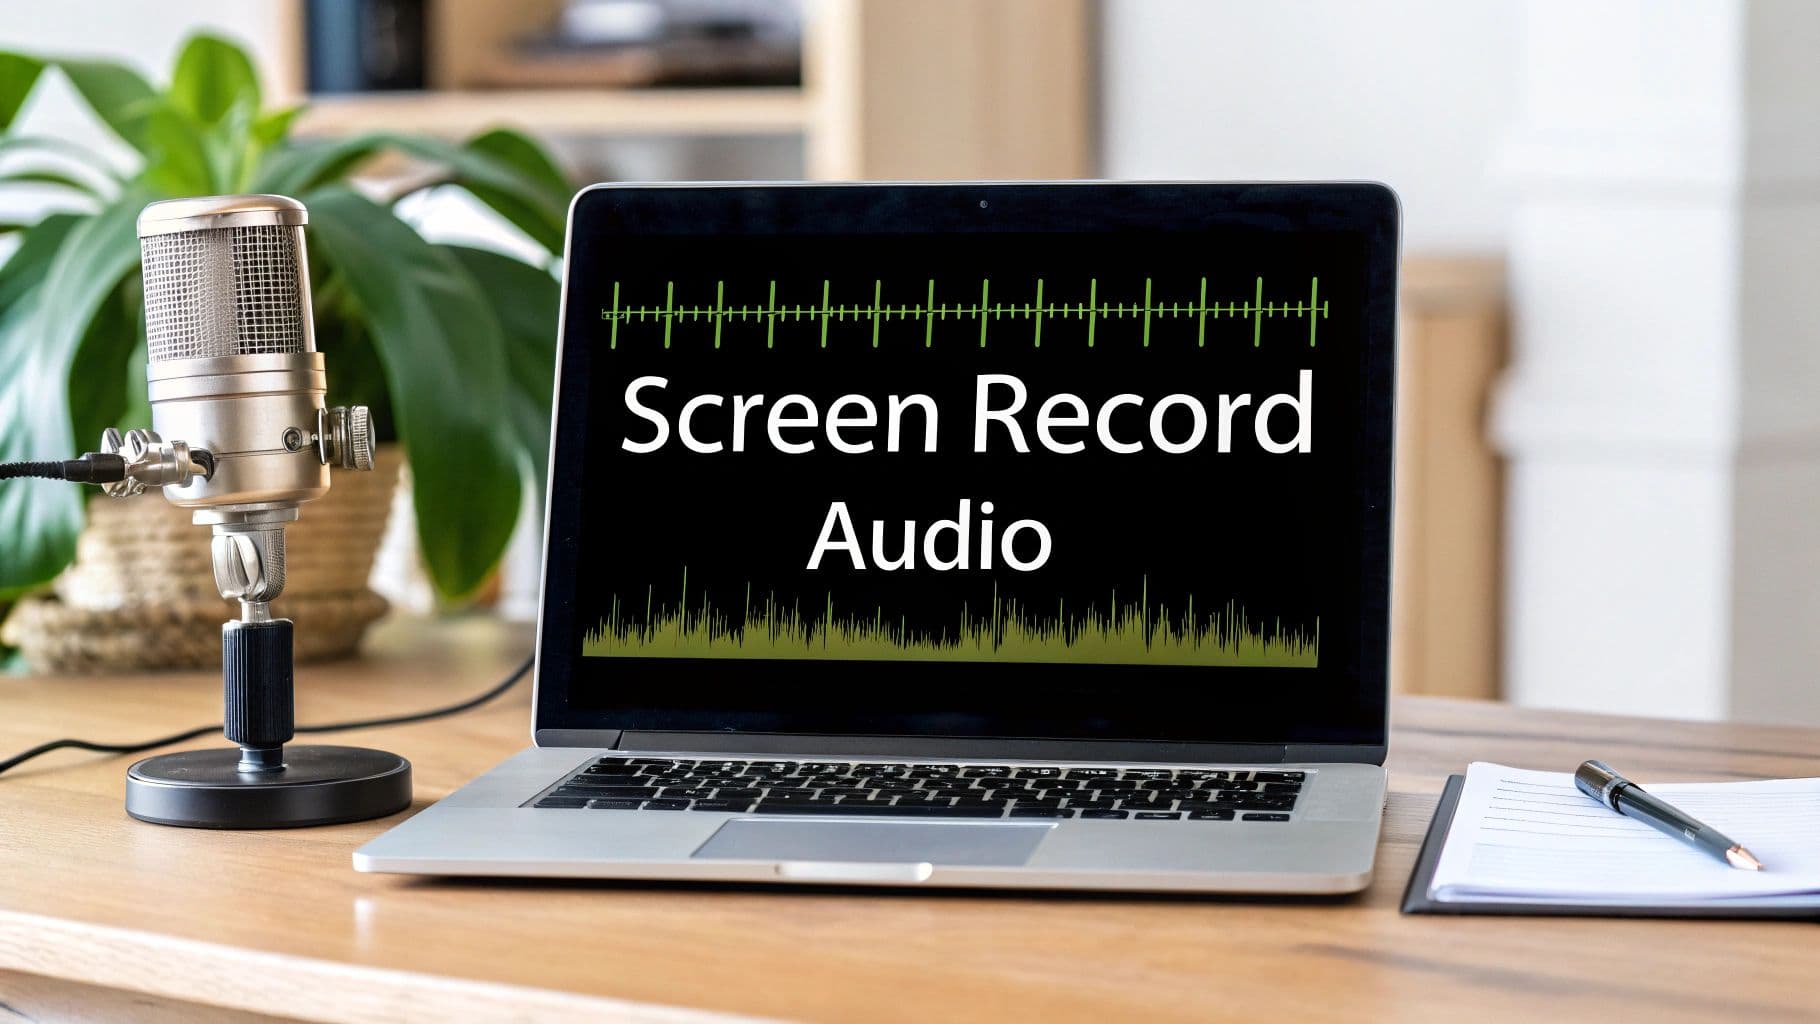
How to Record Screen with Audio on a Mac
Before pressing Record, click Options in the toolbar. This step is what separates rushed clips from intentional, well-organized recordings.
Options menu: settings to configure before you hit Record
Microphone — Select your built-in mic, a USB mic, or AirPods. If you want voice narration, you must set this here, before you start recording.
Save to — By default, recordings land on your Desktop. Change this to a dedicated folder (e.g. ~/Movies/Screen Recordings) to avoid clutter.
Timer — Set a 5- or 10-second countdown. Use this when you need to position windows, open the right app, or compose yourself before recording begins.
Show Mouse Clicks — When enabled, a dark circle appears around your cursor on every click. Indispensable for tutorials where viewers need to follow your actions.
Remember: macOS screen recording cannot capture internal system audio on its own. If you need to record sound from an app, game, or video playing on your screen, you need a third-party tool. See the section below on capturing system audio.
How to Screen Record with QuickTime Player
The Shift + Command + 5 shortcut runs QuickTime Player in the background. But opening QuickTime directly gives you a more focused interface, which is useful when you're prepping a deliberate, polished recording.
Open QuickTime from /Applications, then choose File → New Screen Recording. The same toolbar appears, but now you're in a dedicated recording session rather than the general screenshot panel.
Selecting audio in QuickTime
Inside QuickTime's recording setup, click the dropdown arrow next to the Record button to choose your microphone. If you've plugged in an external USB mic, it will appear here.
Like the toolbar shortcut, QuickTime cannot record internal audio (system sound) natively. For a complete guide to recording system audio on macOS, see our capture system audio on Mac guide.
MacBook Air vs MacBook Pro: Screen Recording Differences
The screen recording process is identical on every Mac, but a few hardware and display differences are worth knowing.
MacBook Air
MacBook Air models (M1, M2, M3) run fanless. During long screen recordings at high resolution — especially with screen sharing, heavy browser tabs, or a connected external display — the chip throttles slightly to manage heat. This is normal and usually doesn't affect recording quality.
If you're recording for more than 30–45 minutes on a MacBook Air, consider:
- Plugging in power
- Closing unused apps and browser tabs
- Recording in a cool room
Display resolution: MacBook Air has a Liquid Retina display scaled by default. Your recording will capture at the display's logical resolution (1440×900 on 13-inch M2 Air), not the native pixel count. If you need a higher-resolution export, a dedicated tool can upscale or record at native resolution.
MacBook Pro
MacBook Pro models have the ProMotion (120 Hz) display on the 14-inch and 16-inch. macOS screen recording captures at 60 fps by default, so you won't see any difference in the recording itself regardless of the display refresh rate.
MacBook Pro's fan-cooled thermal design handles long recordings better than the Air. For professional tutorials, product demos, or recordings lasting more than an hour, a MacBook Pro will maintain consistent performance.
HDMI/Thunderbolt recording note: If you have an external display connected, Shift + Command + 5 lets you choose which screen to record. Click "Options → Screen" to select the right display before hitting Record.
How to Record Screen with Webcam (Picture-in-Picture)
The built-in tools in macOS do not support picture-in-picture webcam recording. You cannot capture your screen and your face simultaneously with QuickTime Player or the Screenshot toolbar.
For this, you need a dedicated app. Screen Charm adds a webcam bubble to your recording — you choose the size, position, and shape. It handles the screen and camera feeds in one recording session. For a full comparison of options, see our guide to the best screen recorder with facecam for Mac.
This is particularly useful for:
- Product demo videos where personality matters
- Online course content
- Customer support walkthroughs
- Product Hunt launch videos
How to Record Internal System Audio on a Mac
macOS doesn't let the built-in tools record system audio by default. This means recording a video playing in Safari, a game's sound effects, or audio from Zoom will result in silence using only QuickTime.
The workaround: a virtual audio device
- Download and install BlackHole (free, open source)
- Open Audio MIDI Setup (in /Applications/Utilities/)
- Create a Multi-Output Device that combines your speakers and BlackHole
- Set this Multi-Output Device as your system audio output
- In QuickTime's recording setup, select BlackHole as the microphone input
This routes your Mac's audio output back in as a recordable input. It takes about 5 minutes to set up and works reliably across macOS versions. For a full step-by-step walkthrough, see our dedicated guide to recording internal audio on Mac.
Alternatively, Screen Charm handles internal audio capture automatically without any virtual audio driver setup.
macOS Version Notes: Monterey, Ventura, Sonoma, Sequoia
The core Shift + Command + 5 toolbar has been stable since Mojave. However, a few version-specific details are worth knowing.
macOS Monterey (12) and Ventura (13)
The Screen Recording permission prompt changed in Ventura. If you use a third-party screen recorder for the first time on Ventura, you may be asked to quit and reopen the app after granting permission. This is normal — the new permission model requires a fresh app launch to take effect.
To manage screen recording permissions on any modern macOS version: System Settings → Privacy & Security → Screen Recording.
macOS Sonoma (14)
Sonoma introduced a more prominent overlay notification that appears briefly when screen recording starts — a small camera icon in your menu bar. This overlay is not visible in the recording output; it's just a system indicator.
Also in Sonoma: when you share a specific window in screen share or recording apps, your other windows and the desktop are automatically obscured. This is a privacy feature and does not affect how recording works.
macOS Sequoia (15)
Sequoia did not change the core screen recording workflow. The Shift + Command + 5 shortcut and QuickTime behavior remain the same. If you upgraded and recording suddenly stopped working, the most common fix is re-granting screen recording permission to your apps in System Settings → Privacy & Security → Screen Recording.
Troubleshooting Screen Recording on Mac
The recording starts but nothing is captured (black screen)
This almost always means the app doesn't have Screen Recording permission.
- Open System Settings → Privacy & Security → Screen Recording
- Make sure the app you're using (QuickTime, or your third-party recorder) is toggled on
- Quit and reopen the app completely — permissions don't take effect until the app restarts
If you're recording a DRM-protected window (Netflix, Apple TV, some streaming services), macOS intentionally prevents capture and renders that window black.
Recording won't start at all
- Check that no other app is actively using screen recording (some video call apps grab the permission exclusively)
- Restart your Mac and try again
- If using a third-party tool, delete and reinstall it, then re-grant the Screen Recording permission
The mouse cursor doesn't appear in the recording
In the Screenshot toolbar's Options menu, cursor visibility is on by default — but some third-party tools hide it. Check the app's recording preferences. In Screen Charm, cursor highlighting and zoom animations are handled automatically.
No audio in screen recording at all
If your screen recording has no sound at all — no mic, no system audio — check the microphone setting in Options before recording, and make sure Screen Recording permission is granted in System Settings → Privacy & Security. For a full checklist of fixes, see our Mac screen recording no sound troubleshooting guide.
Audio is recording but there's a hum or echo
If you're using the built-in microphone while speakers are playing audio, you may get feedback. Use headphones or an external mic during recordings to eliminate this.
The recording stops unexpectedly
- Low disk space is the most common cause. macOS pauses recording if available storage drops below a threshold (~few hundred MB). Free up space and try again.
- On MacBook Air, thermal throttling rarely causes recording to stop, but it can if the machine is severely hot. Let it cool and try again.
Slow down or lag during recording
- Close unused browser tabs and apps
- Turn off external displays you're not recording
- If recording 4K or Retina resolution, consider using a dedicated recorder that handles the encoding more efficiently than QuickTime
Managing and Exporting Your Screen Recordings
Trimming right after you stop
When you stop recording, a thumbnail of the video appears in the bottom-right corner of your screen for a few seconds. Click it to open the trim editor. You can drag the start and end handles to cut the head or tail of the video. This is the fastest way to remove the awkward few seconds at the beginning where you were setting up.
Saving to the right place
Set your default save location once in Options → Save to and you'll never hunt for recordings on your Desktop again. A folder like ~/Movies/Screen Recordings or a project-specific folder is ideal.
File size
A 10-minute 1080p screen recording from QuickTime will typically be 200–600 MB depending on screen motion. For tutorials with mostly static UI, the file will be smaller. For recordings with fast animation, scrolling, or video playback, it will be larger.
To reduce file size without re-encoding in a separate app: open the recording in QuickTime Player, choose File → Export As → 1080p (or 720p). QuickTime will re-encode it at the chosen quality, typically reducing file size by 50–80%.
There have been documented cases of hidden screen recording temp files growing very large (some users report hundreds of GB in system folders) on older macOS versions. If your storage is mysteriously full, check
~/Library/Cachesand the Trash for large.movfiles.
Privacy before you record
A discipline worth building: before every recording, close anything personal — email, messages, password manager, financial apps. Disable notifications with Do Not Disturb (Fn + D on newer Macs, or via Control Center). You can re-enable everything immediately after you stop recording.
When the Built-in Mac Tools Aren't Enough
macOS tools are genuinely good for quick captures. But they have real limitations. Here's what the built-in tools can and can't do compared to a dedicated recorder:
| Feature | QuickTime / Shift+Cmd+5 | Screen Charm |
|---|---|---|
| Record full screen | ✓ | ✓ |
| Record selected area | ✓ | ✓ |
| Microphone audio | ✓ | ✓ |
| Internal system audio | ✗ | ✓ |
| Webcam overlay (PiP) | ✗ | ✓ |
| Auto-zoom & cursor tracking | ✗ | ✓ |
| Trim & edit in the same app | Limited | ✓ |
| 4K export | ✓ | ✓ |
For occasional screen grabs, QuickTime is completely sufficient. For product demos, tutorials, or any video you'll share publicly, Screen Charm removes the friction of stitching together multiple tools. If you want to compare all the options, our best screen recording software for Mac guide ranks and reviews the top tools side by side.
Frequently Asked Questions
How do I screen record on a Mac?
Press Shift + Command + 5. Select whether to record the full screen or a selected area, choose your microphone from Options if you want narration, then click Record. To stop, press Shift + Command + 5 again or click the stop button in your menu bar. The recording saves to your Desktop by default.
How do I screen record on a MacBook Air?
Exactly the same as any other Mac: Shift + Command + 5, choose your recording area, click Record. MacBook Air handles screen recording well for most sessions. For recordings over 30–45 minutes, plug in power to avoid any thermal throttling.
How do I screen record on a MacBook Pro?
Press Shift + Command + 5. If you have an external display connected, go to Options → Screen to select which display to record. MacBook Pro's active cooling makes it better suited for long recording sessions than the Air.
How do I record my screen with audio on a Mac?
Open Shift + Command + 5 → Options → Microphone and select your mic before starting. This records your voice. For internal system audio (sound from apps, videos, games), you need a virtual audio driver like BlackHole or a dedicated app like Screen Charm.
Why is my screen recording black?
The most common cause is missing Screen Recording permission. Go to System Settings → Privacy & Security → Screen Recording, enable the app, then quit and reopen it. A black window in your recording usually means you tried to capture a DRM-protected window (Netflix, Apple TV, etc.), which macOS blocks by design.
How do I record a specific window instead of the whole screen?
Press Shift + Command + 5, then hover your cursor over the window you want to record — it will highlight with a blue border. Click it to select it, then click Record.
Where does the screen recording go after I stop?
By default, your Desktop. The file is named something like Screen Recording 2026-02-13 at 10.30.00.mov. You can change the default save location by opening Shift + Command + 5 → Options → Save to.
Why is my screen recording file so large?
macOS records at full quality by default, which creates large files. To compress: open the file in QuickTime Player, then File → Export As → 1080p (or 720p). This re-encodes it at a smaller file size. For more control, use HandBrake or a tool like Screen Charm that lets you choose codec and quality before exporting.
Can I record my screen and webcam at the same time on a Mac?
Not with the built-in tools. You need a third-party app. Screen Charm supports picture-in-picture webcam recording alongside your screen capture in a single workflow.
How do I screen record on a Mac with the keyboard shortcut only?
Press Shift + Command + 5 to open the toolbar, then use Tab to navigate the toolbar icons if you prefer the keyboard, or simply click the recording icon. To stop recording, press Shift + Command + 5 again, or press the stop button (a square icon) that appears in your menu bar while recording.
My screen recording stopped working after a macOS update. How do I fix it?
Re-grant Screen Recording permission. Go to System Settings → Privacy & Security → Screen Recording, toggle the app off, then back on. Quit and reopen the app. If that doesn't work, restart your Mac. macOS updates occasionally reset privacy permissions for third-party apps.
How do I stop a screen recording on a Mac?
Click the square stop button in your menu bar (it appears while recording). Or press Shift + Command + 5 again and click Stop. Or press Command + Control + Esc — this is a lesser-known shortcut that immediately stops any active screen recording.
Can I record my screen without QuickTime?
Yes. The Shift + Command + 5 toolbar is independent of QuickTime from a user perspective — you don't need to open the app manually. For recording with more features (system audio, webcam, editing), use a dedicated app like Screen Charm.
Does screen recording capture audio automatically?
Not by default. You must explicitly select a microphone input in the Options menu before recording. Internal system audio is never captured automatically by the built-in macOS tools.
How do I record the screen on an older Mac running Mojave or Catalina?
Shift + Command + 5 works on Mojave (10.14) and above. On even older macOS (High Sierra or earlier), open QuickTime Player manually, then File → New Screen Recording. The core functionality is the same.
Ready to go beyond the basics? Screen Charm handles system audio, webcam overlay, auto-zoom, and built-in editing — everything the macOS tools lack — in a single app designed for macOS. Start creating better videos today.