Quick answer: Press ⌘ Command + Shift + 5 to open the macOS Screen Recording toolbar. Choose to record the full screen or a selected area, then click Record. Press ⌘ Command + Control + Esc (or click the menu bar icon) to stop. Works on macOS Mojave and later.
For polished videos beyond the built-in shortcut, Screen Charm is a Mac screen recorder with webcam recording, system audio, 4K export, and shareable links.
Mac Screen Recording Shortcut Cheatsheet
All the shortcuts you need in one place:
| Action | Shortcut |
|---|---|
| Open Screen Capture Toolbar | Command + Shift + 5 |
| Stop any active recording | Command + Control + Esc |
| Record entire screen | Cmd+Shift+5 → click "Record Entire Screen" → Record |
| Record selected area | Cmd+Shift+5 → click "Record Selected Portion" → drag area → Record |
| Screenshot entire screen | Command + Shift + 3 |
| Screenshot selected area | Command + Shift + 4 |
| Record via QuickTime | Open QuickTime → File → New Screen Recording |
| Change shortcut | System Settings → Keyboard → Keyboard Shortcuts → Screenshots |
The Complete macOS Capture Shortcut Reference
Beyond the two headline shortcuts, macOS has a full set of capture combinations — including modifier keys most users never discover:
| Shortcut | What it does |
|---|---|
| Cmd + Shift + 3 | Screenshot of the entire screen (saved to Desktop) |
| Cmd + Shift + 4 | Screenshot of a selected area (drag to select) |
| Cmd + Shift + 4, then Space | Screenshot of a single window (click the window) |
| Cmd + Shift + 4, then Space, hold Option | Window screenshot without the drop shadow |
| Cmd + Shift + 5 | Open the full capture toolbar (screenshots + recordings) |
| Cmd + Shift + 6 | Screenshot of the Touch Bar (Touch Bar Macs only) |
| Hold Control with any screenshot shortcut | Copy to clipboard instead of saving a file |
| Esc | Cancel a selection or close the toolbar before recording |
| Cmd + Control + Esc | Stop an active screen recording |
Modifier tricks while dragging a selection (works with Cmd+Shift+4 and "Record Selected Portion"):
- Hold Space — move the entire selection box without resizing it
- Hold Shift — lock resizing to one axis (horizontal or vertical only)
- Hold Option — resize from the centre instead of a corner
Sponsored by the makers
Tired of boring screen recordings?
Try Screen Charm.
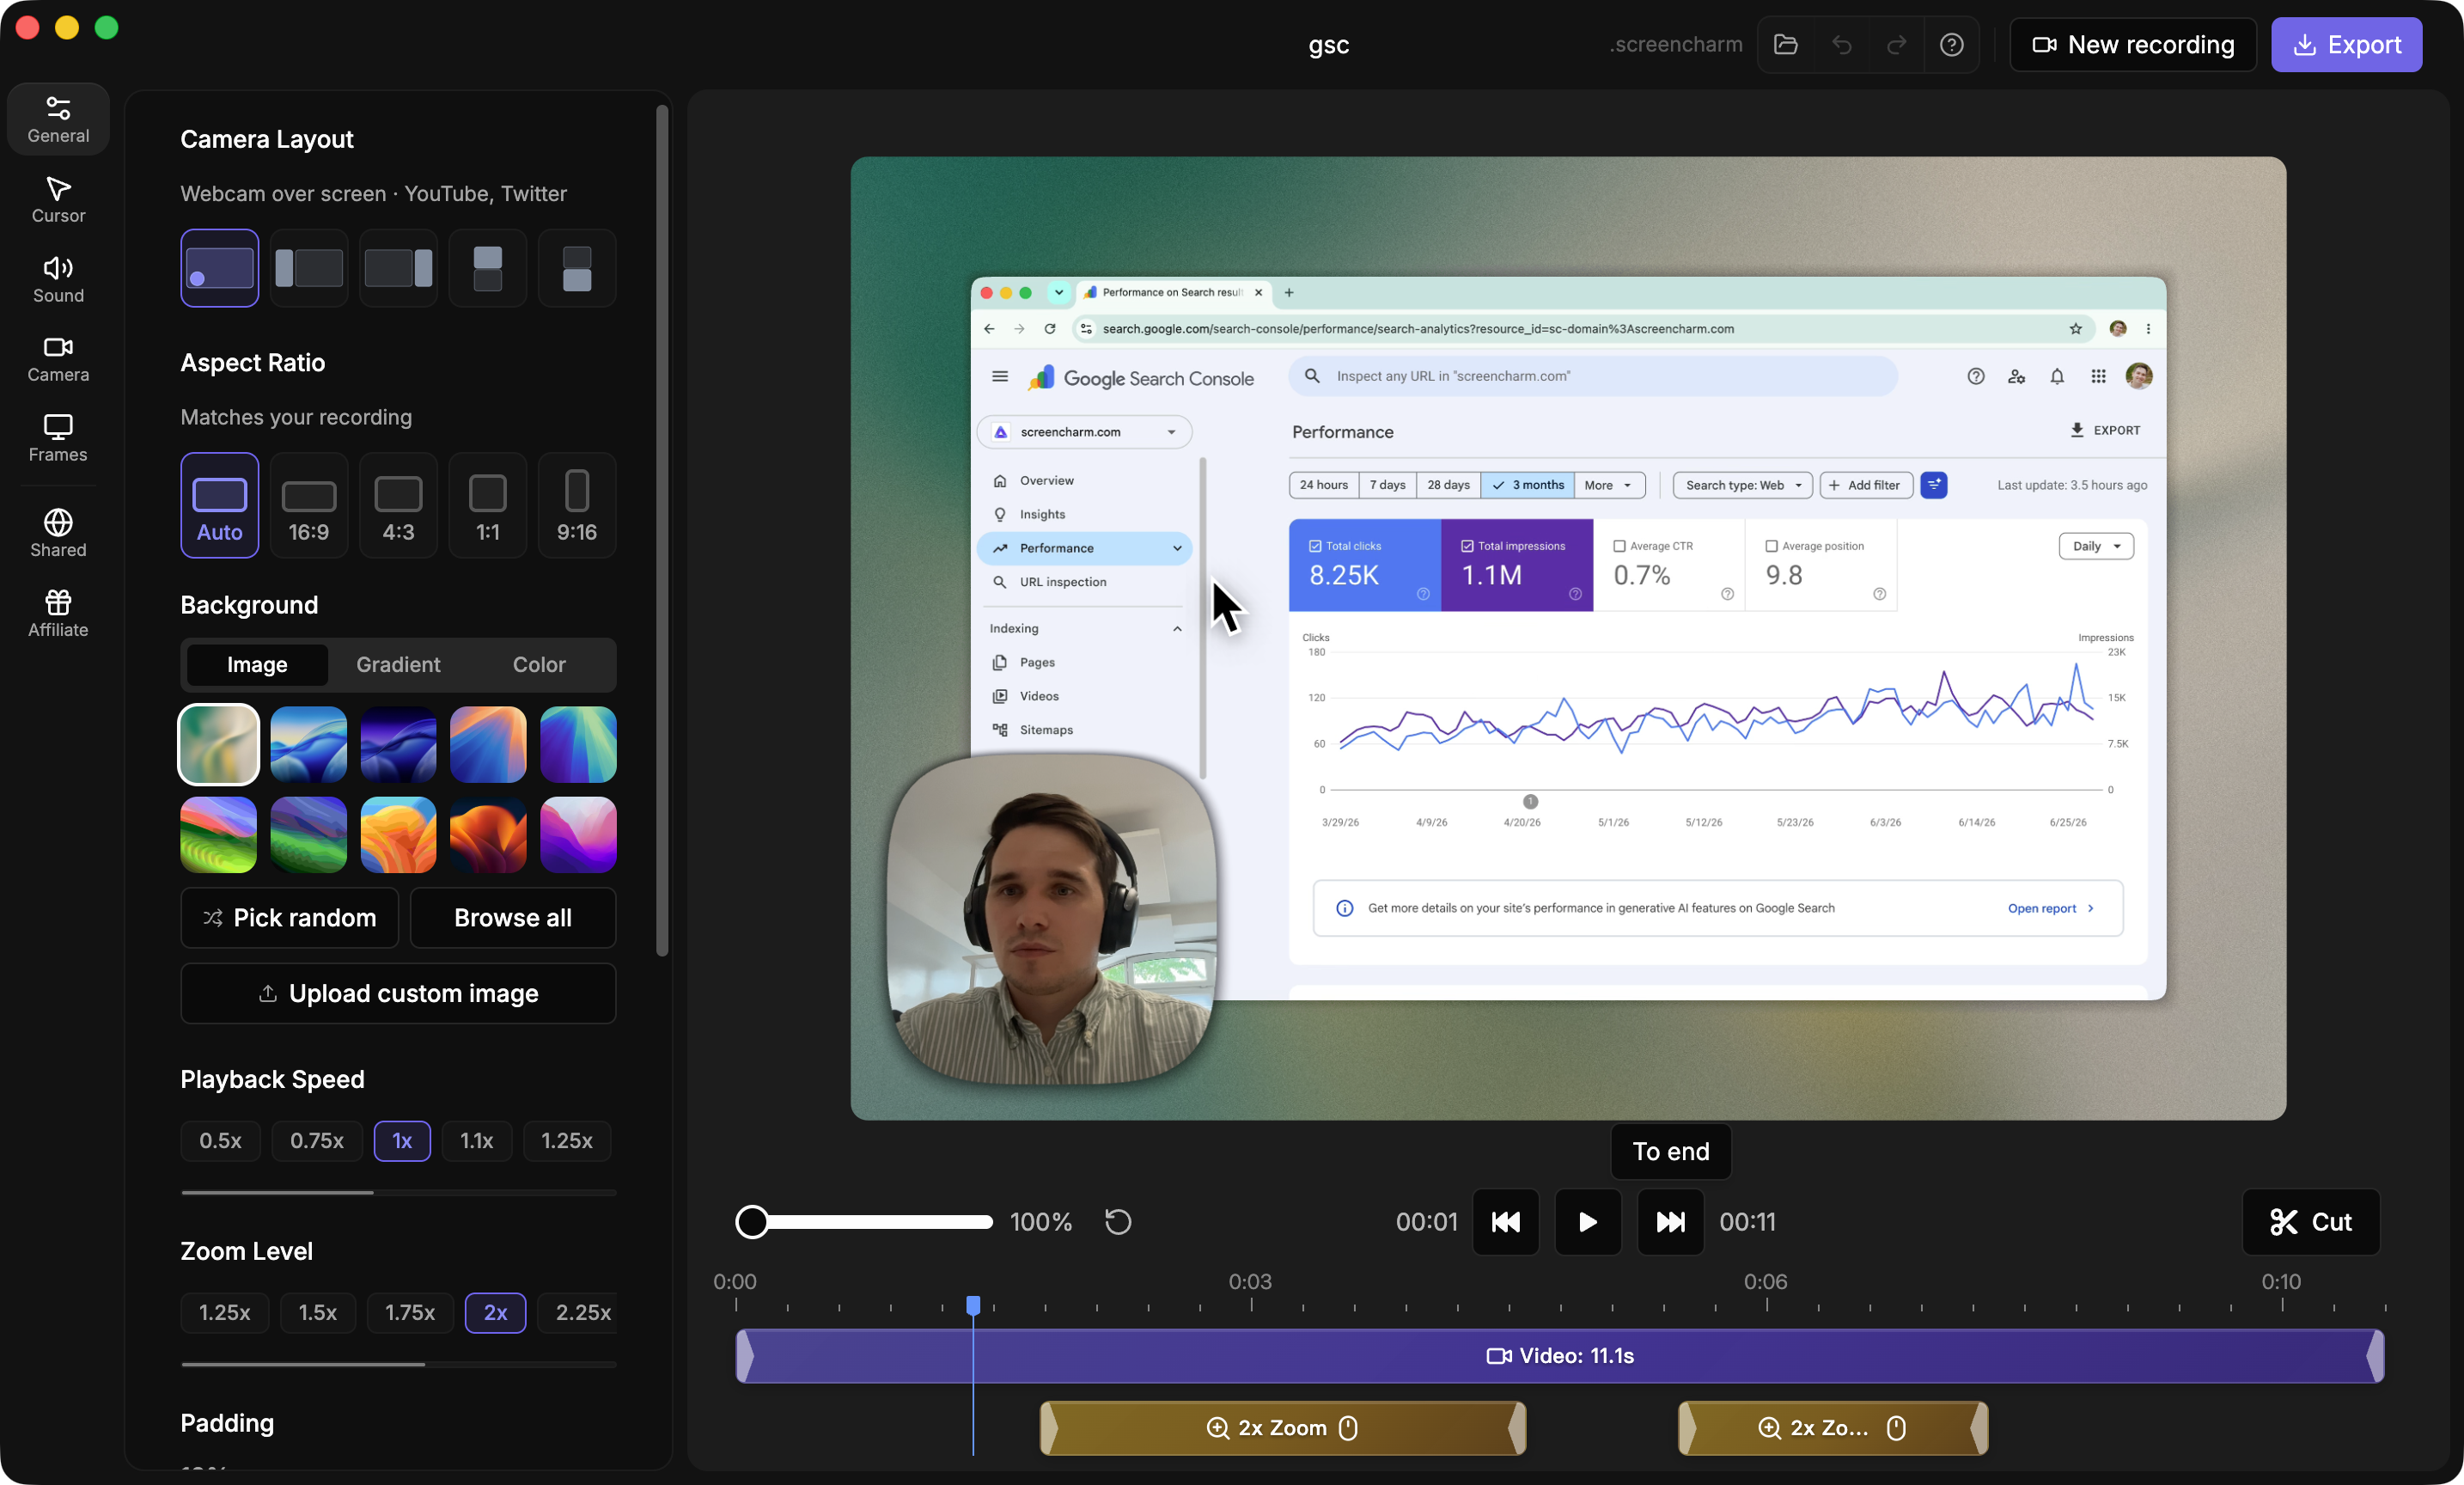
Auto-zoom, motion blur, camera overlay, and background music. All built in. Record once, export a polished video.
See what it doesRelated Mac Recording Guides
- How to screen record on a Mac
- Fix Mac screen recording no sound
- Record system audio on Mac
- Fix Mac screen recording not working
- Record screen and webcam together
How the Cmd+Shift+5 Toolbar Works
The quickest way to start a screen recording on your Mac is Command + Shift + 5. This opens a small floating toolbar at the bottom of your screen with all capture options in one place — no QuickTime required.
For video, focus on two icons:
- Record Entire Screen: Captures your full desktop, including the menu bar and Dock. Perfect for full software walkthroughs.
- Record Selected Portion: Lets you drag a box to record a specific area — ideal for focused demos that cut out desktop clutter.
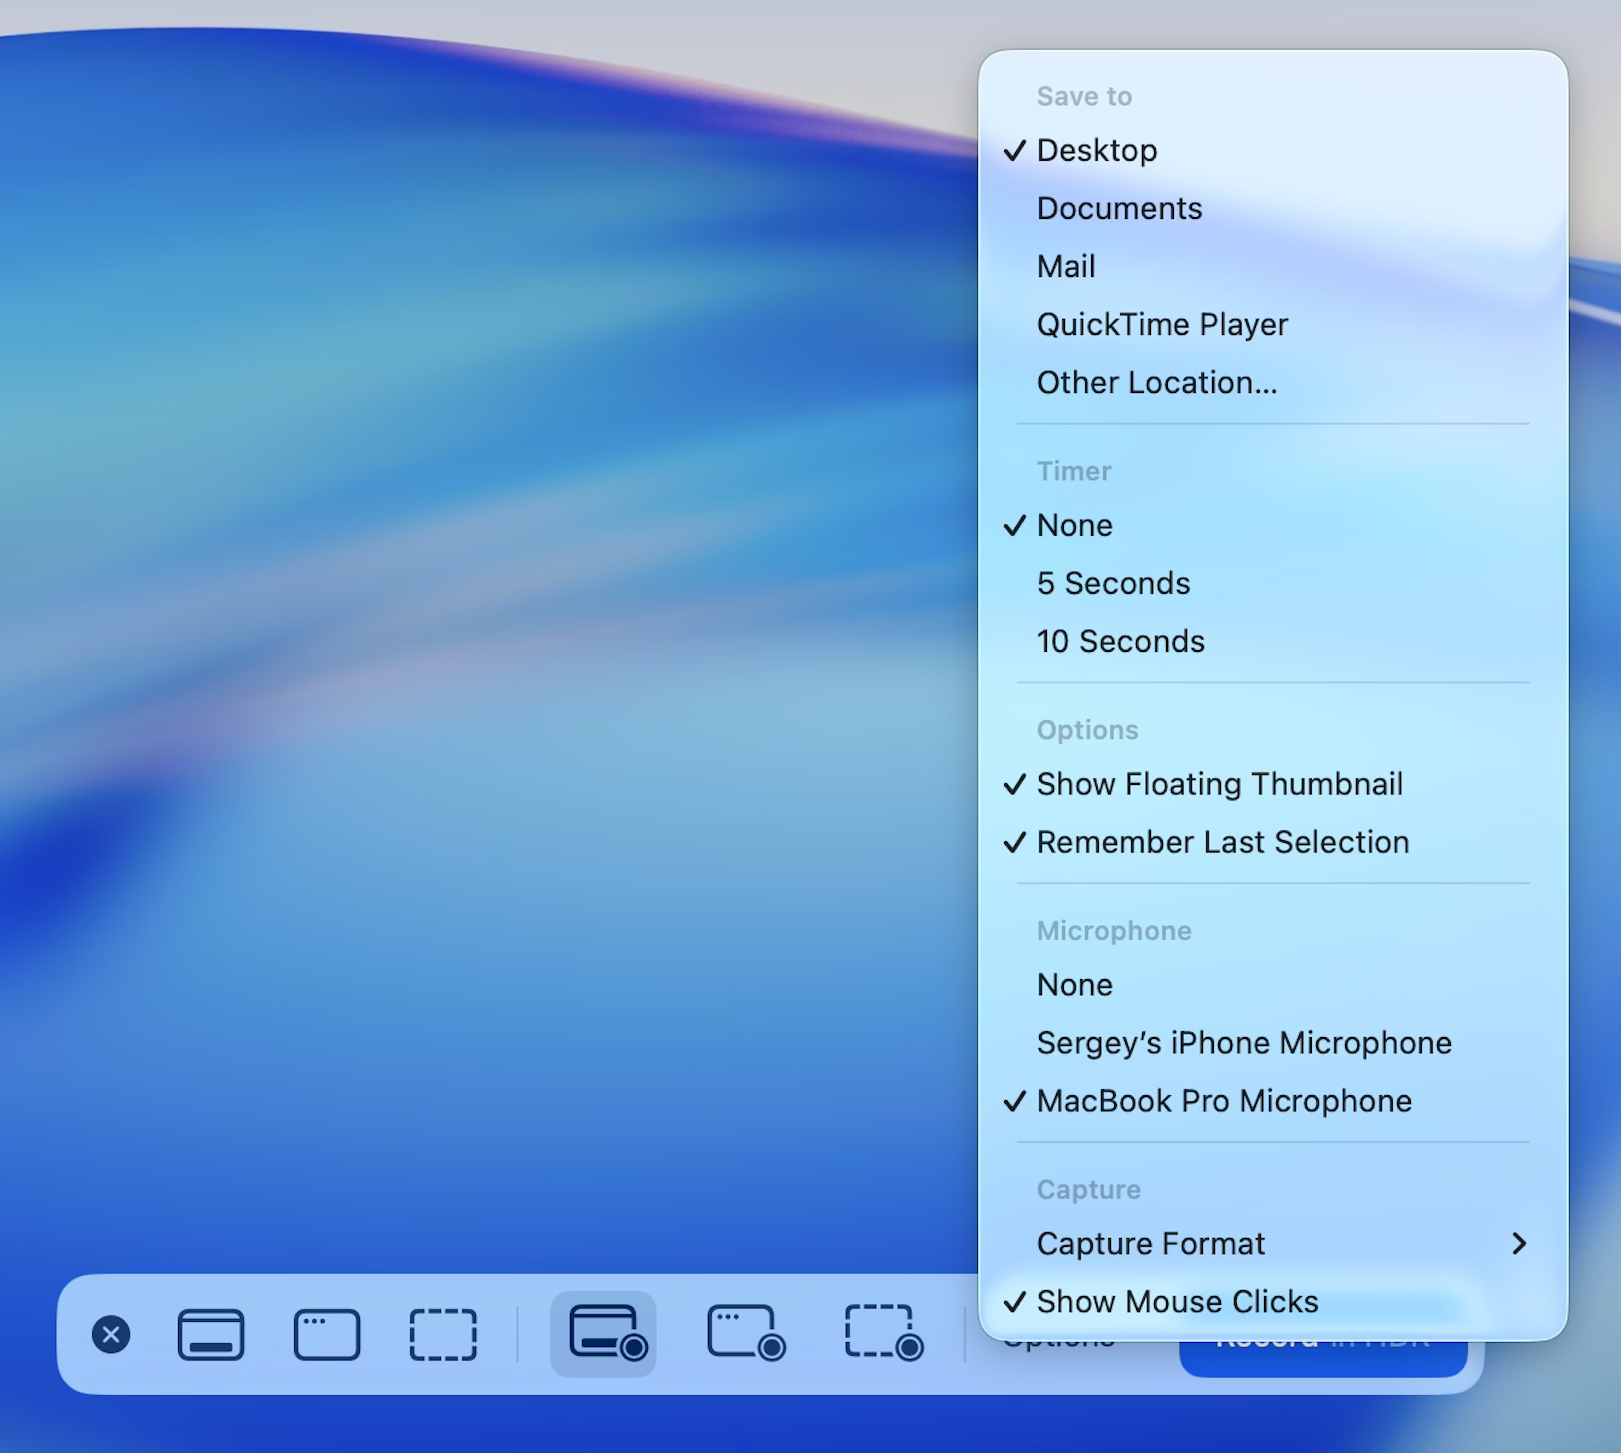
The toolbar also has an Options menu where you can:
- Select a microphone (defaults to None — audio won't record unless you change this)
- Set a save location (defaults to Desktop)
- Set a 5 or 10-second countdown timer before recording starts
Once you've got these down, you can start, manage, and stop recordings without taking your hands off the keyboard.
Customizing Your Recordings with the Capture Toolbar
Okay, so you've nailed the Command + Shift + 5 shortcut. That's your key to unlocking the screen recording controls, but the real power lies in the little toolbar that pops up. This is where you go from a quick-and-dirty capture to a polished, professional video without ever leaving macOS.
Think of it this way: "Record Entire Screen" is perfect when you need to give a full tour of a new software build, showing how everything interacts. On the other hand, "Record Selected Portion" is your go-to for focusing on a single, specific detail—like demonstrating a new button in an app—and cutting out all the clutter.
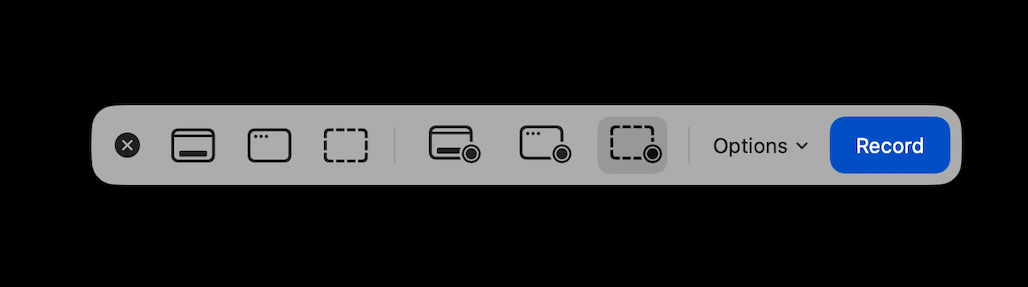
This is what that simple, powerful interface looks like the moment you activate it.
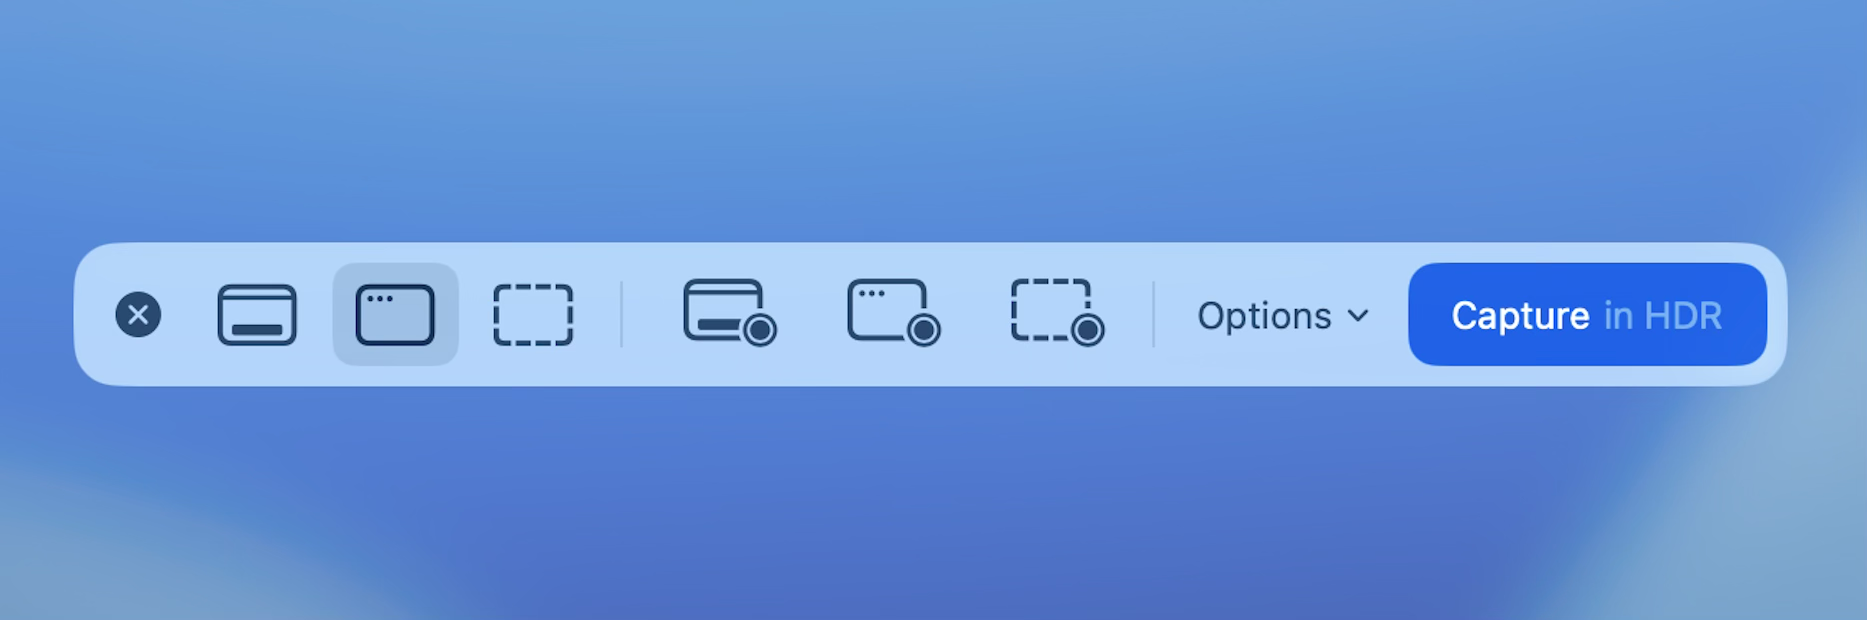
It's a quick, direct path from your keyboard right into a surprisingly robust set of tools.
Diving Into the Options Menu
This is where you'll find the settings that truly elevate your screen recordings. The "Options" menu is your command center for getting the little details just right, and honestly, it's these details that make a huge difference in the final quality.
Here's what you'll want to get familiar with:
- Microphone Selection: Don't settle for muffled audio. You can switch from the built-in mic to a better external one right here. This is crucial for creating tutorials that are actually easy to follow.
- Save Location: By default, everything gets dumped onto your Desktop, which can get messy fast. I always change this to a dedicated "Recordings" folder to keep my projects organized from the start.
- Timer: The 5 or 10-second countdown is a lifesaver. It gives you just enough time to get your windows arranged, hide any distracting notifications, and place your cursor exactly where you want to start.
I've found that these native macOS features are more than enough for about 90% of my needs. Most Mac users I know feel the same—we only really look for third-party apps when we need complex, multi-track video editing.
Mastering these options gives you an incredible amount of control. Taking two seconds to set the right save location and use the timer are small habits that will save you a ton of cleanup work later on.
If you find yourself needing to capture tricky UI elements or want more post-recording flexibility, you might eventually explore a dedicated video screen grabber for Mac. But getting comfortable with these built-in settings is the perfect foundation for creating fantastic screen recordings.
Advanced Tricks for Better Mac Screen Recordings
Knowing the basic shortcut is a great start, but macOS has a few more tricks up its sleeve. You can actually create a much more polished video without ever leaving the built-in tools or opening a separate editor. Let's dive into some of my favorite under-the-radar features.
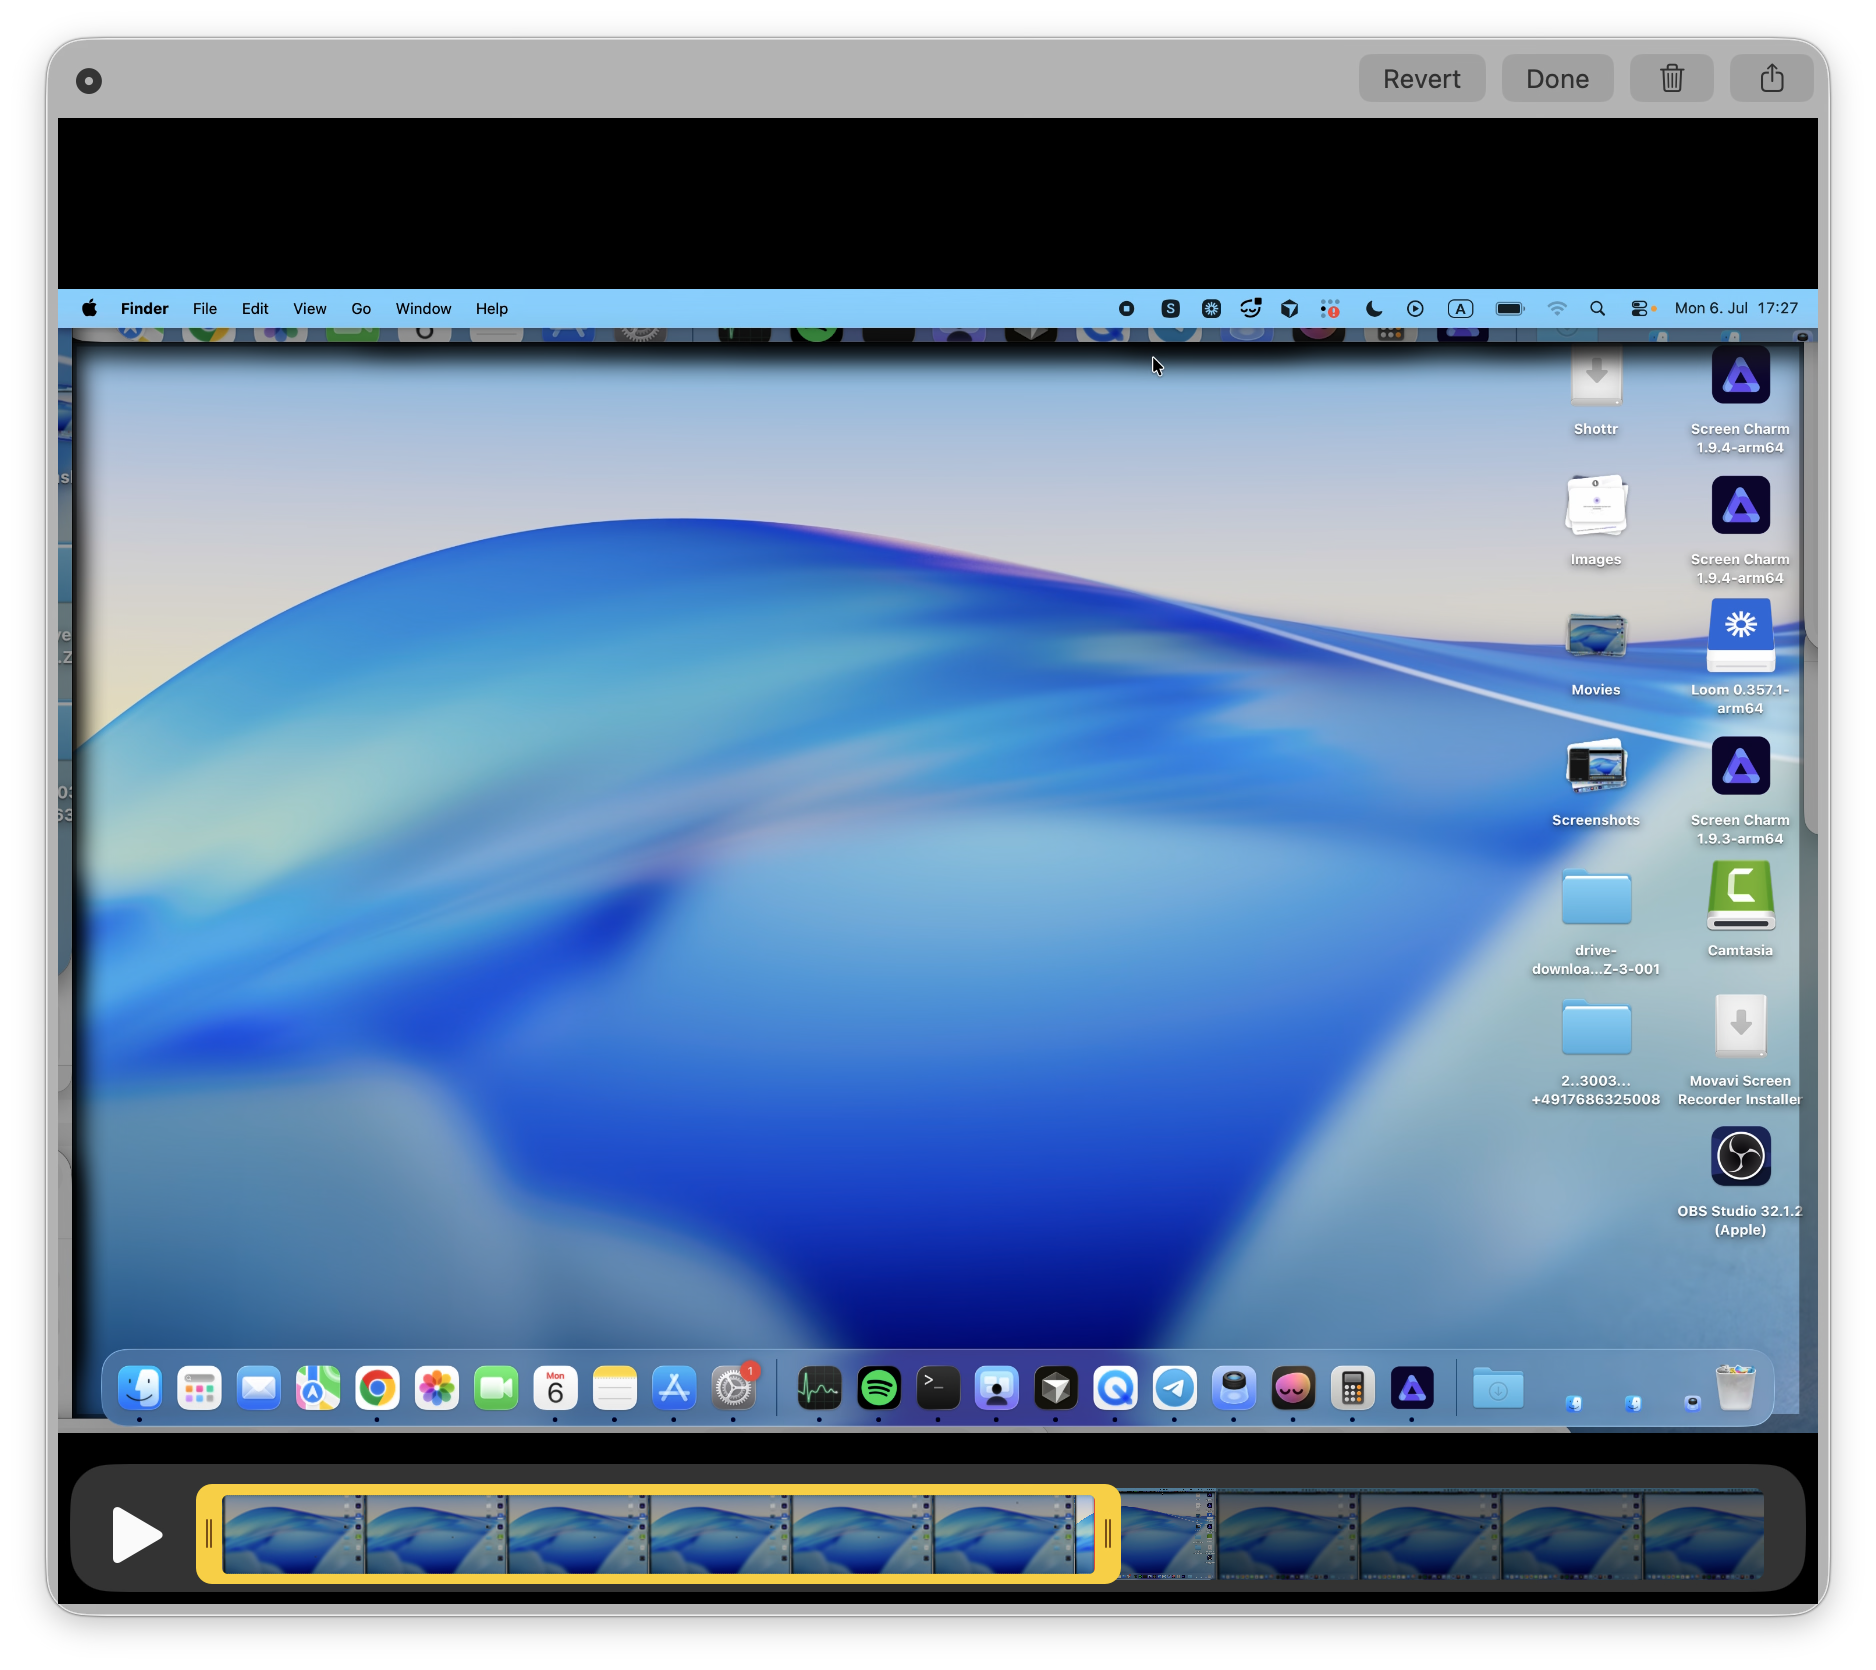
One of the best-kept secrets is the instant trim tool. As soon as you stop your recording, a little thumbnail preview pops up in the corner of your screen. Most people just let it disappear, but if you click it, you'll get a simple editing window. From here, you can just drag the handles to snip off that awkward silence at the beginning or the fumbling to hit "stop" at the end. It's a lifesaver.
Going Beyond the Shortcut with QuickTime Player
While Command + Shift + 5 is your quickest option, firing up QuickTime Player directly gives you a few extra powers. Just open it from your Applications folder, then go to File > New Screen Recording.
This is where you find a feature you can't get anywhere else natively: showing your mouse clicks. In the little options menu next to the record button, you'll see "Show Mouse Clicks." This is a game-changer for creating tutorials because it puts a visual circle around your cursor every time you click, making it crystal clear what you're doing.
Capturing System Audio and Voice Together
Here's a common frustration: recording your computer's audio—like a video playing or an app notification—at the same time as your own voice. The built-in macOS screen recorder can grab audio from your microphone, but it won't capture system sounds.
There are some complicated workarounds for this, but if you need a reliable way to capture both, it's worth exploring dedicated tools. We actually have a whole guide on how to set up a screen recorder with voice and system audio if you want to go deeper.
The key takeaway is that the built-in tools are surprisingly robust. Using QuickTime for visible clicks and the thumbnail for quick trims are pro-level moves that require zero extra software.
Once you've mastered the Mac's screen recording shortcuts, you'll be able to create much clearer and more professional videos straight from your desktop.
Recording Your Screen with Privacy in Mind
When you hit record on your Mac, you're capturing more than just the app you're focused on. Think about it—you might be unintentionally broadcasting personal notifications, a dozen open browser tabs, or sensitive files lingering on your desktop. Keeping privacy in mind isn't just about security; it's about producing a clean, professional-looking video.
Thankfully, starting with macOS Mojave, Apple baked in some solid privacy protections. Any app wanting to record your screen has to get your explicit permission first. Plus, a small icon always appears in your menu bar during a recording, so you're never caught off-guard.
This transparency is a great start, but creating a truly polished recording comes down to prepping your digital workspace before you even think about pressing record.
Pre-Recording Privacy Checklist
Before you use the screen record mac shortcut, I always recommend running through this quick checklist. It only takes a second but can save you from an embarrassing re-shoot or accidentally leaking private info.
- Flip on Do Not Disturb: This is non-negotiable. It stops notifications from iMessage, Slack, or Mail from popping up and ruining your take.
- Close Unrelated Apps and Tabs: Keep only what's absolutely essential for your video open. This not only prevents distractions but also protects the privacy of whatever else you were working on.
- Tidy Up Your Desktop: A cluttered desktop is just distracting. You can quickly drag everything into a temporary folder before recording.
Taking a minute to do this ensures your final video is focused and professional. It shows respect for your viewer's attention by cutting out all the visual noise.
Solving Common Screen Recording Problems on Mac
Even the best tools hit a snag now and then. It's incredibly frustrating when your screen record mac shortcut suddenly stops working, especially when you're on a tight deadline. But don't worry—most of these issues are surprisingly simple to fix.
More often than not, the problem isn't some deep-seated bug. It's usually a simple setting that's been accidentally toggled or overlooked.
No Audio in Your Recording
This is the classic one. You finish a perfect take, play it back, and… silence. This almost always comes down to the wrong microphone being selected or a permissions issue.
Before you even hit record, bring up the toolbar with Command + Shift + 5. From there, click on the "Options" menu and look under the Microphone section. You need to make sure your intended microphone is actually selected, not "None." It's an easy thing to miss.
If you've selected the right mic but still get nothing, it's almost certainly a permissions problem. Here's how to check on macOS:
- Open up your System Settings.
- Head over to Privacy & Security and then click on Microphone.
- You'll see a list of apps. Just make sure the toggle is on for the app you're using, like "Screenshot" or "QuickTime Player."
A quick permissions check can save you the major headache of having to re-record a whole session. I've learned to make it a habit before any important recording.
When the Shortcut Doesn't Work
So you're hitting Command + Shift + 5, and absolutely nothing happens. What gives? This usually means another application or a custom keyboard mapping is interfering with the default macOS shortcut.
You can sort this out pretty quickly. Just go to System Settings > Keyboard > Keyboard Shortcuts and then click on Screenshots. You'll see all the default commands for screen captures. Ensure the boxes next to them are checked and that the commands haven't been accidentally changed. If they have, you can easily restore the defaults right from this screen.

And one last tip: if you've finished a recording but can't find the file, don't panic. Just use Spotlight (Command + Spacebar) and search for "Screen Recording." It's a lifesaver for finding files that got saved to an unexpected corner of your hard drive.
The Recording Won't Stop
Occasionally the stop icon in the menu bar disappears or Cmd + Control + Esc doesn't respond. Try these in order:
- Press Cmd + Shift + 5 again — the toolbar reappears with a Stop button
- Check the menu bar carefully; on Macs with a notch, the stop icon can be hidden behind it — quit an app with many menu bar icons to make room
- As a last resort, open Activity Monitor, search for
screencapture, and quit the process. The recording up to that point is usually saved
The Screen Recording Is a Black Rectangle
If a specific app or video appears black in your recording, that content is protected by DRM. Streaming services (Netflix, Apple TV+, Disney+) block screen capture at the system level — no recorder can bypass it, and that's intentional. Browser windows playing DRM content record as black even though everything looks normal live.
If the entire recording is black, it's a permissions issue instead: System Settings → Privacy & Security → Screen & System Audio Recording, toggle the recording app on, and restart the app. More fixes in Mac screen recording not working.
Recording Stops By Itself or Drops Frames
Long recordings that stop unexpectedly usually mean disk space ran out — macOS recordings are large (roughly 1–2 GB per 10 minutes at Retina resolution). Check free space before long sessions, and point the save location at a drive with room to spare. Dropped frames on older Macs improve if you close browser tabs and record a selected portion instead of the full screen.
Where Recordings Are Saved (and How to Change It)
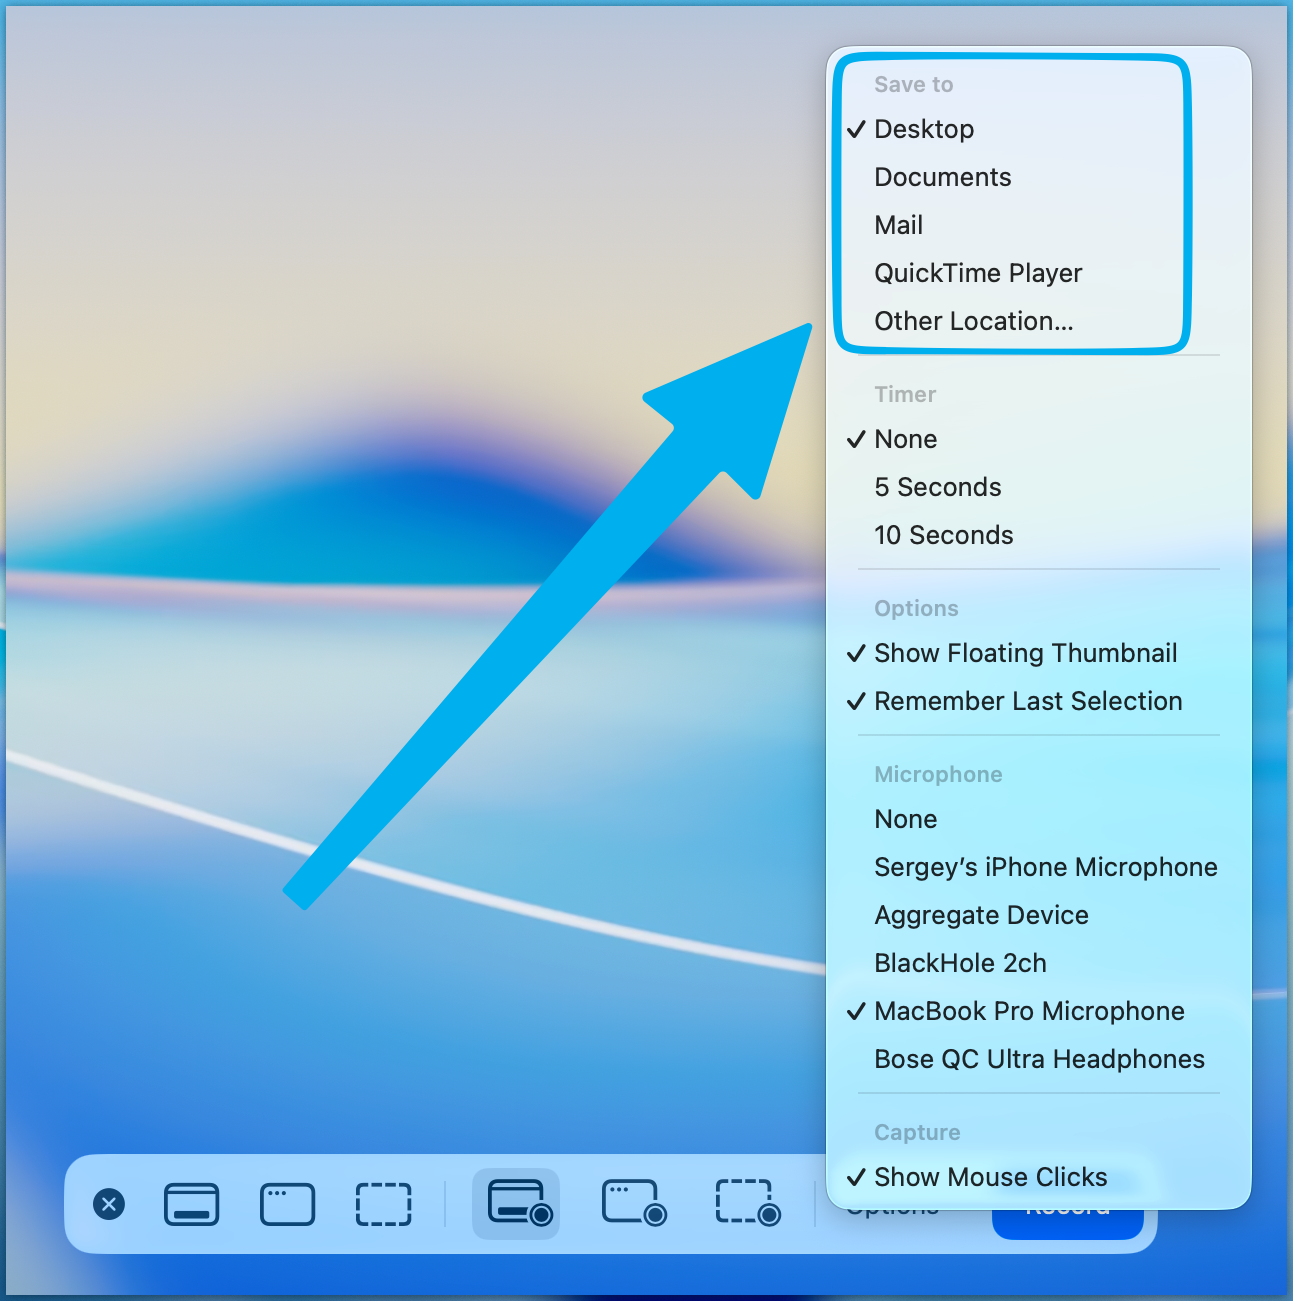
By default, screen recordings save to the Desktop as .mov files named "Screen Recording [date] at [time].mov". Two ways to change this:
- Toolbar Options menu: press Cmd + Shift + 5 → Options → Save to and pick Documents, Clipboard, Mail, Messages, or Other Location for a custom folder.
- Terminal (applies to screenshots and recordings):
defaults write com.apple.screencapture location ~/Recordings
killall SystemUIServer
The Options menu remembers your choice, so this is a one-time change. If recordings ever seem to vanish, check the Options menu first — a past selection of a custom folder is the usual culprit.
Got Questions? Let's Clear Things Up
How Do I Stop a Recording on the Fly?
The quickest way to end a screen recording is with the keyboard shortcut: Command + Control + Esc. Think of it as the universal "stop" button for any screen capture on your Mac.
If you prefer using your mouse, you'll also see a small, circular stop icon appear in the menu bar at the very top of your screen. A simple click on that will end the recording instantly.
Can I Change the Default Command + Shift + 5 Shortcut?
Absolutely. If Command + Shift + 5 is already being used by another app or you just find it awkward, you can set a new one.
Head over to System Settings > Keyboard > Keyboard Shortcuts, then click on Screenshots. From there, you can double-click the existing shortcut for screen capture and type in your new preferred combination. Just be mindful not to pick one that's already in use by another essential macOS function.
My Video Files Are Huge. What Can I Do?
This is a common one. By default, macOS records in high quality, which means big files, especially for longer videos. Thankfully, you have a couple of easy ways to shrink them down.
- Export at a lower resolution: Open your finished recording in QuickTime Player, then go to
File > Export As. Just choosing a lower setting like 720p can dramatically cut down the file size without a huge loss in clarity. - Trim the fat: Right after you finish recording, a thumbnail of the video appears. Click it. This opens a simple editor where you can immediately trim any dead air or mistakes from the beginning and end.
Managing your file size is a crucial step, especially if you're getting into creating polished tutorials. It's a big part of learning how to make tutorial videos that are easy for people to watch and download.
Why is my screen recording shortcut not working?
If Cmd+Shift+5 does nothing, another app has likely taken over that keyboard shortcut. Go to System Settings → Keyboard → Keyboard Shortcuts → Screenshots and verify the shortcut is still assigned and checked. Restore defaults if it has been changed.
Can I screen record with audio using Cmd+Shift+5?
Yes — microphone audio only. Press Cmd+Shift+5, click Options, and select your microphone. System audio (sounds from apps and videos) cannot be captured with the built-in tools. For system audio you need a dedicated app like Screen Charm or a virtual audio driver like BlackHole.
What is the shortcut to stop screen recording on Mac?
Command + Control + Esc stops any active recording. You can also click the stop icon that appears in the menu bar during a recording.
Is there a time limit on Mac screen recordings?
No — the built-in recorder has no time limit. The practical limit is disk space: expect roughly 1–2 GB per 10 minutes at Retina resolution. For multi-hour recordings, check free space first and consider pointing the save location at an external drive.
Can I record just one window with the shortcut?
Not directly — the Cmd+Shift+5 toolbar offers full screen or a dragged region, not a window-snapped recording. The workaround is "Record Selected Portion" dragged tightly around the window. (Window-snapped screenshots do exist: Cmd+Shift+4 then Space.) Dedicated recorders like Screen Charm offer true window recording that follows the window even if you move it.
What format does Cmd+Shift+5 record in, and can I get MP4?
The built-in recorder saves .mov files (H.264). Most platforms accept MOV, but if you need MP4, open the recording in QuickTime and use File → Export As
Does Cmd+Shift+5 work on all Macs?
The toolbar requires macOS Mojave (10.14) or later — every Mac from 2012 onwards that's been updated has it. On older systems, use QuickTime Player → File → New Screen Recording, which has existed since OS X 10.6.
Ready to create stunning, professional-looking product demos and tutorials without the steep learning curve? Screen Charm simplifies the entire process with intelligent auto-zoom, customizable cursors, and an integrated editor, all designed for macOS. Get your one-time license and start producing captivating videos today at https://screencharm.com.