Learning how to trim a video on your Mac is surprisingly easy, mainly because macOS comes equipped with great, free tools built right in. For most basic edits, like chopping off the beginning or end of a clip, apps like QuickTime Player and Photos are often all you need to get a polished, shareable video in minutes. If you don't want to download anything, our free browser video trimmer lets you trim MP4, MOV, and WebM files instantly — no upload, no install.
Why Mastering Video Trimming on a Mac Matters
If you're creating any kind of video content on your Mac—a product demo for your team, a tutorial for your students, or a quick clip for social media—clean edits are non-negotiable. A well-trimmed video cuts right to the point, removes the fumbles and dead air, and keeps your audience hooked. It's the difference between a video that looks professional and one that feels like a rough draft.
This guide skips the fluff and gets straight to the practical side of things. We'll walk through the tools that come standard with macOS and also look at a more integrated workflow that can save you a ton of time and headaches.
Choosing the Right Tool for the Task
Not every trim is the same. Snipping out the first few seconds of a screen recording is a world away from meticulously removing every "um" and "ah" from a long tutorial. Knowing which macOS tool to reach for is the secret to a faster, less frustrating editing process.
Here’s a quick rundown of your best options on macOS:
- QuickTime Player: Perfect for incredibly fast, no-fuss trims of the start and end of a video.
- Photos App: Super convenient for quick edits on videos you've already imported from your iPhone or camera.
- iMovie: Your go-to when you need more control, like cutting out sections from the middle of a clip.
- Screen Charm: A purpose-built macOS tool for creators who need to record, trim, and polish in one seamless workflow.
The goal isn't just to cut your video; it's to refine your message. The right tool makes that process intuitive, letting you focus on the story you're telling instead of getting bogged down in the software.
To make the choice even clearer, let's break down how these Mac-native tools stack up.
Mac Video Trimming Tools at a Glance
Deciding which app to open can feel like a toss-up, but each has its own sweet spot. This table gives you a quick overview to help you pick the right one for your specific project on your Mac.
| Tool | Best For | Key Strengths |
|---|---|---|
| QuickTime Player | Quick, simple start/end trims | Already on your Mac; no import needed |
| Photos App | Editing videos in your library | Integrated with your iCloud Photo Library |
| iMovie | Removing middle sections | More timeline control; project-based |
| Screen Charm | Demos & tutorials | Integrated record-and-edit workflow |
By matching the tool to the task, you’ll make your video editing process on macOS a whole lot smoother right from the start.
Your Mac’s Built-In Tools for Quick and Easy Trims
Believe it or not, your Mac comes loaded with some fantastic, no-fuss tools for basic video editing. You don’t need to download a thing to make a quick, clean cut. These built-in macOS apps are perfect for those simple jobs, like snipping out the awkward silence at the beginning of a recording or the fumbling to turn the camera off at the end.
We'll walk through the two best options for this: QuickTime Player and the Photos app.
The need for simple, fast editing is exploding. It's not just for professional filmmakers anymore. The global video editing market is on track to hit $3.54 billion by 2025 and is projected to swell to $4.78 billion by 2030. Think about it: with over 500 million hours of content watched on YouTube every single day, everyone from teachers to customer support reps is creating video. They all need efficient ways to make their content look polished without a steep learning curve.
Using QuickTime Player for Lightning-Fast Edits
When you need a video trimmed in seconds, QuickTime Player is your best friend. It’s probably the most straightforward way to trim a video on your Mac. There’s no complicated timeline or annoying import process—just open the file and you’re ready to go.
Open your video, then hit Command + T. This macOS keyboard shortcut instantly brings up the trimming bar at the bottom. You’ll see the timeline wrapped in a yellow frame. From here, just drag the handles on either end to highlight the exact part of the video you want to keep. Everything outside that yellow box gets cut.
When you've got it just right, click the "Trim" button. Now, you have a couple of choices for saving, and it's good to know the difference:
- Save As (Command + Shift + S): This is my go-to. It creates a brand-new file with your changes, so your original video remains safe and untouched. It's the safest bet.
- Export (Command + E): Choose this if you need more control. It lets you pick the final resolution and format, which is super helpful for shrinking the file size before you email it or upload it somewhere.
Trimming Videos in the Photos App
Don't sleep on the Photos app! It’s another great tool hiding in plain sight on your Mac, and it’s especially handy for videos you’ve synced from your iPhone via iCloud. Your clips are already there, so you can jump right into editing without having to hunt for the file first.
Just find the video you want to work on and double-click to open it. Look for the "Edit" button in the top-right corner and click it. This will bring up a simple editing timeline at the bottom, which looks and works a lot like the one in QuickTime. Grab the yellow handles, drag them to your desired start and end points, and you're done.
The best part about using the Photos app is that its edits are non-destructive. If you trim too much or just change your mind, you can always go back into edit mode and hit "Revert to Original." Your original video is never lost.
This makes it a perfect fit for a simple video editing for mac workflow. It lets you make quick fixes without the headache of a full-blown editing program. Plus, you can share your freshly trimmed video directly from the Photos app.
Sponsored by the makers
Tired of boring screen recordings?
Try Screen Charm.
Auto-zoom, motion blur, camera overlay, and background music. All built in. Record once, export a polished video.
See what it doesMaking Precise Cuts with iMovie
When a simple trim at the beginning or end of your video just won't cut it, it's time to open iMovie. Think of it as the next level up from QuickTime. It’s the free, surprisingly powerful video editor that’s already on your Mac, and it’s perfect for when you need to remove a mistake from the middle of a clip.
Unlike the drag-and-drop simplicity of QuickTime, iMovie has a more professional feel. You’ll start by creating a new project and importing your video. This drops the clip into a timeline at the bottom of the screen, which is your new editing playground.
Navigating and Splitting Clips
The iMovie timeline gives you a much better view of what you're working with, complete with an audio waveform so you can see where you paused or coughed. To pinpoint the exact spot for a cut, you'll use the skimmer—that vertical red line that follows your mouse. It lets you scrub through your footage and find the perfect frame without constantly hitting play and pause.
Found the spot? Great. Now you split the clip. This is the core technique for surgically removing mistakes.
- Move the skimmer to the exact frame where you want to make the cut.
- Hit Command + B on your keyboard.
- Just like that, your clip is sliced into two separate parts.
To get rid of an unwanted section in the middle, just split the clip at the beginning of the mistake and again at the end of it. This isolates the bad take. Now you can just click on that middle piece and hit the Delete key. Poof, it’s gone, and the remaining clips snap together perfectly.
This is a lifesaver for anyone recording tutorials or product demos on their Mac. Did a notification pop up? Did you stumble over a word? No problem. Just snip it out. You’re no longer stuck with only being able to clean up the start and finish. If you're looking to build on these basics, checking out some video editing tips for beginners can really help you get the hang of it.
Fine-Tuning Your Edits
Splitting isn't the only way to tighten things up in iMovie. You can also drag the edges of a clip for super-precise trimming. Just hover your cursor over the beginning or end of any clip in your timeline, and it will change into a trim icon.
Click and drag inward to shorten the clip, or drag outward to bring back footage you might have cut. This is how you can get the timing of your edits just right, down to the very last frame, giving your video a much more professional and polished flow.
A Faster Editing Workflow with Screen Charm
If you’ve ever created a product demo or tutorial on your Mac, you know the drill. Record your screen, export a massive file, drag it into a video editor, wait for it to import, and then finally start cutting. It’s a tedious process that kills momentum.
This is where a dedicated macOS tool like Screen Charm completely flips the script. It collapses that entire multi-step headache into a single, fluid motion. The whole point is to keep you in the creative flow.
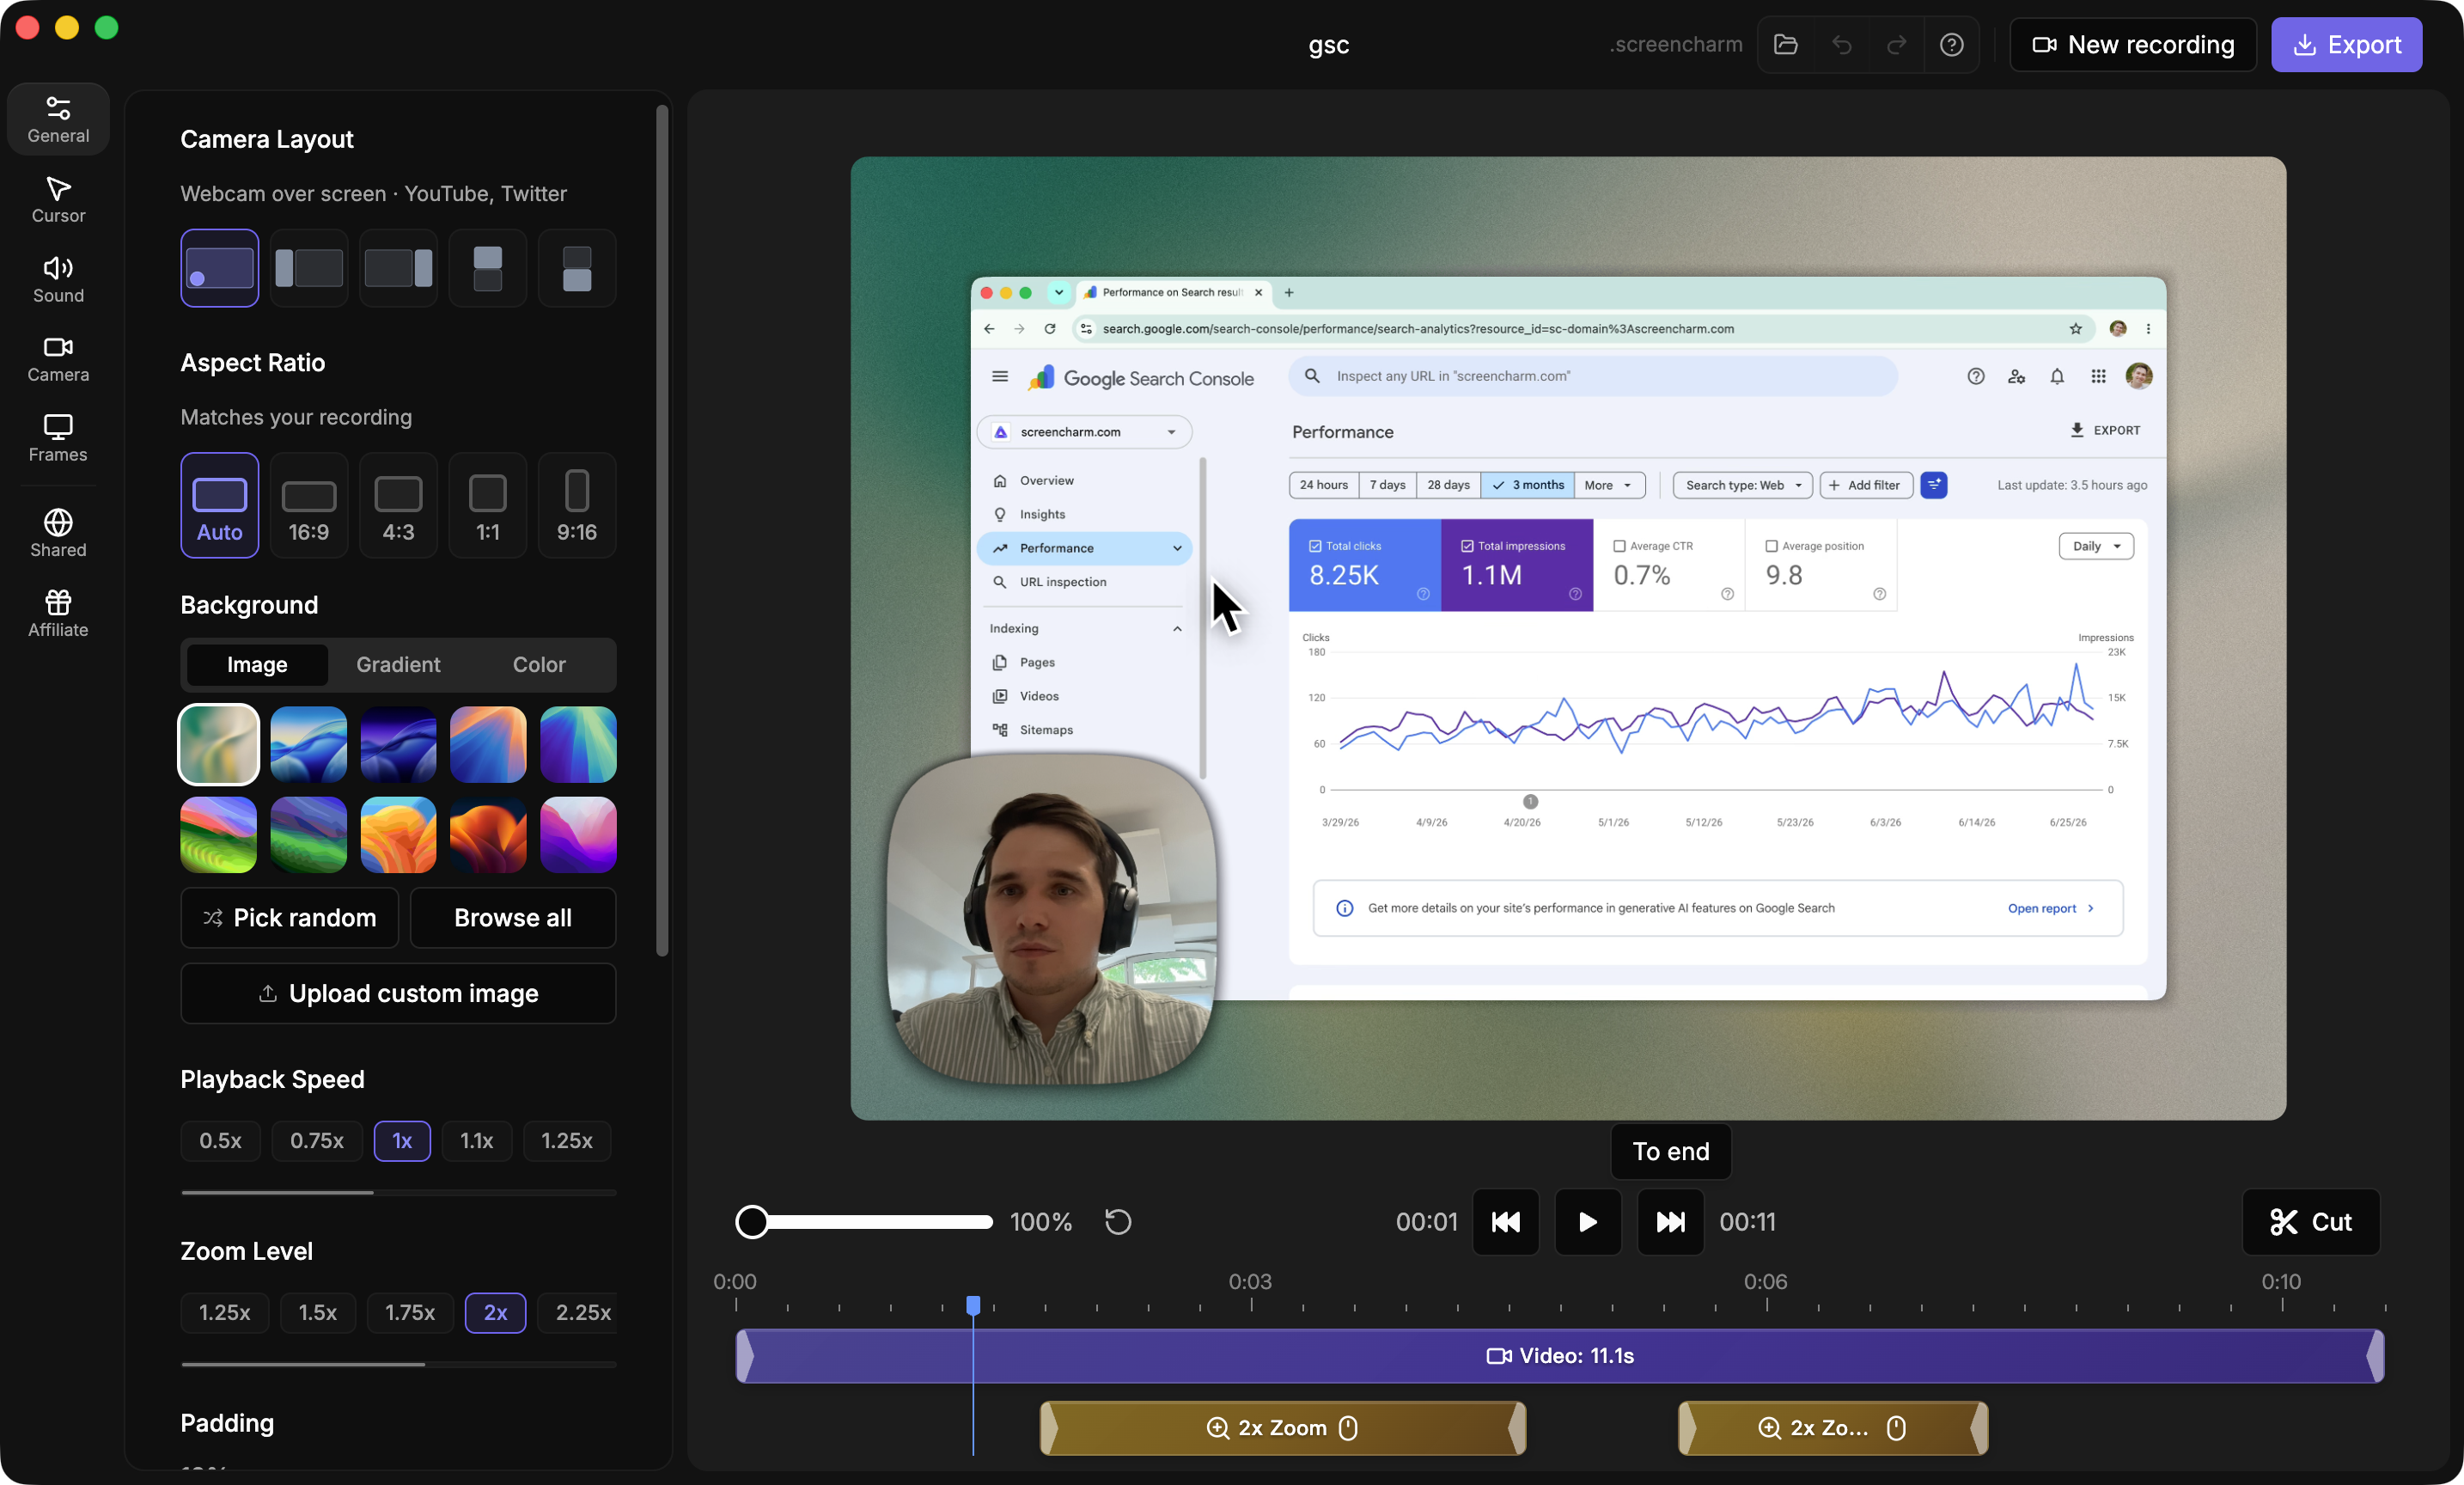
The moment you finish a screen recording, you're not looking at a save dialog—you're looking at an editing timeline with your video already loaded. No exporting, no re-importing, no context switching. You can go from recording to refining in literal seconds.
Trimming Inside the App
With your video ready to go on the timeline, you can immediately start cleaning it up. We all have those moments: the fumbling at the start, the awkward pause where you lost your train of thought, the frantic search for the "stop recording" button at the end. With Screen Charm, you just slice them out.
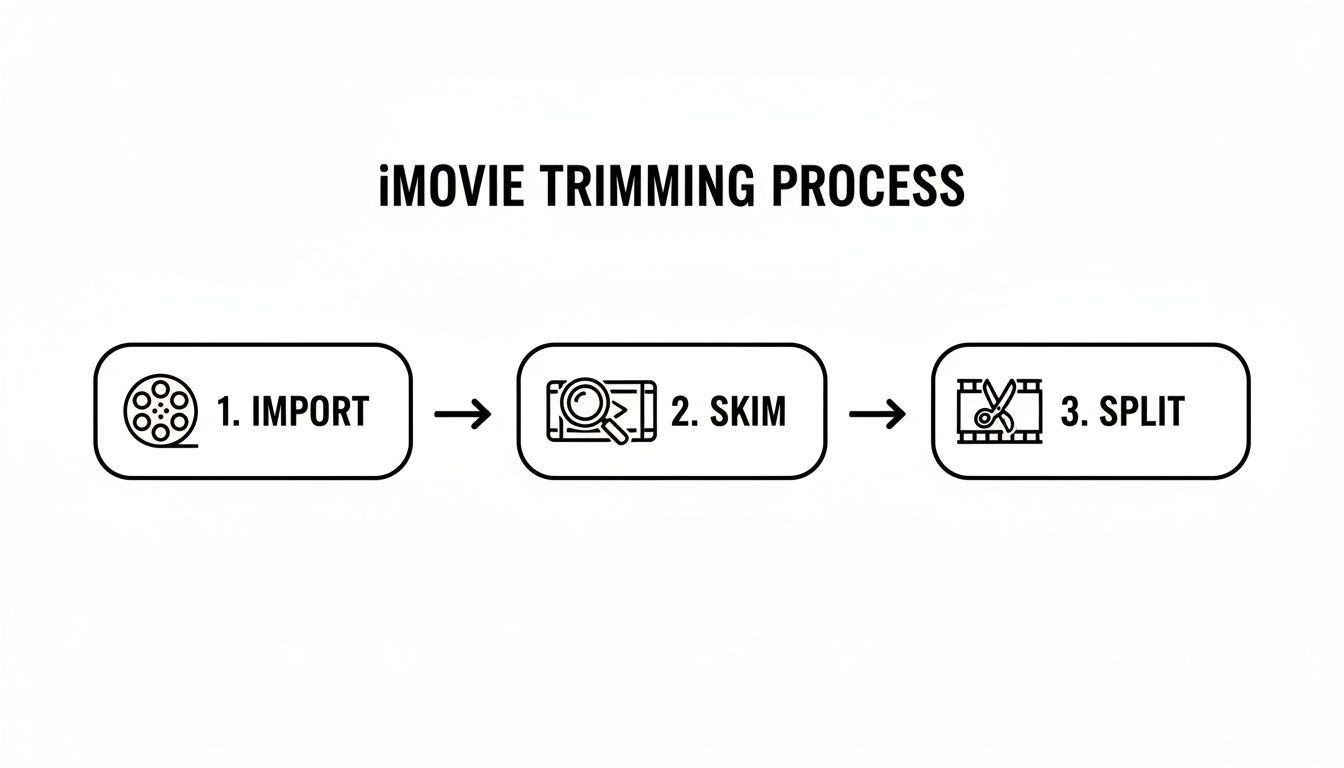
The traditional editing sequence—import, skim, split—is what eats up so much time. Screen Charm’s approach bypasses the import step entirely, dropping you right into the action.
This kind of efficiency is a game-changer. Sure, a powerhouse like Final Cut Pro can do it all, but its $299 price tag and steep learning curve are total overkill for most creators just needing to make a clean demo. (You can see how many professionals rely on it with these insights on Apple's pro software.)
Screen Charm gives you that seamless in-app trimming, plus features like auto-zoom and 4K exports, for a one-time $79 payment. For developers, marketers, or support teams on macOS, this means you can polish an onboarding video or a bug report in minutes, not hours.
Keyboard Shortcuts and Auto-Zoom
To really get into a rapid-fire editing rhythm, you need to get your hands off the mouse. Screen Charm is built for this, with keyboard shortcuts that let you fly through the timeline and make cuts without breaking your focus. A few keystrokes are all it takes to jump between sections, snip out a mistake, and keep moving.
The real magic, though, is when you pair trimming with the app's signature auto-zoom feature. As you're cutting out dead air, you can simultaneously tweak the automatic zoom points.
This means you’re not just shortening the video; you’re directing the viewer’s attention at the same time. Imagine you cut a five-second pause and, in the same motion, tell the video to instantly zoom in on the next important menu item you click. It becomes one smooth, combined action.
This isn’t just about using another tool to trim a video on your Mac. It's about adopting a workflow designed from the ground up to produce polished, professional-looking tutorials and demos in a fraction of the time, without ever getting bogged down by the complexity of traditional video editors.
Pro Tips for Faster and Cleaner Video Edits
Knowing the basic mechanics of trimming a video on your Mac is a great start, but getting fast and clean with your edits is a whole other ballgame. It's about building a few key habits that professional editors use to fly through footage and produce polished final cuts. These aren't complicated tricks, just small shifts in your workflow that make a huge difference.
One of the best things you can do for your editing speed is to master keyboard shortcuts for navigating your timeline. Forget clicking and dragging the playhead. Most macOS editors, from iMovie to the high-end stuff, lean on the classic J, K, and L keys.
- J Key: Tap it once to rewind. Tap it multiple times to rewind faster.
- K Key: This is your play/pause toggle. It lets you stop on a dime.
- L Key: Tap it to fast-forward. Multiple taps will speed things up.
Using the J-K-L combo lets you shuttle back and forth through your video with incredible precision, helping you find the exact frame for a cut without ever taking your hand off the keyboard.
Adopt the Two-Pass Trimming Method
Trying to get every single cut perfect on your first go-around is a recipe for frustration and wasted time. A much more efficient approach is to break the process into two distinct stages.
First, do a rough cut. The only goal here is speed. Blast through the entire video and just chop out the big, obvious mistakes—the long pauses, the moments you had to restart a sentence, or entire sections that just don't work. Don't sweat the small stuff; just get the junk out.
Once you’ve cleared out the major clutter, you can move on to the second pass for fine-tuning. This is where you polish your work. Go back and tighten up the timing between sentences, trim a few extra frames to get the pacing just right, and make sure every cut feels smooth and invisible to the viewer.
Always Leave "Handles" on Your Clips
Here’s a small tip that will save you countless headaches: always leave a little extra footage at the start and end of every clip you trim. In the editing world, we call these "handles," and they're your secret weapon for creating smooth transitions.
If you trim a clip to the exact frame where you start talking, you leave yourself no room to add a dissolve or a fade without it eating into your dialogue. By leaving a second or two of "handle" footage on either side, you give your editing software the material it needs to blend clips together. It also gives you wiggle room to adjust edit points later without having to start from scratch.
A clean visual edit is only half the battle. A truly professional video needs crisp audio to match. Beyond trimming, achieving professional-grade video also means addressing audio imperfections, such as learning how to effectively remove background noise from video.
Practical Scenarios for Clean Edits
Let's put this into practice. Say a notification banner pops up mid-way through your screen recording on your Mac. A simple cut will create a jarring jump. Instead, trim the clip right before the pop-up, and on the next clip, apply a subtle zoom or reposition the frame slightly. This small visual shift masks the cut, makes the transition feel intentional, and keeps your viewer engaged.
Of course, a great edit can be undone by poor export settings. Making sure your final output is flawless is just as critical, a topic we cover in our guide to rendering a video.
Common Questions About Trimming Videos on Mac
Once you start trimming videos on your Mac, you'll probably run into a few common questions. I see them pop up all the time. Getting them sorted out early will save you a ton of headaches and help you pick the right tool for the job from the get-go.
Let's dive into what people usually ask.
Can I Trim the Middle of a Video in QuickTime?
This is easily the most common question. You've recorded a great tutorial on your Mac, but you flubbed a sentence right in the middle. Can you just snip it out with QuickTime?
Unfortunately, no. QuickTime Player is fantastic for simple trims—lopping off the beginning or end of a clip. But it can't cut out a section from the middle. Think of it as just setting a new start and end point.
If you need to remove a mistake or a long pause from the middle, you'll need to reach for a slightly more powerful tool on your Mac.
- iMovie: This is your best bet for a free, built-in solution. You can use the 'Split Clip' feature (just hit Command + B) to make cuts at the start and end of the part you want to remove. That isolates the unwanted section, and you can simply click on it and hit delete.
- Screen Charm: If you're doing screen recordings, this is a game-changer. The editor is built right in, so you can make precise cuts anywhere you want on the timeline. It’s perfect for cleaning up those little "ums," "ahs," or unexpected macOS notifications without having to export your recording to another app first.
Does Trimming a Video Reduce Its Quality on a Mac?
This is a valid concern. You don't want to spend time editing only to end up with a blurry, pixelated video.
The short answer is: generally, no. When you trim a video with apps like QuickTime and save it, the file does get re-encoded. However, the default quality settings on macOS are so good that you almost certainly won't see any difference. The final video will look just as sharp as the original.
The real secret to keeping your video looking great is in the export settings. Tools like iMovie and Screen Charm are designed to produce high-quality files. As a rule of thumb, always export at the highest resolution possible, like 1080p or 4K, to match your source footage.
This simple step ensures all your editing work pays off with a crisp, professional-looking final product.
What Is the Fastest Way to Trim Multiple Clips for a Tutorial Video?
If you’re creating tutorials or product demos on your Mac, speed is everything. The biggest time-waster I see is people bouncing between different apps—recording in one, importing into another to edit, then exporting the final version. It's a clunky workflow that kills momentum.
The most efficient way to work is with a tool that combines screen recording and editing. This is where an app like Screen Charm really shines. It completely removes that tedious export-import cycle.
As soon as you finish a recording, you're right there in the editor, ready to trim, split, and polish your video. This single-app workflow is dramatically faster than, say, recording with QuickTime and then editing in iMovie. A task that could easily take an hour gets boiled down to just a few minutes. When you need to trim video on a mac quickly and efficiently, this is the way to do it.
Ready to stop wasting time juggling apps and start creating polished demos faster? Screen Charm is a macOS app that integrates screen recording and trimming into one seamless workflow, helping you produce professional-quality videos in minutes. Find out more about Screen Charm.