Your Guide to Video Screen Grabber Mac Tools
Dec 13, 2025

So you want to record the audio coming from your Mac, and you've probably discovered it's not as simple as clicking a button. That's not a bug or something you're doing wrong—it's actually a deliberate security feature built right into macOS.
Why Is It So Hard to Record System Audio on a Mac?
If you've ever tried to capture the sound from a YouTube video or a game directly on your Mac, you know the frustration. Unlike other operating systems, macOS intentionally prevents applications from easily grabbing the audio output of other apps. This is a core part of Apple's "privacy by design" philosophy.
The whole point is to isolate audio streams. Apple's engineers built macOS to stop a sneaky app from listening in on a private Zoom call or capturing your system notification sounds without you knowing. Think of each application as being in its own soundproof room. This is fantastic for security, but it's a real headache for legitimate creators who need to record tutorials, gameplay, or online meetings.
It's a Feature, Not a Flaw
This isn't a new problem. This intentional audio barrier has been a part of macOS for years, forcing creators to find clever workarounds. Back in the days of Mac OS X 10.6 Snow Leopard around 2010, maybe 15% of audio recording apps could even attempt to capture system sound. The other 85% of users had to rely on tools like Soundflower, a free virtual audio driver that racked up over 500,000 downloads by 2012 simply because it was one of the only games in town.
This history is why a standard screen recording often captures video but no sound. For a deeper dive, you can learn more about why screen recordings don't always capture audio and the technical reasons behind it. The bottom line is, to record internal audio on a Mac, we have to build our own virtual pipeline that macOS will recognize as a valid audio source.

This design choice reflects the clean, user-focused experience Apple is known for, but it hides a complex security architecture underneath that protects your data—including your audio streams.
The Solution: Virtual Audio Drivers
So how do we get around this? We use a third-party tool called a virtual audio driver. These clever apps create a new, software-based audio device that appears right alongside your built-in speakers or headphones in your Mac's Sound settings.
Instead of sending audio directly to your physical speakers, you can route it through this new virtual device. From there, your recording software (like QuickTime or OBS) can select that virtual device as its microphone input, effectively "listening in" and capturing the system sound.
Getting your head around this concept is the key. Once you understand that you're just rerouting the audio, the frustrating limitation becomes a simple technical puzzle with a clear solution. The next sections will walk you through exactly how to set these tools up.
Choosing Your Tool: BlackHole vs. Loopback
To record your Mac’s internal audio, you first need a virtual audio driver. This is the magic piece of software that creates an invisible "cable" to reroute sound from your speakers to your recording app. The two biggest names in this space are BlackHole and Loopback, and your choice between them will really define your entire recording workflow.
BlackHole is the champion of the open-source world. It’s powerful, flexible, and best of all, completely free. Developed by Existential Audio, it has become the go-to for countless creators. Think of it like a manual transmission in a car—it gives you an incredible amount of control, but you need to be comfortable working under the hood in macOS's built-in Audio MIDI Setup utility.
This hands-on approach is perfect if you're technically inclined or just on a budget. It's rock-solid once you get it set up and even offers multi-channel versions for complex projects, like sending separate audio streams from different apps into a digital audio workstation (DAW).
The Power of BlackHole
All the configuration for BlackHole is done right inside Audio MIDI Setup, a utility that’s already on your Mac.
As you can see from this image on BlackHole’s official GitHub, it doesn't have its own flashy interface. Instead, it integrates seamlessly into your system’s audio device list, right alongside your microphone and speakers. This native approach gives you a powerful routing tool without any extra clutter.
Then there's Loopback. Made by the brilliant folks at Rogue Amoeba, Loopback is the premium, paid alternative that puts user experience first. If BlackHole is the manual car, Loopback is a luxury automatic. It completely replaces the sometimes-clunky Audio MIDI Setup with a beautiful, intuitive drag-and-drop interface.
With Loopback, you literally draw virtual wires to connect your audio sources. Want to grab audio from Spotify and a YouTube video in Chrome, mix in your microphone, and send the whole package to OBS? You can build that custom device in about 30 seconds. This simplicity and power come at a price, but for many, it's well worth the investment.
For professionals, podcasters, and streamers, the time saved and headaches avoided with Loopback's visual setup easily justify the cost. It lets you focus on creating, not on troubleshooting complex audio configurations.
Virtual Audio Driver Comparison: BlackHole vs. Loopback
To help you decide which tool fits your needs and budget, here’s a direct comparison of their key features. This table breaks down what you get with the free, community-driven option versus the premium, user-friendly powerhouse.
Feature | BlackHole | Loopback |
|---|---|---|
Price | Free (Open-Source) | Paid (Premium License) |
Interface | None (Uses macOS Audio MIDI Setup) | Intuitive Drag-and-Drop Visual Interface |
Ease of Use | Moderate to High (Requires manual setup) | Very Easy (Beginner-friendly) |
Flexibility | High (Supports up to 256 audio channels) | High (Create and manage multiple virtual devices) |
Use Case | Ideal for tech-savvy users, budget-conscious creators, and static setups. | Ideal for professionals, frequent streamers, and anyone who needs to change audio routing on the fly. |
Developer | Existential Audio | Rogue Amoeba |
Ultimately, both tools are fantastic at what they do. They just serve different audiences.
If you’re comfortable with a one-time technical setup and want a powerful tool without spending a dime, BlackHole is a phenomenal choice. If you value your time, need to change your audio sources frequently, or simply want the most foolproof way to record system audio on macOS, Loopback is a sound investment. This decision often goes hand-in-hand with your primary recording software; check out our guide on the best screen recorders for Mac with audio to see how different apps pair with these drivers.
Setting Up BlackHole with Audio MIDI Setup
Alright, with BlackHole installed, it's time to get our hands dirty in one of macOS’s most powerful—and honestly, most overlooked—tools: Audio MIDI Setup. This is where we'll create the virtual plumbing that lets us capture our Mac’s internal audio. It might look a bit technical at first glance, but stick with me. It’s a logical process that will unlock a ton of recording potential.
First thing's first, make sure you've installed the latest version of BlackHole from the official source. You won't see a new app icon pop up in your Dock or anything; BlackHole works its magic in the background as a virtual audio driver.
To find the configuration hub, just use Spotlight Search (Command + Spacebar), type in "Audio MIDI Setup," and hit Enter.
Creating a Multi-Output Device
Once you’re inside the Audio MIDI Setup window, you'll see a list of every audio device connected to your Mac. Our goal here is to create a special device that lets us both hear the audio and record it simultaneously. This is called a Multi-Output Device.
Look for the small “+” button in the bottom-left corner. Click it and select “Create Multi-Output Device.” A new device will appear in your list, ready for us to configure.
Now, with your new device selected, look to the panel on the right. This is where you tell macOS where you want the sound to go.
First, check the box next to your primary output—whatever you use to listen. This will likely be “MacBook Pro Speakers,” “External Headphones,” or your audio interface.
Next, check the box for “BlackHole 16ch.” This is the crucial step that duplicates the audio stream and sends it over to our virtual driver for recording.
A really important detail here is Drift Correction. When sending audio to two different places, the signals can sometimes get a tiny bit out of sync, creating a weird echo or phasing effect. To fix this, macOS needs a primary "clock source." Just check the Drift Correction box for the secondary device (BlackHole). Your main physical output (speakers or headphones) should be left unchecked.
Making It Your Default System Output
We've built our custom audio device. Now we just need to tell the entire Mac to use it.
Head over to System Settings, click on "Sound," and go to the "Output" tab. You should see your newly created "Multi-Output Device" in the list. Go ahead and select it. Now, every sound your Mac makes—from a YouTube video to a system alert—will be routed to both your headphones and to BlackHole.
A Quick Tip from Experience: If your sound suddenly cuts out, the first place to check is this output setting. It's incredibly common to accidentally select "BlackHole 16ch" directly as your output. When that happens, your audio is sent into a silent digital void. You'll always want to select your custom Multi-Output Device to hear what you're recording.
This diagram helps visualize the difference between the manual, system-level setup we just did with BlackHole versus the more graphical approach of a tool like Loopback.
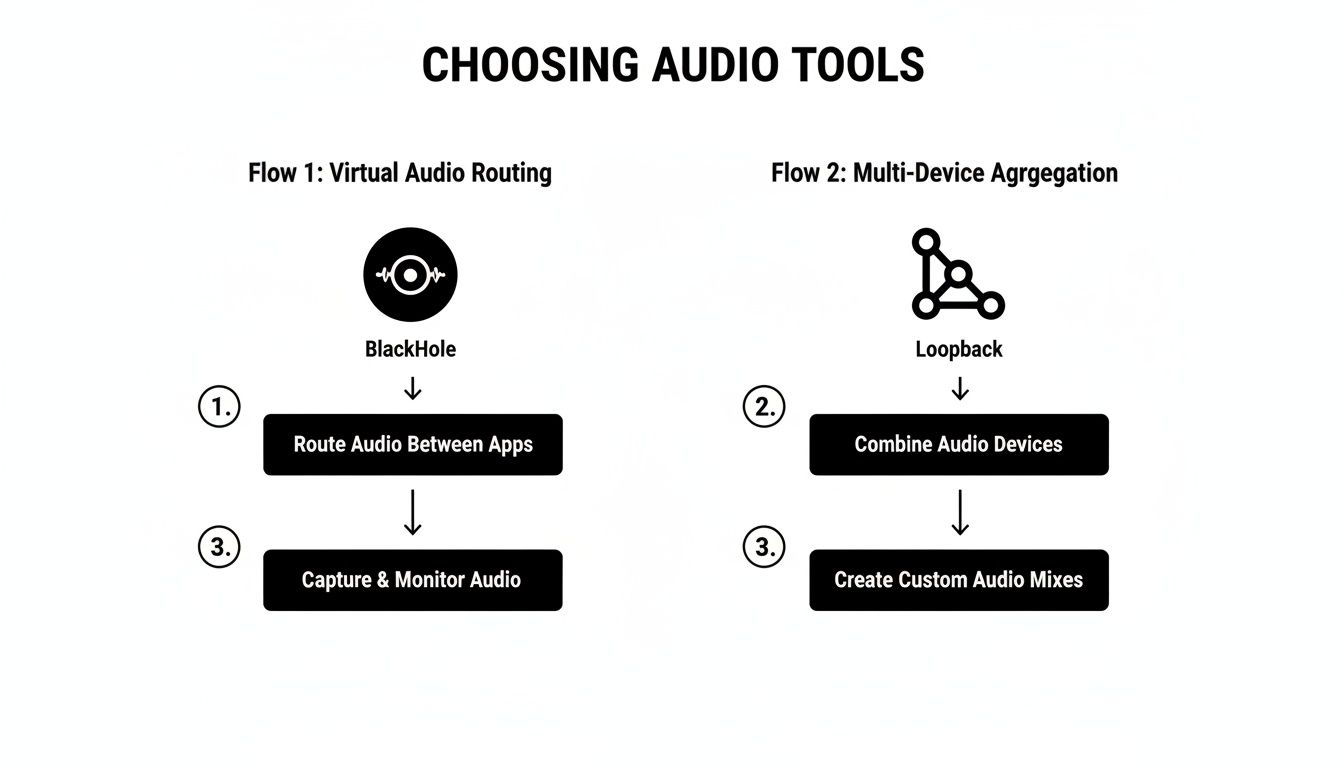
As you can see, BlackHole requires you to work within macOS itself, while Loopback offers a dedicated app to drag and drop your connections. Neither is better, it just depends on your comfort level. With this configuration complete, you’ve laid the groundwork to record your Mac’s system audio with pretty much any recording application.
Getting the Right Permissions to Record Your Screen and Audio
Alright, you’ve got your virtual audio driver set up. You're so close to hitting that record button, but there's one crucial gatekeeper you have to get past first: your Mac's own security system.
Modern macOS is locked down tight. It won’t let any app just start snooping on your screen or listening to your audio without your explicit say-so. This isn't a friendly suggestion; it's a hard stop. I've seen countless people get tripped up here, wondering why their perfectly configured setup just gives them a black screen or a silent video.
Think of it this way: macOS is asking for a key to two different rooms. One key lets the app "see" your screen, and the other lets it "hear" your computer's sound and your microphone. Without both, you're not getting a complete recording.
Finding the Privacy and Security Toggles
You'll need to dive into your Mac's System Settings to grant these permissions. Look for the Privacy & Security section.
Once you're in there, scroll down and keep an eye out for two specific settings:
Screen & System Audio Recording: This is the big one. It’s what lets your software capture the visuals on your screen and the internal audio you've so carefully routed.
Microphone: This is separate. If you want to narrate your recording with an external mic, you have to give your app permission to access it here, too.
Usually, the first time you launch an app like OBS Studio or QuickTime and try to record, macOS will pop up a dialog box asking for permission. It's easy to dismiss it by accident. If you clicked "Don't Allow" or the prompt never showed up, you'll have to go in and enable it manually.
Just find your recording app in the list and flip the toggle switch on.
Heads up: After you flip that switch, macOS will make you quit and reopen the app. The new permissions won't kick in until you do a full restart of the software.
Why This Is Such a Big Deal Now
This isn't just Apple being difficult; it’s all about privacy. These strict controls really became the norm a few years back. Post-2020, with the release of macOS Big Sur, these permission prompts became mandatory for 100% of apps trying to capture your screen or audio.
It’s a significant hurdle. I’ve seen data suggesting that users deny these requests in 45% of initial prompts, and that number shoots up to 62% for apps they don't immediately recognize. It's easy to see why so many recordings fail before they even start. Understanding these controls is the final, non-negotiable step to successfully record system audio on macOS.
If you're still running into trouble, our guide on how to get sound on a screen recording dives even deeper into troubleshooting these specific issues. Getting this last check right is what separates a frustrating afternoon from a perfect recording.
Capturing System Audio With OBS And QuickTime
Alright, you've got your virtual audio driver set up and the permissions sorted out. Now for the fun part: actually recording your Mac's audio. Let's walk through how to do this with two of the most common tools out there. One is a powerhouse for creators, and the other is the quick-and-dirty solution that's already built into your Mac.
This way, you'll be ready to record system audio on macOS whether you're creating a professional tutorial or just need to capture a quick clip.
Pro-Level Recording With OBS Studio
If you're into streaming, making video tutorials, or just want total control over your recording, OBS Studio is the gold standard. It’s a free, open-source beast that lets you juggle multiple audio and video sources like a pro. All we need to do is tell it to listen to the virtual driver we just configured.
Fire up OBS and find the "Sources" panel, which is usually hanging out at the bottom of the window.
Click the little "+" icon and pick "Audio Input Capture" from the menu.
Give it a clear name you'll recognize, like "System Audio" or "Mac Audio," then click OK.
A properties window will pop up. From the "Device" dropdown menu, select "BlackHole 16ch" (or whatever you named your virtual driver).
And that's it! You should see the audio meter for that new source start dancing along with whatever sound your Mac is making. Now you can hit record, and OBS will capture that internal audio perfectly alongside your microphone and screen capture.
One common mistake I see is people adding the same audio source multiple times. If you're not getting any sound, double-check your Sources list for duplicates or the wrong device before you start troubleshooting. A clean OBS setup is a happy OBS setup.
Quick and Easy Captures With QuickTime Player
Sometimes you just don't need all the bells and whistles of OBS. For a quick screen recording—maybe you're showing a software bug to a support team or saving a snippet from a webinar—the QuickTime Player app that came with your Mac works beautifully.
A lot of people don't even know this is possible, but QuickTime can absolutely record internal audio once you've done the prep work.
Open QuickTime Player and go to File > New Screen Recording. A small control bar will pop up on your screen. Before you smash that record button, click the "Options" dropdown. You'll see a "Microphone" section.
Just select "BlackHole 16ch" from that list. Now, when you start recording, QuickTime will grab all the audio being routed through that virtual driver. It’s an incredibly efficient way to handle simple jobs without needing to open a complex application.
Once you have your recordings, you might want to do some more advanced editing. For advanced audio and video post-processing, including merging captured audio with video, explore powerful tools like FFmpeg.
Common Hiccups and How to Fix Them
Even with the best-laid plans, you can run into a few snags when setting up your Mac to record system audio. The whole process involves a few different components talking to each other, and it's easy for one setting to get out of place. Let's walk through the most common issues I see and how to sort them out quickly.
"Can I record my microphone and system audio at the same time?"
Yes, you absolutely can! This is a classic setup for anyone recording a tutorial, a gameplay session, or a podcast interview. The trick is to create an Aggregate Device using the Audio MIDI Setup utility.
Think of an Aggregate Device as a virtual mixer that combines multiple audio inputs into a single, unified stream. You'll just need to add both your microphone (like a Blue Yeti or even your AirPods) and the BlackHole driver to it.
Then, inside your recording software—whether it's OBS, QuickTime, or Audacity—you simply select this new "Aggregate Device" as your one and only audio source. It magically captures both your voice from the mic and all the sounds coming from your Mac.
"Help! I switched to BlackHole and now my Mac is silent!"
This is hands-down the most frequent problem people encounter, and it's an easy one to fix. When you select "BlackHole" as your Mac's primary sound output in System Settings, you're essentially sending all your audio into a black hole—it gets routed to the virtual driver but has no way to get to your actual speakers or headphones.
The Fix: Never select "BlackHole" by itself as your main output. You always want to choose the Multi-Output Device you created earlier. That’s the special device designed to do two things at once: send audio to your speakers so you can hear it, and simultaneously send a copy to BlackHole so your software can record it.
"Is it safe to install a virtual audio driver like BlackHole?"
It's completely safe, as long as you stick to the official source. BlackHole is a reputable, open-source project from Existential Audio. Its code is public for anyone to inspect, and it's trusted by a huge community of audio engineers, podcasters, and creators.
These drivers are simple plugins for macOS's core audio system; they don't snoop on your data or do anything malicious. They just redirect audio signals from one place to another. As long as you download it directly from the developer's official website or their GitHub page, you're good to go.
Getting your audio right is a huge step, but for truly polished tutorials and product demos, your visuals need to be just as clear.
This is where a tool like Screen Charm comes in. It makes your screen recordings look incredibly professional by automatically zooming in on your clicks and cursor movements, keeping your audience locked in on what's important. It's the simplest way to create a polished guide without fussing with a complicated video editor. You can learn more at https://screencharm.com.
