Making a great video on your Mac really just comes down to three core stages: planning what you want to say, recording your screen and camera, and then editing it all together. While your Mac has some basic tools built-in, jumping into a dedicated app like Screen Charm is the secret to getting a polished, professional result without the headache.
Your Starting Point for Mac Video Creation

It’s never been easier to create impressive videos on macOS. Whether you're putting together a software demo for your team, a tutorial for your students, or some slick marketing content, you can do it all on the machine you use every day. Think of this guide as your complete roadmap, taking you from that initial spark of an idea all the way to the final export.
We’ll walk through the entire process, showing you how to really make your Mac shine.
Why macOS Is an Ideal Platform for Video
The whole macOS ecosystem is a fantastic starting point for anyone creating video. The operating system is stable, and the hardware is top-notch, giving you a reliable canvas for recording and editing. The real magic, though, happens when you step beyond the tools that come pre-installed.
Sure, QuickTime can do a basic screen capture in a pinch. But it falls short when you need integrated features to create something that looks truly professional. You often end up juggling multiple apps—one to record, another to edit, maybe even a third to add overlays or effects. That kind of fragmented workflow is just slow and frustrating on any computer.
This is exactly why specialized Mac apps built for video creation are such a game-changer. They pull all the tools you need into one clean interface, smoothing out the entire process from start to finish.
Meeting the Demand for Video Content
The hunger for video content is undeniable. It's not just a trend; it's how people prefer to learn and engage online. In fact, a staggering 78% of people watch online videos every single week, and 55% watch daily. That massive audience is fueling a video creation market projected to balloon from $0.9B in 2023 to $4.4B by 2033.
This isn't just about making more content; it's about making better content, efficiently. For Mac users, the key is finding software that feels native to macOS and makes complex tasks feel simple.
Your goal should be to create videos that are not just informative but also engaging. Features like dynamic zooms, clean transitions, and custom backgrounds are no longer nice-to-haves; they are essential for holding a viewer's attention.
Throughout this guide, we’ll cover everything you need to know. If you’re brand new to this, our overview of content creation for beginners is a great place to get your bearings. We'll show you how to plan, record, and edit your way to videos that look and feel like they were made by a pro.
Planning Your Video for Maximum Impact

Here's a hard-earned lesson: the best videos are made long before you ever hit the record button. A solid plan is the foundation of any great tutorial or product demo, and it's what separates a polished, helpful video from one that just meanders.
Skipping this step is tempting, but it almost always leads to a jumbled recording, rambling narration, and hours of frustrating edits. Think of it like a road trip. You wouldn't just start driving without a destination in mind. A few minutes of planning up front will make the entire process smoother and the final product infinitely better.
Define Your Audience and Objective
First things first, ask yourself: who is this video actually for? The answer changes everything. A walkthrough for a brand-new user needs a slow pace and a lot of hand-holding, while a deep-dive for a seasoned pro can skip the basics and get right to the advanced stuff.
Once you know your audience, nail down a single, sharp objective. What’s the one thing you want the viewer to be able to do after they finish watching? Trying to cover too much ground is a classic mistake.
For instance, an objective like "Show our software" is way too broad. A much stronger goal is "Teach a new user how to set up their first automation rule in under 90 seconds." That's specific, measurable, and gives your video a clear purpose.
Scripting for a Natural Flow
You don't need a word-for-word script unless that's your style, but you absolutely need an outline. A simple bulleted list is often enough to keep you on track, prevent you from forgetting crucial steps, and stop you from going off on tangents.
I've found this simple structure works wonders:
- The Hook: Grab their attention immediately. What problem are you solving for them?
- The "How-To": This is the meat of your video. Break down the process into logical, easy-to-follow chunks.
- The Recap: A quick summary of what you just showed them to reinforce the key takeaway.
- The Next Step: What should they do now? Maybe it's trying the feature for themselves or watching another video.
One of the biggest mistakes I see is people scripting their videos like they're writing a technical manual. Write like you talk. A relaxed, conversational tone is far more engaging and helps your audience feel like they're learning from a real person.
Visualize with a Storyboard
"Storyboard" sounds intimidating, but it doesn't have to be. You don't need to be an artist. For a screen recording on your Mac, a storyboard is just a simple visual plan that maps your script to what's happening on the screen.
Let's say you're demoing a new scheduling feature. Your storyboard could be as simple as this:
- Shot 1: Full-screen of the app's calendar view. Narration: "Let's take a look at the new drag-and-drop scheduling feature."
- Shot 2: Zoom in on the "Create Event" button. Narration: "To get started, just click here..."
- Shot 3: Show the event being dragged to a new time slot. Narration: "...and now you can simply drag the event to reschedule it instantly."
This little bit of prep work forces you to think visually. It connects your words to the on-screen actions, ensuring you capture the right clicks, zooms, and highlights to make your points crystal clear. This plan is your guide to successfully making a video on your Mac that actually helps people.
Sponsored by the makers
Tired of boring screen recordings?
Try Screen Charm.
Auto-zoom, motion blur, camera overlay, and background music. All built in. Record once, export a polished video.
See what it doesGetting Your Screen and Webcam Set Up on macOS
Okay, you've got your plan. Now it's time to capture the actual footage, and this is where the magic really starts. The quality of what you record right now sets the ceiling for your final video, so it pays to get this step right.
Your Mac actually has some decent recording tools built right in, which is great for getting your feet wet without spending a dime. Let's look at what they can do and, more importantly, where they fall short.
Starting with Your Mac’s Built-In Tools
The two main players baked into macOS are the Screenshot toolbar and QuickTime Player. They're both powered by the same engine but offer slightly different experiences.
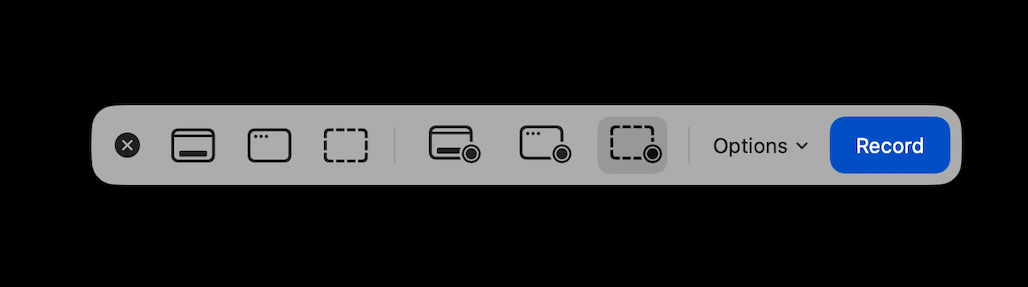
The Screenshot toolbar is your go-to for speed. Just hit Shift-Command-5, and you’ll get a simple control panel to record your full screen, a specific app window, or a custom area. It's perfect for those quick, no-fuss recordings where you just need to show something fast.
QuickTime Player gives you a tiny bit more insight. When you open the app from your Applications folder and go to "New Screen Recording," you get the same basic options, but you can also see the file size grow in real time. This can be a lifesaver if you're working with limited drive space.
But here's the catch—both have some serious limitations for anyone creating polished content:
- No Facecam Overlay: You can't record your screen and webcam at the same time. You'd have to record them as separate files and then try to sync them up later in editing, which is a massive headache.
- No System Audio: Want to record the sound from an application or a video playing on your Mac? You can't do it with these tools alone. You'll need extra software just for that.
- Zero Visual Aids: There are no options for highlighting your cursor, showing click animations, or adding a virtual background to hide your messy office.
These built-in options are fine in a pinch, but they create a ton of extra work down the line. That's why dedicated recording software is almost always the better choice. And if your goal is to capture team calls or webinars, it's also worth learning how to record online meetings like Google Meet as a complementary skill.
Why an All-in-One Tool Like Screen Charm Is a Game-Changer
To create a professional video without tearing your hair out, you need a tool that handles screen, webcam, and audio recording all at once. This is exactly what apps like Screen Charm were built for.
Instead of fumbling with multiple apps, an integrated solution puts everything you need—webcam feeds, microphone selection, screen area, and visual effects—into one clean control panel.
This approach doesn't just save time; it removes technical roadblocks so you can focus on delivering great content.
Dialing in Your Professional Recording Setup
The software is only half the battle. How you set up your recording environment makes a huge difference in the final quality. A few tweaks here can elevate your video from amateur to pro.
The most engaging format for tutorials is the classic picture-in-picture, where your face appears in a corner of the screen recording. It builds a human connection and helps your audience feel like you're right there with them. We dive deep into this technique in our guide to using a facecam and screen recorder.
Before you hit record, dial in these key settings:
- Microphone Input: If you have an external USB microphone, use it. The difference in audio quality compared to your Mac's built-in mic is night and day.
- Webcam Framing: Position yourself so you're centered in the frame and looking just over the camera lens. This helps create a direct, confident connection with your viewers.
- Cursor Effects: Turn on cursor highlighting or click animations. It's a small detail that makes a massive difference in helping viewers follow along with your actions.
- Virtual Background: Use a simple blurred background or a clean branded image. It hides any clutter in your room and keeps the focus where it belongs: on you and your content.
This style of recording isn't just a trend; it's become a cornerstone of modern video marketing. By 2026, screen recording had become a primary tool for 19% of video marketers, putting it nearly on par with live-action and animated videos.
Setting up these elements before you record is the secret to a smoother workflow. You're not just capturing raw footage; you're producing a high-quality asset from the get-go. A clean, clear, and engaging recording is the perfect foundation for an easy editing process.
Editing Your Video for a Professional Finish
Hitting "stop record" feels great, but the raw footage is really just the starting point. The editing suite is where the magic happens—where you take a collection of clips and weave them into a story that actually connects with your audience. This is your chance to clean up mistakes, perfect the pacing, and add a layer of polish that makes people want to keep watching.
A lot of creators feel intimidated by editing, picturing those complicated timelines and a sea of buttons. But here's the good news: on a Mac, you don’t need a film degree to create something amazing. Modern Mac apps are built to be intuitive, giving you powerful features without the ridiculously steep learning curve.
The real goal is to get past simply chopping off the beginning and end. Great editing is all about guiding your viewer, making complex ideas simple, and creating a smooth, professional journey from start to finish.
Going Beyond the Basic Cut and Trim
First things first: trimming. This is the most fundamental part of editing, where you snip out all the awkward pauses, false starts, and those "ums" and "ahs" that always manage to sneak in. A tight, clean edit shows you respect your viewer's time and keeps the energy up.
With your core clips cleaned up, you can start building the narrative. This means dragging and dropping your clips onto the timeline in a logical order. If you're creating a software tutorial, for instance, you'd arrange each clip to follow the user's workflow perfectly, creating an experience that's completely seamless and easy to follow.
But a truly professional video needs more than just clean cuts. This is where subtle but powerful effects come into play, transforming a basic screen recording into a dynamic and engaging presentation.
Focusing Attention with Dynamic Auto-Zoom
One of the biggest hurdles in any product demo is making sure your audience is looking at the right spot. A full screen packed with menus and icons can be totally overwhelming. This is where dynamic zoom becomes your secret weapon.
Instead of a jarring hard cut, a smooth zoom-in effect naturally pulls the viewer's eye to the exact button, menu, or text field you're talking about. For example, as you say, "...and then click on the 'Advanced Settings' tab," the video can glide in to focus on that specific part of the screen. It’s an incredibly powerful way to provide clarity without ever saying "look here."
The best editing is invisible. Effects like auto-zoom shouldn't feel like effects at all. They should just make the viewer feel like the video is naturally showing them exactly what they need to see, right when they need to see it.
Tools like Screen Charm are built around this idea, using AI to track your cursor and intelligently apply these zooms for you. This one feature alone can save you hours of tedious keyframing and dramatically boost the clarity of your tutorials. For more foundational advice on structuring your edits, check out our guide with essential video editing tips for beginners.
Enhancing Your Video with Overlays and Transitions
Once your core story is flowing and your zooms are guiding the way, it's time to add the finishing touches. These small additions provide context and a sense of professionalism that really elevates the final product.
Think about adding these elements to your next video:
- Text Overlays: Use these to introduce a new topic, call out a keyboard shortcut, or emphasize a key point. A simple lower-third graphic with your name and title at the start of the video adds a nice touch of authority.
- Smooth Transitions: Instead of a hard cut between two different scenes, a subtle cross-dissolve or fade can signal a shift. Just be sure to use them sparingly to keep things looking clean and modern.
- Audio Refinements: Editing isn't just a visual game. Pop on a pair of headphones and listen to your entire video. Make sure the volume levels are consistent, remove any distracting background hums, and maybe add some quiet background music to fill any dead air.
Putting It All Together: A Real-World Example
Let's say you're editing a two-minute tutorial for a new feature in your app. Your raw footage is a single, five-minute screen recording.
First, you'd pull that clip into your editor and start trimming. You’d chop off the first 30 seconds where you were getting set up and that last minute where you were fumbling to find the stop button. You'd also find that spot in the middle where you coughed and snip it out.
Next, you'd apply the auto-zoom. As you talk through each step, the editor automatically zooms in on the relevant parts of the interface. Then, you'd add a clean text overlay that says "Step 1: Configure Your Profile" just as that section begins.
Finally, you’d add a simple fade-out at the very end and do one last pass to make sure your voiceover audio is clear and even. By combining these simple techniques, you’ve turned a messy raw recording into a polished, easy-to-follow tutorial that makes learning how to make a video on Mac feel both achievable and professional.
Exporting and Sharing Your Polished Mac Video
You’ve done the hard work. Your video is edited, the pacing feels right, and your message is crystal clear. Now comes the final—and surprisingly important—part: getting that video out of your Mac and in front of the people who need to see it.
This last step, exporting, can feel a bit technical. But really, it’s all about packaging your work so it looks just as good on a viewer's phone as it did on your editing timeline. The right settings ensure your video loads quickly, plays smoothly, and maintains its professional quality everywhere it goes.
Nailing the Right Export Settings
When you hit that "Export" button in your Mac app, you'll see a bunch of options like format, resolution, and bitrate. Don't get overwhelmed. For almost any video you're putting online, the choice is actually pretty straightforward.
The go-to standard is an MP4 file using the H.264 codec. This format is the universal language of online video. It gives you fantastic quality without creating a gigantic file, ensuring it plays perfectly on YouTube, LinkedIn, or embedded on your website.
Next up is resolution. While 4K is tempting, 1080p (1920x1080) is truly the gold standard for most content. It looks sharp and professional on almost any screen but won't result in a massive file that takes an eternity to upload. You'd only really need 4K if your original footage was 4K and your video showcases intricate visual details that would be lost otherwise.
Your goal is a high-quality file that respects your audience's time and internet connection. A video that's constantly buffering is a video that gets closed, no matter how amazing the content is. For a reliable, excellent viewing experience, 1080p is your best bet.
A Quick Guide to Export Settings
While a standard 1080p MP4 works almost everywhere, you can fine-tune your settings to get the best possible result on specific platforms. A higher bitrate, for example, gives platforms like YouTube more data to work with, which can lead to a cleaner final product after their own compression is applied.
Here's a quick cheat sheet for your next export.
Recommended Video Export Settings for Popular Platforms
| Setting | YouTube (Standard) | LinkedIn / Social Media | High-Quality Archive |
|---|---|---|---|
| Format | MP4 | MP4 | MP4 or MOV |
| Codec | H.264 | H.264 | H.264 or ProRes 422 |
| Resolution | 1920x1080 (1080p) | 1920x1080 (1080p) | Original (e.g., 4K) |
| Frame Rate | Match Source (24/30 FPS) | Match Source (24/30 FPS) | Match Source (24/30 FPS) |
| Bitrate | 8-12 Mbps | 5-8 Mbps | 20+ Mbps (or ProRes) |
Keep in mind that when you're uploading these finished files, your internet connection matters. Having a good upload speed for modern internet use can be the difference between a quick upload and a frustratingly long wait.
Going Beyond the Export: Optimizing for Discovery
A technically perfect video file is great, but it's only half the job. You also need to make sure people can actually find it. Once your video is uploaded, a few simple tweaks to its metadata can make a huge difference in its reach.
Craft a Compelling Title Your title is your first impression. It needs to be descriptive but also spark curiosity. Instead of something generic like "New Software Demo," try "How to Set Up Your First Project in [Software Name] in Under 3 Minutes." It tells the viewer exactly what they're getting and promises a quick solution.
Write a Keyword-Rich Description Think of the description as your chance to give search algorithms context. Briefly summarize the video's content, add any relevant links, and naturally weave in keywords people might use to find your tutorial. This is essential for helping YouTube and Google understand what your video is about.
Design an Eye-Catching Thumbnail On a crowded platform, your thumbnail is your video's billboard. It’s often the single biggest reason someone clicks (or doesn't). Use a clear, high-contrast image from your video, overlay a short, punchy headline, and if it fits your brand, include a person's face to create an instant connection. A great thumbnail makes your video impossible to ignore.
Still Have Questions About Making Videos on Your Mac?
Even with a solid plan, a few questions always pop up when you're getting started. Let's tackle some of the most common ones I hear from creators. Getting these answers sorted out now will save you a lot of headaches later.
What's Genuinely the Easiest Way to Record My Screen and Myself?
For an all-in-one, no-fuss experience, you really want a dedicated app built for macOS.
Sure, you can use the built-in Screenshot tool (Shift-Command-5), and it’s great for a quick, down-and-dirty screen capture. But it has one killer flaw: it can't record your webcam at the same time. Trying to sync up a separate webcam video with a screen recording later is a nightmare. Trust me.
This is exactly why tools like Screen Charm exist. It was designed from the ground up to solve this specific problem. You can capture your screen, webcam, and microphone all in one go, perfectly synchronized from the start. Plus, having the editor built right in means you don't have to jump between different apps.
The real goal here is efficiency. You want to get the idea in your head onto the screen with as little technical friction as possible. An integrated tool lets you focus on your message, not on juggling files.
This approach is, hands down, the fastest way to create that classic picture-in-picture look that’s become the standard for great tutorials and product demos.
Can I Actually Make Professional-Looking Videos Without iMovie or Final Cut Pro?
Absolutely. You don't need a complex, Hollywood-grade editor to create a polished video. What truly makes a video feel "professional" is good planning, crystal-clear audio, and clean, intentional edits—not how many fancy effects you use.
Frankly, traditional editors like iMovie or Final Cut Pro can be overkill. They come with a steep learning curve that can grind your progress to a halt.
Modern, purpose-built tools for macOS are designed for speed and simplicity. They take features that used to require hours of manual work and automate them.
For instance, you can get a super polished look with features like:
- Automatic Zoom: It intelligently tracks your cursor, zooming in on the action so your audience never misses a click. No more tedious manual keyframing.
- Custom Backgrounds: Instantly replace your messy office with a clean, professional backdrop. It keeps the focus right where it should be: on you and your content.
- Cursor Highlighting: Adds a subtle glow or click effect to your cursor, guiding your viewer’s eye and making your steps incredibly easy to follow.
These are the kinds of details that create a premium feel, and you can achieve it in a fraction of the time it would take in a traditional NLE (non-linear editor).
How Do I Stop My Audio from Sounding Terrible?
This is a big one. Great audio isn't optional—it's everything. Your audience will forgive a slightly grainy video, but they will click away in a second if your audio is scratchy, distant, or full of echo.
Your Mac's built-in microphone is fine for a FaceTime call, but it's not made for high-quality content creation.
The single best investment you can make is an external USB microphone. You don't have to break the bank; even an entry-level model will sound leagues better than the tiny mic next to your webcam.
Your recording space matters, too. Find a quiet room, away from humming refrigerators or street noise. Soft surfaces are your best friend—carpets, curtains, and couches all help absorb sound and kill that awful echo. And when you record, try to maintain a consistent distance from the mic to keep your volume nice and even.
What’s the Best Video Format for Sharing Online?
Don't overthink this one. For almost every scenario—YouTube, LinkedIn, your website, social media—the answer is MP4 with the H.264 codec.
It's the universal standard for a reason. It gives you fantastic video quality without creating a gigantic file that takes forever to upload.
Every modern platform and device supports it, so you never have to worry about compatibility issues. Most screen recording apps on the Mac, including Screen Charm, default to exporting in this format, so it's usually as simple as hitting the "Export" button.
Ready to create stunning product demos and tutorials on your Mac without all the complexity? Screen Charm gives you everything you need in one place—from simultaneous screen and webcam recording to AI-powered auto-zoom and a dead-simple editor.