So, you need to capture video on your Mac. The good news is, you've already got some powerful, free tools baked right into macOS. For quick tutorials or simple software demos, macOS gives you the Screenshot Toolbar and QuickTime Player, letting you start recording in just a few clicks.
Your Complete Toolkit for Video Capture on Mac
Whether you're whipping up a quick walkthrough for a coworker or planning a polished tutorial for your YouTube channel, your Mac is more than ready for the task. The real trick is knowing which tool to grab for which job. The built-in options are champions of speed and simplicity, but for those more professional projects, a dedicated third-party app will give you the advanced features you need.
This guide will walk you through the best methods for any scenario. We'll start with the essentials—the Screenshot Toolbar and QuickTime Player—and show you how to get fast, effective recordings out of them. From there, we'll dive into when it makes sense to upgrade to more powerful software designed specifically for macOS.
Choosing the Right Path for Your Project
So, when do you stick with the built-in tools versus springing for an advanced application? It really comes down to your project's complexity. If you're just sharing your screen for a simple explanation, the native macOS tools are perfect. But for recordings that demand high-quality audio, simultaneous camera and screen feeds, or detailed edits, a specialized app is the way to go.
This decision tree gives you a quick visual to help you pick the right tool for the job.
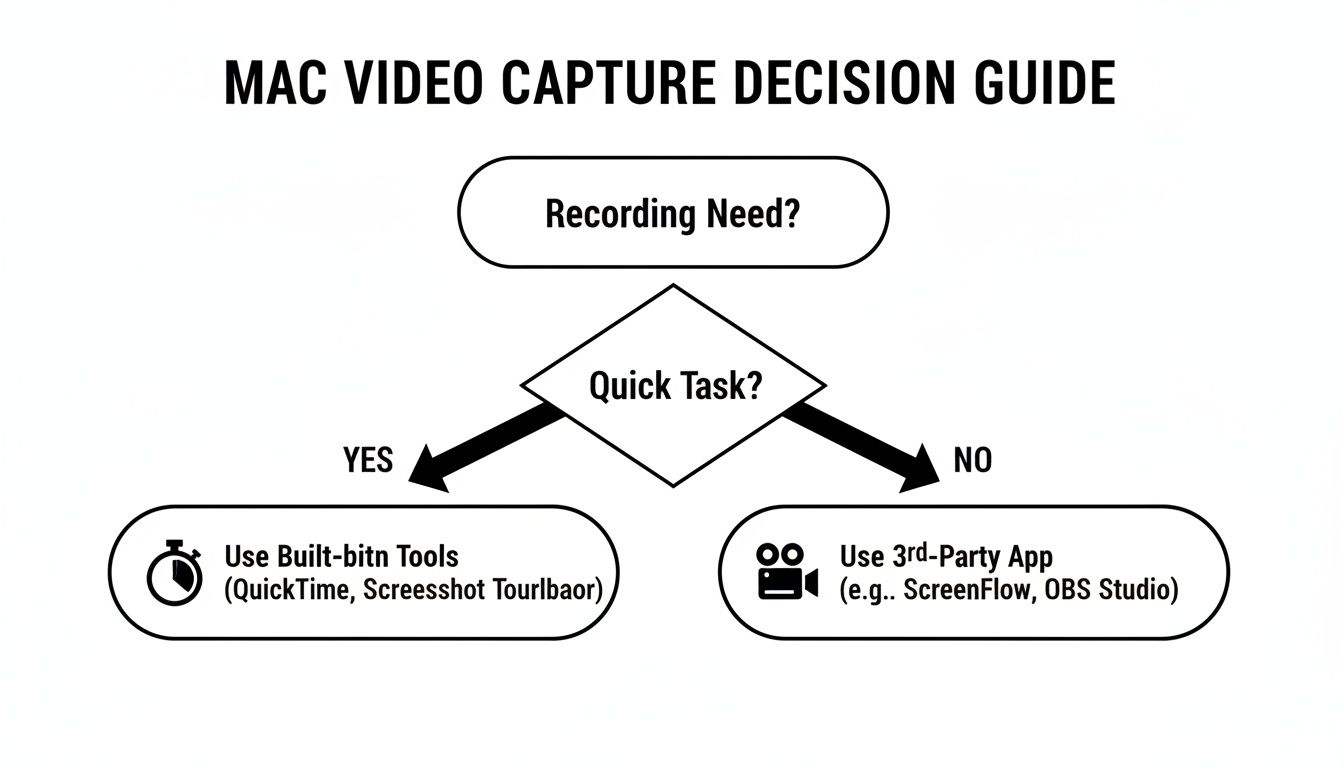
As you can see, for straightforward recordings, macOS has you covered. For anything more involved, the expanded features of third-party apps are a huge advantage.
To make this even clearer, here's a quick side-by-side comparison of the options.
Mac Video Capture Methods at a Glance
| Tool | Best For | Audio Input | Ease of Use |
|---|---|---|---|
| Screenshot Toolbar | Quick, simple screen recordings (full screen, window, or selection). | External microphone only. | Extremely easy. |
| QuickTime Player | Basic screen and webcam recordings. Good for simple tutorials. | External microphone. No internal audio. | Very easy. |
| Third-Party Apps | Professional tutorials, webinars, multi-source recordings. | Internal system audio, external mics, multiple sources. | Varies, but generally more complex with a richer feature set. |
Essentially, the built-in tools are fantastic for their convenience, but dedicated software unlocks a new level of quality and control.
The Evolution of Mac Video Recording
Capturing video on a Mac has gone from a niche activity to a mainstream one, largely thanks to Apple's tight integration of recording tools and hardware-accelerated codecs. While QuickTime Player has offered basic recording since the 2000s, the real game-changer came with recent macOS updates that introduced system-level APIs and hardware H.264/H.265 encoding.
This shift was massive. It reduced CPU usage by as much as 30–50% compared to older software-only methods, making it possible to capture long, high-resolution video without grinding your entire system to a halt.
By the end of this guide, you’ll know exactly which tool fits your needs, from simple screen recordings to complex setups involving multiple audio sources and webcams.
Understanding the pros and cons of each option is the key. While the free tools are incredibly convenient, exploring the best screen recording software for Mac can open up a world of powerful features—like capturing your Mac's internal audio or advanced editing tools—that can seriously elevate your final product.
Getting Great Results with macOS's Built-In Recording Tools
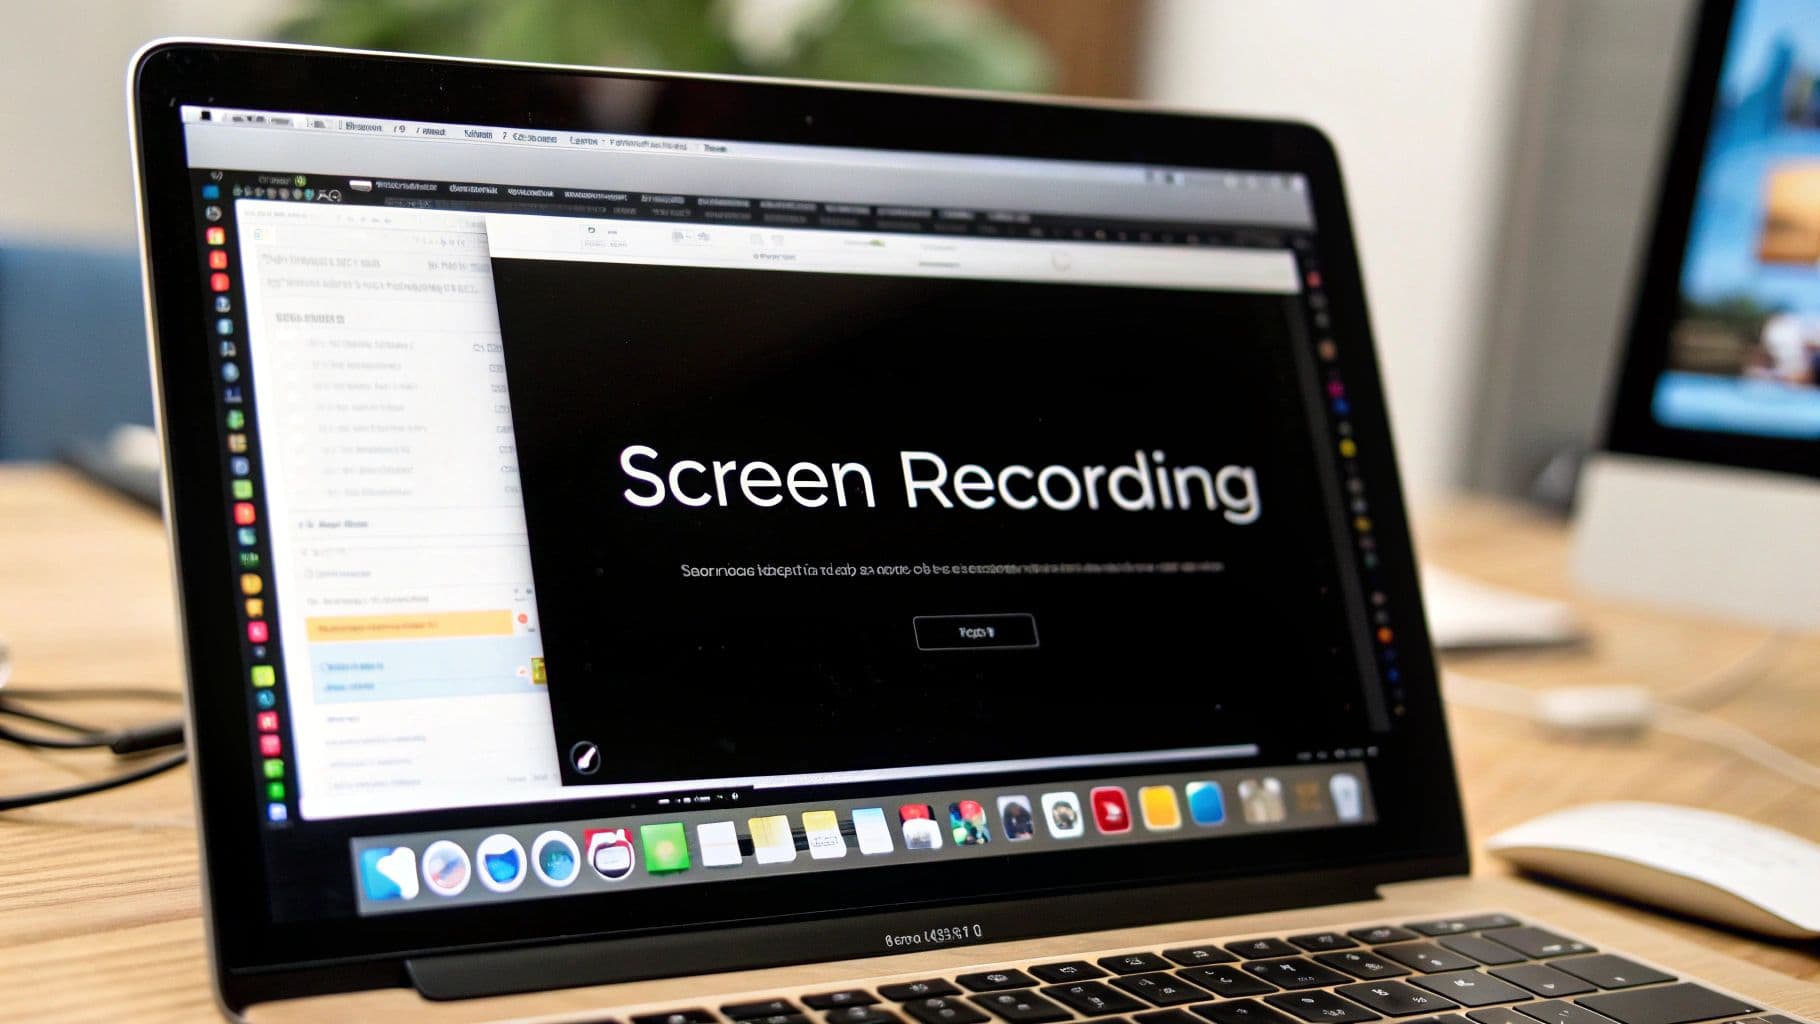
Sometimes, the best tool is the one you already have. When you need to record your screen on a Mac, you don't have to go hunting for fancy software—Apple has already baked in some surprisingly powerful options.
These built-in macOS tools are my go-to for quick, no-fuss recordings. Think bug reports, short how-to guides for a colleague, or just capturing a process without the overhead of a complex application. We'll look at two key players: the lightning-fast Screenshot Toolbar and the slightly more robust QuickTime Player.
The Screenshot Toolbar: Your Instant-Record Shortcut
For pure speed, nothing beats the Screenshot Toolbar. I use it constantly. Just hit Command + Shift + 5, and a control panel pops up, ready to go. It’s the fastest way to get from an idea to a recording on your Mac.
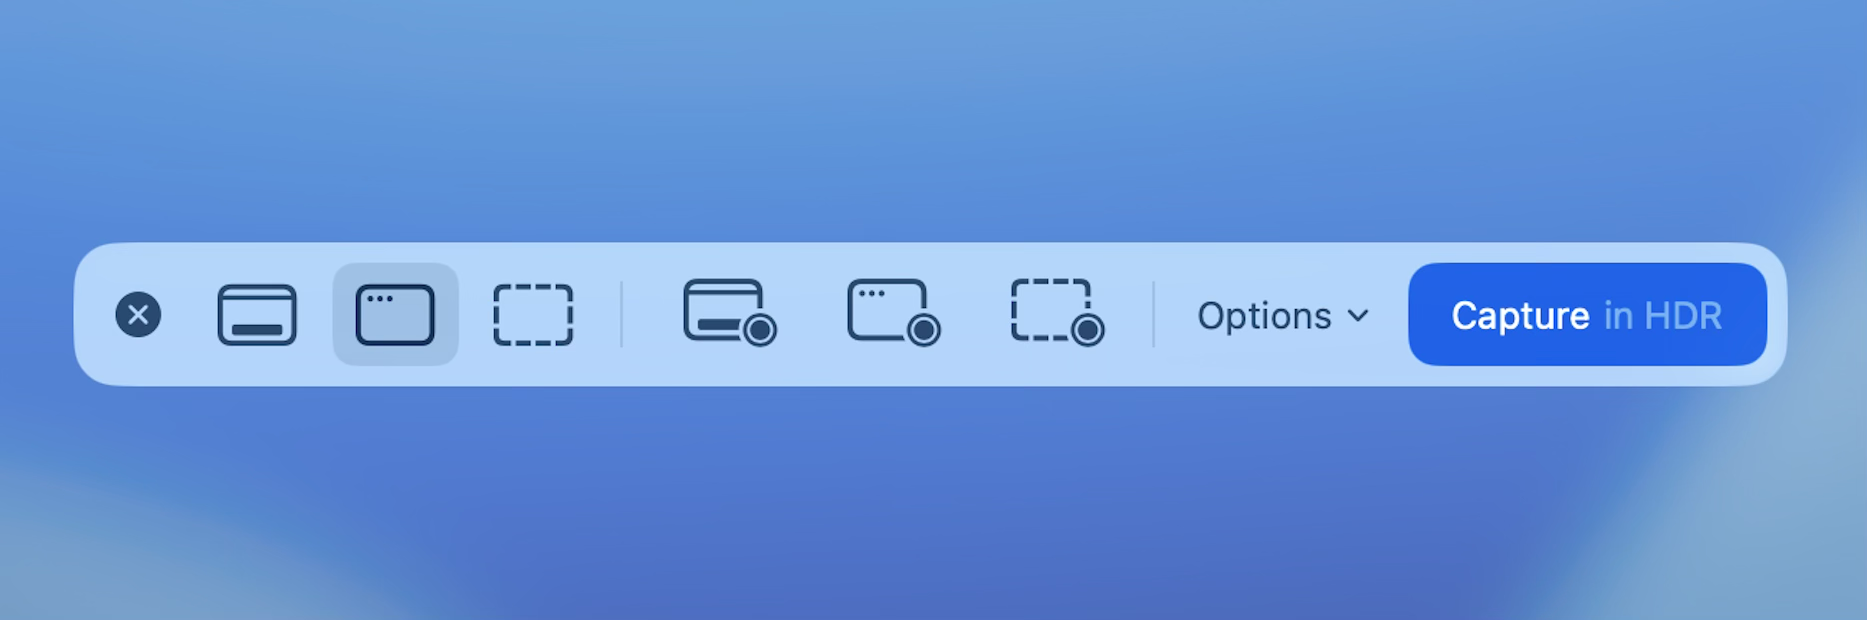
Once the toolbar is on-screen, you’ve got two main choices for video:
- Record Entire Screen: This is exactly what it sounds like. It captures your entire desktop, making it perfect for demonstrating a workflow that jumps between different apps.
- Record Selected Portion: This is my favorite. You can drag a box around a specific window or even just a small section of your screen. This is fantastic for focusing your viewer's attention and cutting out all the clutter from your desktop or menu bar.
Fine-Tuning Your Capture in Seconds
Before you jump in, pop open the "Options" menu. This is where a simple screen grab becomes a proper recording.
You can choose your audio source here—essential for adding a voiceover. I often use my external mic to get clearer audio than the built-in one provides.
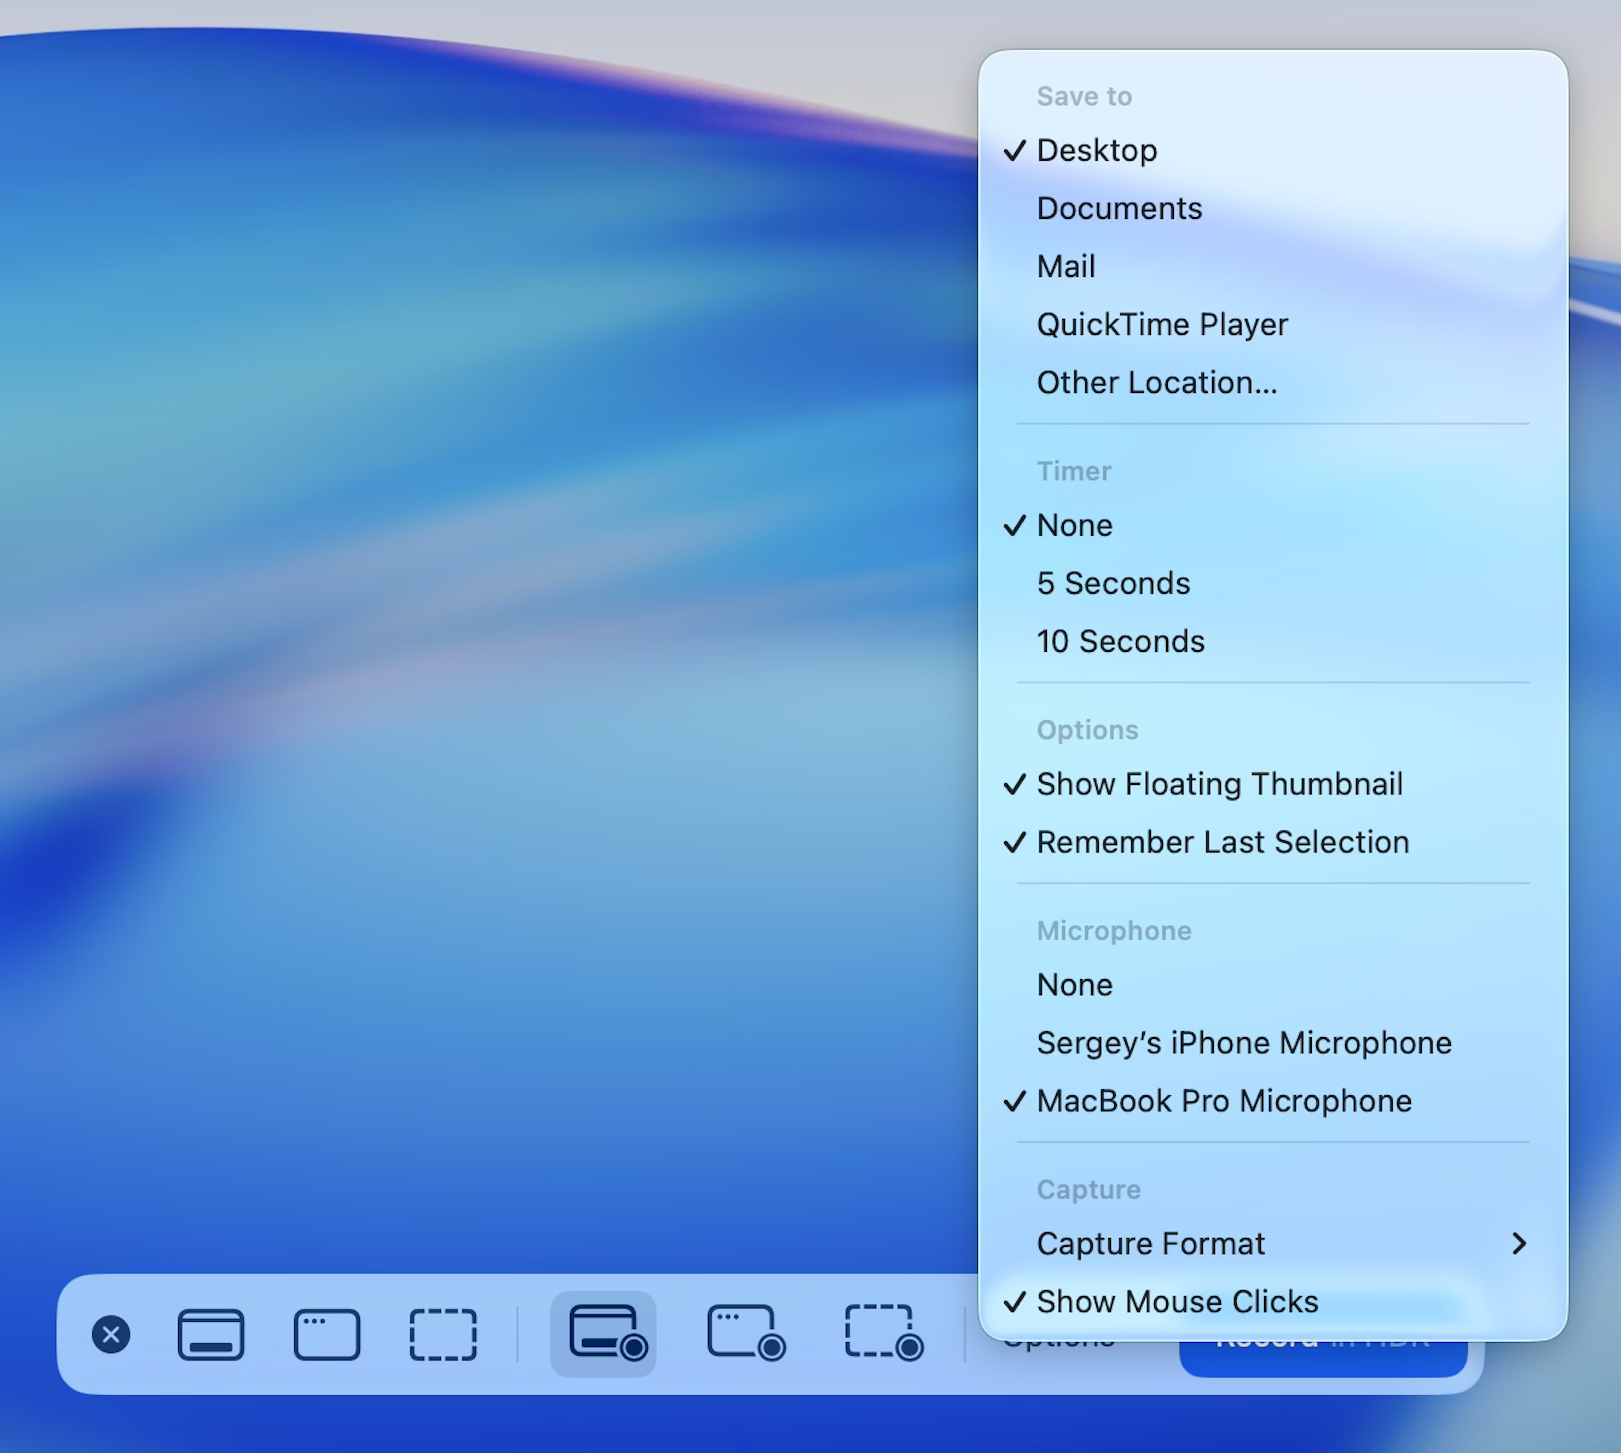
Here’s a pro tip: always check the "Show Mouse Clicks" option. It puts a little circle around your cursor every time you click. For tutorials or software demos, this is non-negotiable. It gives your audience a clear visual cue to follow, so they never wonder what you just clicked on.
The Screenshot Toolbar is all about efficiency. It saves your recording as a .MOV file right to your Desktop, making it incredibly easy to find and share immediately.
When you're ready, hit "Record." A little stop icon will appear in your menu bar at the top of the screen. Click that when you’re done, and a thumbnail of your new video will slide into the corner of your screen, ready for a quick look or to be dragged straight into an email.
Using QuickTime Player for More Control and a Personal Touch
The Screenshot Toolbar is great for quick hits, but QuickTime Player offers a bit more runway, especially when you want to include your face in the recording. It's the old reliable of macOS video.
To get started, just open QuickTime Player from your Applications folder. From the menu bar, select File > New Screen Recording. You'll notice the interface looks almost identical to the Screenshot Toolbar, with the same options to record your full screen or a portion.
So what's the difference? The magic is in combining a screen recording with a separate webcam recording to create a picture-in-picture effect.
Here's the workflow:
- First, go to File > New Movie Recording. This opens your webcam feed in a new window.
- Next, go to File > New Screen Recording to bring up the screen capture controls.
- Before you hit record, go back to your webcam window. From the QuickTime menu bar, select View > Float on Top.
This keeps your face on-screen, floating over whatever you're recording. It’s a fantastic way to add a personal touch to a presentation or make a tutorial feel more engaging. I use this trick all the time to connect with my audience without needing any third-party tools.
Once you stop the recording, QuickTime automatically opens the video file, giving you a chance to quickly trim any dead space from the beginning or end before you save it. It’s a simple, effective workflow for creating more polished content right out of the box.
Sponsored by the makers
Tired of boring screen recordings?
Try Screen Charm.
Auto-zoom, motion blur, camera overlay, and background music. All built in. Record once, export a polished video.
See what it doesLeveling Up with Advanced Third-Party Apps
When the quick-and-dirty approach of the Screenshot Toolbar or QuickTime Player just won't cut it, it's time to bring in the heavy hitters: third-party apps. Let's be clear, the built-in macOS tools are fantastic for a quick share or a simple bug report. But they hit a wall pretty fast.
The biggest limitation? Neither can record your Mac’s internal system audio. That's an immediate dealbreaker if you're trying to capture gameplay, app sound effects, or the audio from a conference call. This is exactly where dedicated software steps in, turning your Mac into a far more serious video production tool.
Advanced apps offer a level of control and flexibility you just can't get otherwise. We're talking about moving beyond a basic screen grab to things like multi-track recording, higher frame rates, and serious audio management. These tools are built for anyone who needs to capture video for Mac with real precision, whether for a polished tutorial, a detailed software demo, or an engaging presentation.
Why a Dedicated App Is Worth It
Making the jump from built-in tools to a dedicated application isn't just about small tweaks; it unlocks powerful new ways to create video content. These aren't minor upgrades—they're core features that enable a much more professional result.
Here's what you really gain:
- Internal System Audio: This is the big one. It’s often the main reason people start looking for a new app in the first place. You can finally record the sound coming from your applications, which is impossible with the native macOS tools.
- Separate Tracks: Most pro-level apps can record your screen, webcam, and microphone as separate, individual tracks. This is huge for editing. It gives you total control to adjust the size, position, and volume of each element on its own.
- Multi-Source Recording: Need to show your screen, your face via webcam, and maybe even your iPhone screen all at once? The right tools can juggle multiple video and audio inputs without breaking a sweat.
- Better Quality and Performance: You get way more control over technical specs like bitrates, codecs, and frame rates. Recording at a smooth 60 fps is often a simple checkbox away, ensuring your final video looks crisp and professional.
Think of it this way: a specialized app doesn't replace the built-in tools. It adds a powerful new layer to your creative toolkit for when "good enough" just isn't good enough.
A Practical Workflow with an Advanced Tool
Let's imagine a real-world scenario: you need to create a professional software tutorial. The goal is to record your screen cleanly, add a personal touch with your webcam, and make sure the software's sound effects are captured perfectly.
For this walkthrough, we'll use an app like Screen Charm as our example, mainly because it strikes a nice balance between powerful features and a user-friendly design.
First, you'd set up your recording in one central dashboard instead of juggling separate windows like you would with QuickTime. Here, you can select your main display as the screen source and your webcam as a secondary source. The key difference is that the app records the webcam footage as a completely separate asset—it isn't permanently "burned into" the screen recording.
Next, and this is critical, is the audio setup. You’ll choose your external mic for your voiceover and—most importantly—enable system audio capture. This ensures your narration is crystal clear while also grabbing any important in-app sounds. Many apps require a simple, one-time installation of an audio driver to pull this off, but it's a tiny step for a massive gain in quality.
Once you hit record and run through your demo, the app captures everything cleanly in the background. But the real magic happens when you stop. The app presents your screen recording, webcam video, and audio as distinct tracks on a timeline, ready for you to edit without ever having to export and open another program.
Comparing Popular Third-Party Options
While Screen Charm is a fantastic choice for creating polished tutorials (especially with its auto-zoom feature), there are other great tools out there built for different jobs. The best app for you really depends on what you're trying to create.
| Tool | Primary Strength | Ideal User Scenario |
|---|---|---|
| Screen Charm | Auto-zooming and integrated editing | Software developers and educators making polished product demos and tutorials. |
| Camtasia | All-in-one recording and advanced editing | Corporate trainers and marketers who need a full suite of editing tools, quizzes, and annotations. |
| ScreenFlow | Powerful editing and multi-app recording | Content creators producing complex tutorials that involve capturing from an iPhone or iPad simultaneously. |
| OBS Studio | Live streaming and extreme customization | Gamers, live streamers, and technical users who need granular control over every aspect of their stream or recording. |
For example, if you're a gamer planning to stream on Twitch, OBS Studio is the undisputed king. It’s free, incredibly flexible, and has massive community support. But if your goal is to quickly produce a stunning product demo for your startup's website, an app like Screen Charm is built for that exact workflow, helping you get a professional result much, much faster.
Choosing the right tool is all about matching its strengths to your project's goals. It's the surest way to capture video for Mac efficiently and effectively.
How to Configure Your Audio and Camera Setup
A fantastic-looking video can fall completely flat if the audio is bad. It’s a simple truth: if your audience can’t hear you clearly, they’ll tune out. The single biggest upgrade you can make to your entire recording setup is a decent external microphone.
Sure, your Mac’s built-in mic is fine for a quick FaceTime call, but for recording content, it’s a liability. It picks up every keyboard clack, room echo, and background hum. An external mic zeroes in on your voice, giving you that crisp, professional sound that immediately signals quality. You don't need to spend a fortune to get a massive improvement.
Choosing the Right Microphone for Your Mac
Picking a microphone is your first big decision. You can go from simple plug-and-play to more complex audio interfaces, but for most people looking to capture video for Mac, a USB microphone hits the sweet spot between quality and convenience.
- Entry-Level USB Mics: There's a reason you see mics like the Blue Yeti or Rode NT-USB+ everywhere. They connect directly to your Mac and deliver audio quality that’s in a completely different league from the internal mic.
- Lavalier Mics: These are the little clip-on mics you often see in interviews. They're fantastic when you need to move around because they stay close to the source—your voice—and capture clear audio without picking up as much room noise. They’re also surprisingly affordable.
Once you’ve got your mic, just plug it into your Mac. It should be recognized right away, but it’s always a good idea to double-check the settings.
Selecting Your Audio Input Source
Before you even think about hitting that record button, you have to tell your Mac which microphone to listen to. This is a simple but critical step that’s shockingly easy to forget.
Head over to System Settings > Sound. Under the "Input" tab, you'll see a list of every audio device your Mac can see. Find your external microphone in the list and click on it. You’ll know it’s working when the input level meter jumps in response to your voice.
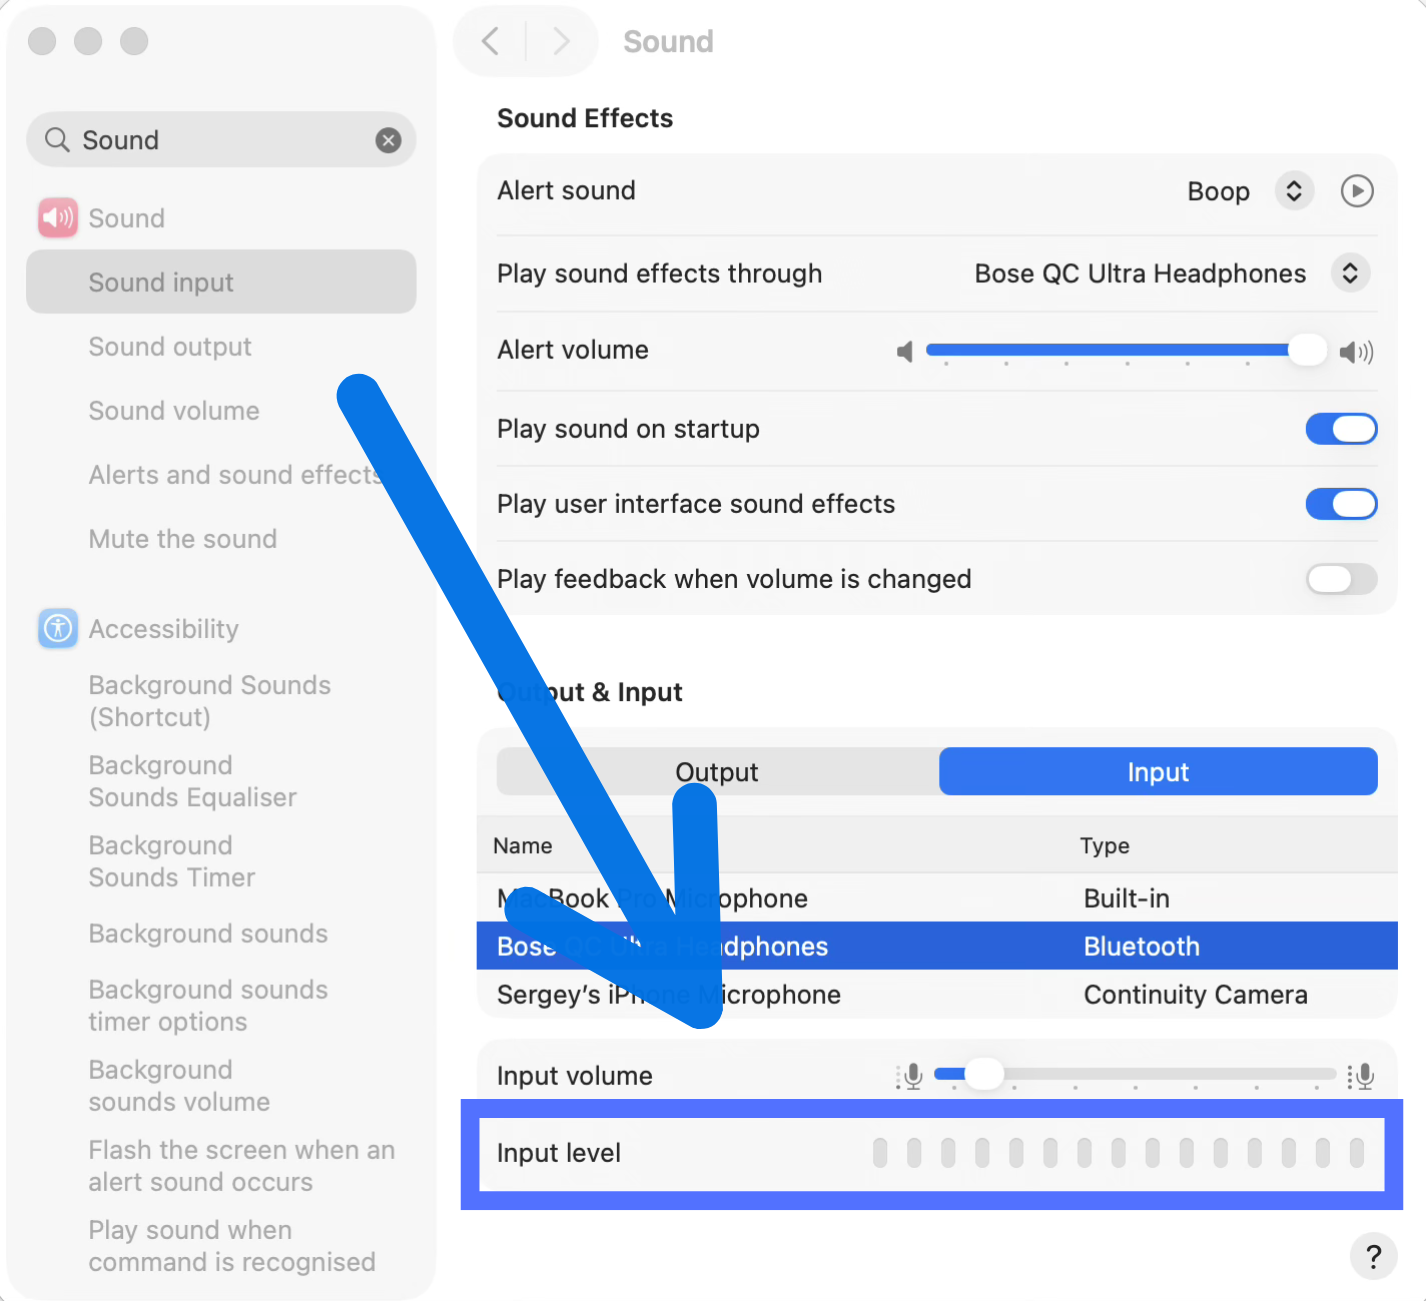
You’re not done yet! You also have to select that same microphone inside your recording software. Whether you’re using QuickTime, Screen Charm, or something else, look for a small dropdown menu next to the record button to select your audio input. Always, always check this before you start.
A quick test recording—even for just five seconds—can save you the heartbreak of realizing an hour of work was captured with the tinny built-in mic. This simple habit is an absolute lifesaver.
Optimizing Your Webcam and Visuals
With your audio dialed in, it’s time to turn your attention to what people will see. A few thoughtful tweaks to your camera setup can make a world of difference, turning a homemade video into something that looks genuinely professional. You don't need a fancy DSLR; your Mac’s built-in FaceTime camera or a solid external webcam can look great if you set the scene correctly.
Lighting is everything. The best light source you have is probably free: a window. Try to position your desk so you’re facing the window, letting that soft, natural light illuminate your face. Whatever you do, avoid having a bright window behind you—it’ll turn you into a dark silhouette. If natural light isn’t an option, a simple desk lamp or a ring light placed behind your webcam works wonders.
Next up is camera positioning. You want the camera to be at or slightly above your eye level. This angle feels more natural and engaging for your audience. If you’re just using your MacBook, an old-fashioned stack of books is the perfect, no-cost solution to get it to the right height. Frame yourself so you're centered, leaving a little bit of breathing room above your head.
Finally, take a look at your background. A cluttered or busy background is distracting. It pulls the viewer’s focus away from you and your message. A clean bookshelf, a simple wall with a plant, or even a virtual background can give your recording a much more polished and intentional look. If you want to go even deeper on this topic, check out our guide on webcam recording for Mac for more advanced tips.
Fine-Tuning Your Recording Settings and Choosing the Right Format
With your audio and camera dialed in, it's time to talk tech specs. Getting your resolution, frame rate, and file format right is the secret to a professional-looking video. These aren't just technical details; they have a huge impact on your final video's quality, how big the file is, and where you can easily share it.
Think of it this way: spending a minute on these settings before you hit record can save you hours of frustration later. You'll avoid massive files that take forever to upload or choppy playback that makes your content look amateur.
Getting Resolution and Frame Rate Right
First up is resolution, which is all about the clarity and detail of your picture. For most things you'll create—tutorials, presentations, or general online video—1080p (1920x1080) is your best bet. It’s the sweet spot, delivering a crisp HD image that looks fantastic on most screens without bogging down your computer.
If you’re capturing something with a lot of fine detail, like a complex software demo or footage you plan to show on a massive screen, then 4K (3840x2160) is worth considering. The trade-off? 4K files are enormous and demand a lot more from your Mac, both during recording and editing.
Next, let's talk about frame rate, or frames per second (fps). This setting controls how smooth the motion in your video looks. It’s pretty straightforward:
- 30 fps: This is the standard for almost all online video. It looks clean, natural, and is exactly what viewers expect for things like webinars and product walkthroughs.
- 60 fps: Double the frames means double the smoothness. This is essential if you're recording anything with fast action, like video gameplay or complex animations. It keeps everything looking fluid and prevents motion blur.
Making Sense of Video Formats and Codecs
Finally, let's untangle file formats. When you save a recording on a Mac, you’re usually choosing a container (like MP4 or MOV) and a codec (like H.264 or HEVC).
The codec is what actually compresses your video into a manageable file. On a Mac, you'll mainly see two:
- H.264 (AVC): This is the king of compatibility. If you want your video to play on pretty much any device, browser, or social platform without a hitch, H.264 is the way to go. It strikes a great balance between quality and file size.
- H.265 (HEVC): This is the newer, more efficient option. It delivers the same visual quality as H.264 but in a file that can be up to 50% smaller. This is a lifesaver for anyone working with 4K footage or trying to save on storage space.
My Go-To Advice: For sharing and uploading, stick with H.264/MP4. It just works everywhere. If you're archiving pristine 4K footage for yourself, HEVC/MOV is a fantastic space-saver. You can always convert it later.
While MOV is native to macOS, MP4 is undeniably the more universal format. If you need a little help converting files, our guide on how to convert MOV files to MP-4 has you covered. And to make sure your final video is sized perfectly for your audience, this guide to social media video dimensions is a great resource.
Polishing Your Recording and Fixing Common Glitches
Getting your video recorded is a huge step, but a little bit of editing is what really makes it shine. You don't need a pro-level editing suite, either. Your Mac comes with iMovie, which is surprisingly powerful and more than enough for cleaning up your captures.
Once you have your raw footage, a few basic post-production tweaks can make all the difference. If you're new to this, getting a handle on some video editing fundamentals is a great starting point. In iMovie, you can easily trim the awkward silence at the beginning and end of a take or snip out a mistake you made right in the middle.
It's also great for combining different video sources. Let's say you recorded your screen and your webcam as separate files. Just drag both into the iMovie timeline, and you can create that classic picture-in-picture look by resizing your webcam video and placing it in a corner over your screen recording.
Overcoming Common Recording Hurdles
Even with a perfect plan, you’ll occasionally hit a snag when you capture video for Mac. The good news is that most of these problems are pretty easy to solve once you know what to look for. One of the biggest culprits? App permissions.
If you hit record and all you see is a black screen or an error message, don't panic. The fix is almost always buried in your System Settings.
- Head over to System Settings > Privacy & Security > Screen Recording.
- Scroll through the list to find your recording app.
- Just make sure the little switch next to it is toggled on.
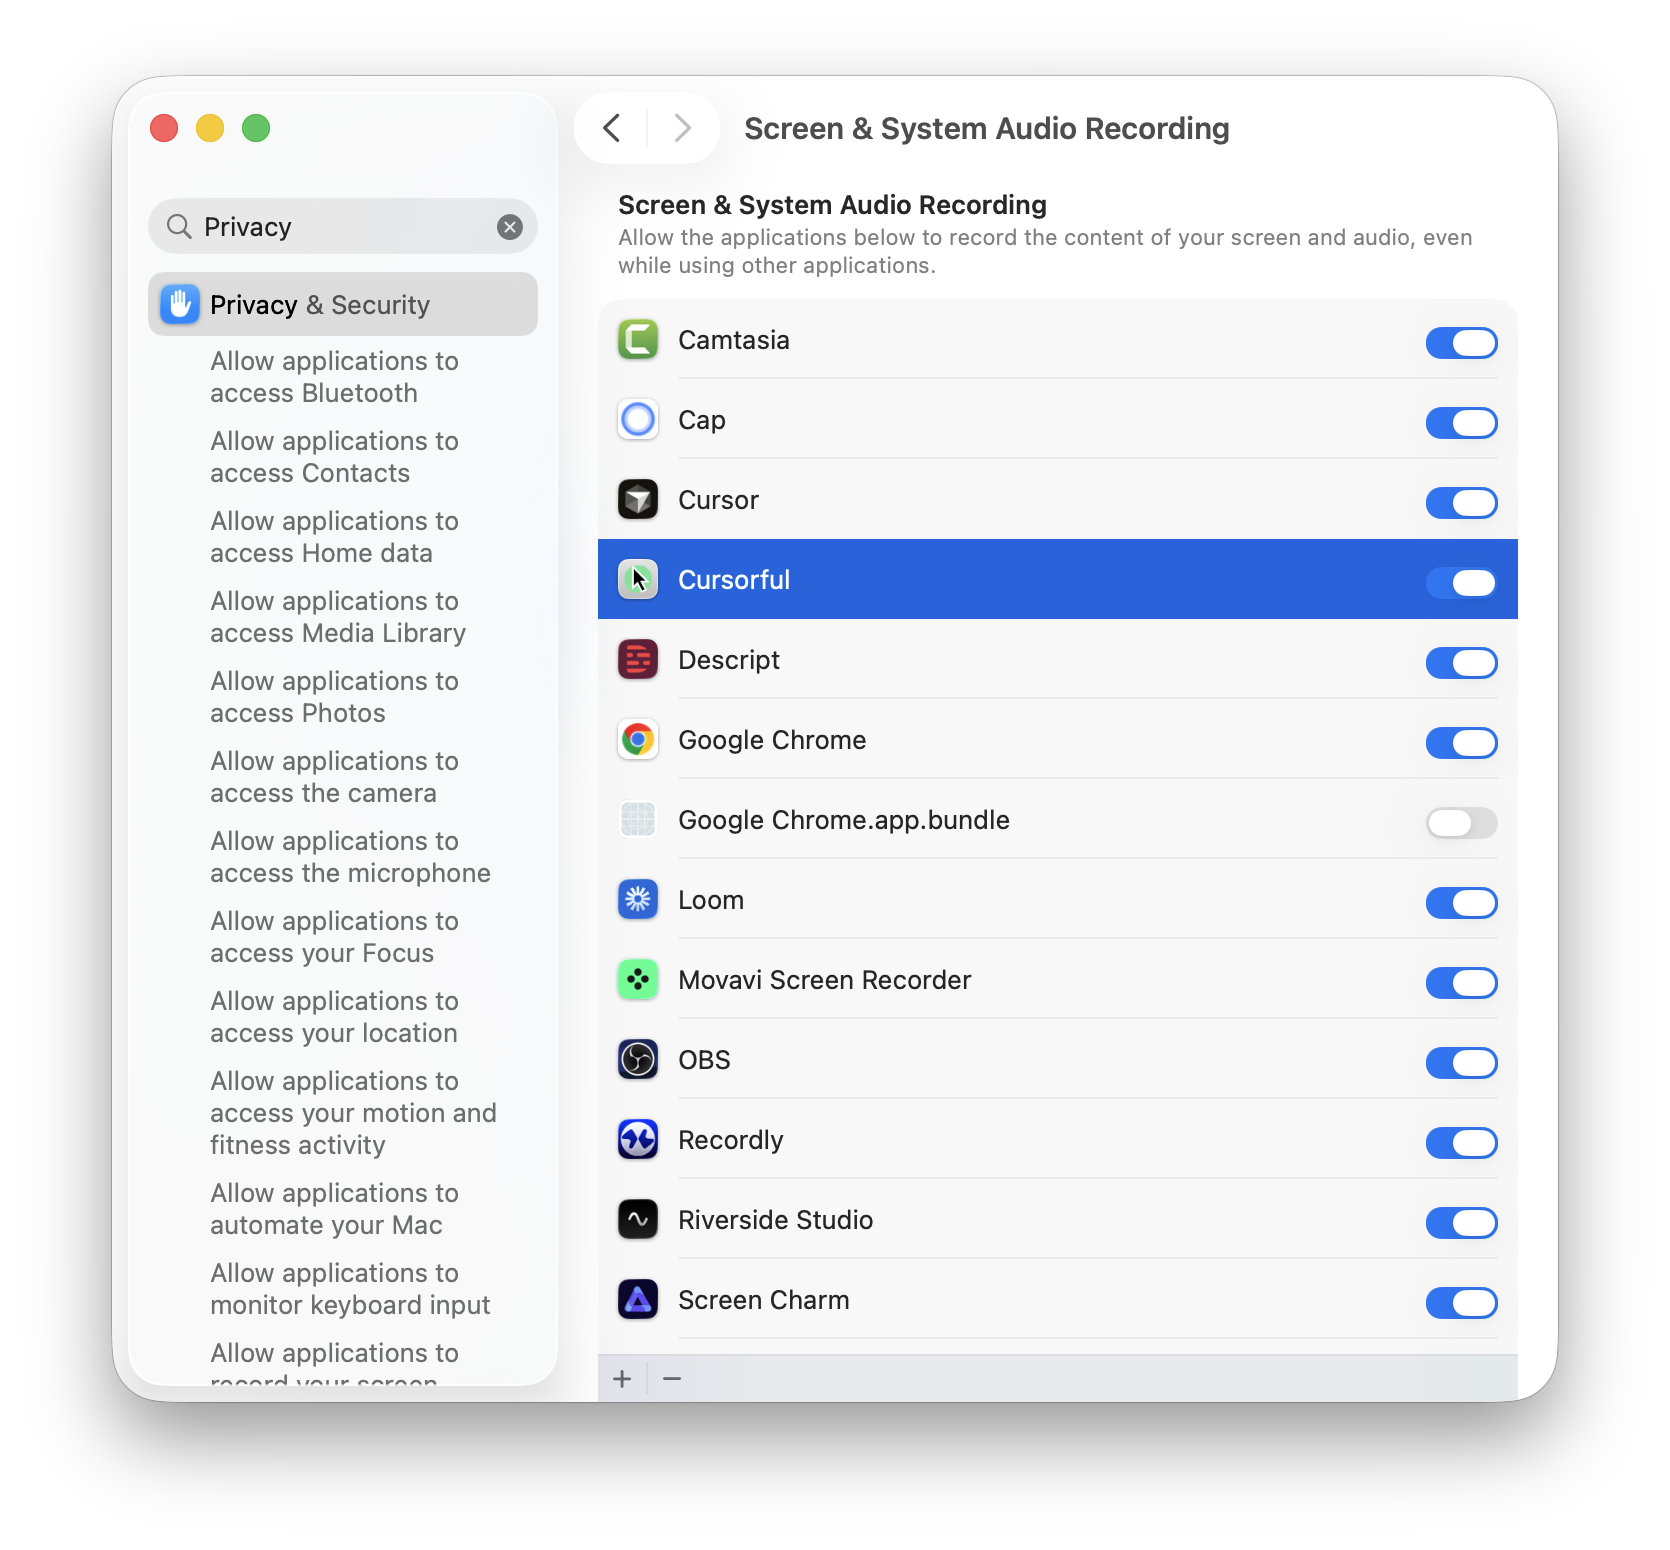
You’ll likely have to quit and restart the app for the new permission to kick in, but this one simple check solves the vast majority of "my app won't record" headaches on a Mac.
Another common pain point is choppy video or dropped frames. This is a classic sign that your Mac is just trying to do too much at once. Before you start a big recording, do yourself a favor and close every application and browser tab you don't absolutely need. Freeing up that memory and CPU power makes a huge difference.
Solving Audio and Sync Problems
Nothing ruins a good video faster than your audio falling out of sync with the picture. When your voice doesn't line up with your mouth, it's incredibly distracting. This tends to happen on longer recordings, especially if your computer is under a lot of strain.
A simple preventative measure is to just restart your Mac before you begin a marathon recording session. If the problem keeps happening, check for updates. Make sure both your recording software and macOS are on the latest version, as developers often release performance fixes that can solve these exact kinds of bugs.
Frequently Asked Questions
Even with the best tools, you’ll probably run into a few questions along the way. Here are some of the most common issues people face when capturing video on a Mac, along with some practical answers to get you back on track.
How Can I Record My Mac’s Internal System Audio?
This is a classic Mac recording problem. By design, macOS doesn't let apps easily grab the sound coming from other applications. It's a security measure, but it’s a real headache if you want to record gameplay audio or the sound effects from a software demo.
The built-in QuickTime Player only records microphone audio, not your system’s output. To get around this, you’ll need a third-party tool. Many advanced screen recorders have this capability built right in. Others might require you to install a free virtual audio driver, which essentially creates a "loopback" to route your Mac's sound into the recording app.
When Should I Use a Paid App Instead of QuickTime?
QuickTime is fantastic for quick, simple recordings. But you'll hit its limits pretty fast. It’s time to look at a dedicated app when your project demands more control and flexibility.
You'll definitely want a paid tool if you need to:
- Record system audio from games or other apps.
- Capture your screen and webcam on separate tracks so you can edit them independently later.
- Record at higher frame rates like 60 fps for buttery-smooth motion.
- Manage multiple audio inputs or video sources at the same time.
For anything that needs a professional touch—like polished tutorials or marketing videos—the advanced features of a paid app give you a level of quality and efficiency that QuickTime just can't match.
My Screen Recording Is Choppy or Lagging. What Can I Do?
Choppy video is almost always a sign that your Mac is struggling to keep up. Video recording is intensive, so the first thing to do is free up as many resources as possible. Close every unnecessary application and browser tab you have open.
If that doesn't fix it, try lowering the recording settings. If you’re recording in 4K, dropping down to 1080p can make a massive difference. Likewise, reducing the frame rate from 60 fps to 30 fps will ease the load on your system. Finally, make sure you have plenty of free space on your hard drive—writing large video files in real-time requires a fast, uncluttered disk.
Ready to create stunning product demos and tutorials without the hassle? Screen Charm offers auto-zooming, separate track recording, and an integrated editor to make your videos look professional, minus the steep learning curve. Get started today at https://screencharm.com.