So, you want a custom cursor for Mac? Start by designing a cursor image, usually a PNG file with a transparent background. The key details are size, visibility, and the click hotspot. Once the cursor is ready, you can use it in macOS workflows, screen recordings, or website interactions depending on your goal.
If your goal is specifically to make tutorials or product demos look better, also read our guide to custom cursors for macOS screen recordings.
Giving Your Mac a Personal Touch with a Custom Cursor
Getting away from the default pointer is about more than just looks; it's about making your digital workspace feel like it belongs to you. Maybe you're a content creator wanting to keep your branding consistent, or perhaps you're a developer who needs better cursor visibility during screen recordings. Either way, a custom cursor completely changes how you interact with your Mac. It’s a small tweak that can make your workflow feel more intuitive and a lot more engaging.
Think about it: a brighter, more distinct cursor can cut down on the time you waste hunting for your pointer on a cluttered screen, especially if you're juggling multiple monitors. And if you’re making product demos or tutorials, a branded cursor is a subtle but powerful way to reinforce your identity while guiding your viewer’s attention exactly where you want it.
Why a Custom Cursor Matters
The real magic of a personalized cursor goes beyond simple aesthetics and into real, tangible productivity boosts. If you're in a creative field, a well-designed pointer can make tasks like photo editing or graphic design feel more precise and natural. These aren't just feelings; the benefits are measurable.
A 2021 usability study on desktop interfaces revealed that cursor modifications—including custom icons—led to an 8–12% improvement in task completion times. It also showed a reduction in pointing errors by around 6% on precision-heavy tasks. For professionals who live in creative or technical software all day, those numbers add up to some serious time saved.
A custom cursor is one of the simplest yet most effective ways to personalize your macOS environment. It’s a functional upgrade that reflects your personality or brand, making every click and movement feel more intentional and connected to your work.
In this guide, we’re going to cover everything you need to create and set up your own cursor. We'll start with design ideas and then walk through making it a functional part of your desktop with Screen Charm. And while our focus here is on system-wide changes, you can also check out our guide on how to change your Mac's cursor for other tips and tricks. Let's get started on turning that simple idea into a part of your daily Mac life.
Designing a Cursor That’s Both Functional and Stylish
Before you can get your custom cursor running on macOS, you've got to design it. This part is a fun mix of creative flair and nitty-gritty technical details. The goal is to create something that not only looks great but also feels right in everyday use.
First things first, you'll need the right tools. I always recommend vector-based apps like Figma, Sketch, or Adobe Illustrator. Working with vectors gives you the freedom to scale and tweak your designs without losing a pixel of quality. You could use something like Photoshop, but vector editors just make the whole process of exporting to precise dimensions so much smoother.
Nailing the Technical Details
Let's get down to the most important part of any cursor: the hotspot. This is the single, exact pixel that macOS uses to register a click. On a standard arrow, it's the very tip. For a crosshair, it's dead center. Everything in your design has to be built around this tiny point of interaction. If you get the hotspot wrong, using your cursor will feel off and frustratingly inaccurate.
Once you have a design in mind, it's time to think about file formats and sizes. For macOS, a PNG file is your best friend. It supports transparency, which is non-negotiable—you don't want your cursor showing up as a big, clunky square on the screen.
Think of your cursor as a tiny, interactive icon that's always on the move. It needs to be instantly recognizable and clear, even when you're flying across the screen. Visibility and clarity are everything.
When you're ready to export, size is key. A 32x32 pixel canvas is a solid starting point for standard displays. However, you absolutely should create a 64x64 pixel version for Retina displays. This little extra step ensures your cursor looks sharp and crisp on any modern Mac.
Cursor Design Specifications for macOS
Here’s a quick reference table I put together with the key technical details you'll need to keep in mind while designing your cursor assets for a Mac.
| Attribute | Recommended Value | Why It Matters |
|---|---|---|
| Hotspot | Single, defined pixel | This is what makes your clicks accurate and predictable. It's the most crucial functional element. |
| File Format | PNG | You need the transparency support it offers. It's also perfectly compatible with apps like Screen Charm. |
| Dimensions | 32x32px & 64x64px | Creating both a standard and a high-res version guarantees a crisp look on all Mac displays. |
| Visibility | High-contrast outline | A thin black or white border helps the cursor pop against both light and dark backgrounds. |
Getting these specs right from the start will save you a lot of headaches later on.
Designing for Different States
A truly great cursor isn't just one image; it's a whole set. To make your custom cursor feel like a natural part of macOS, you should design for the different "states" it will enter as you work.
- Pointer: This is your everyday, general-purpose cursor.
- Link/Hand: The classic hand icon that shows up when you hover over something clickable.
- Text/I-beam: That familiar vertical bar that tells you where you can start typing.
- Busy/Loading: The spinning wheel (or your custom equivalent) that lets you know your Mac is thinking.
When you create unique designs for each of these, your cursor set feels complete and professionally done. By focusing on these functional details, you can create a custom cursor that’s not just a cool visual tweak but a genuine upgrade to how you use your Mac every day.
Sponsored by the makers
Tired of boring screen recordings?
Try Screen Charm.
Auto-zoom, motion blur, camera overlay, and background music. All built in. Record once, export a polished video.
See what it doesBringing Your Custom Cursor to Life on macOS with Screen Charm
Alright, you've designed your brilliant custom cursor, and the PNG files are ready to go. Now, it's time for the fun part: making it work on your Mac. To bridge the gap between your image files and a system-wide cursor, you'll need a dedicated app. For macOS users, Screen Charm is the way to go.
First things first, you need to grab the app. Head over to the official Screen Charm website to download it. Installation is just like any other Mac app—drag it to your Applications folder, and you're all set. When you fire it up, you’ll find a clean, straightforward interface waiting for you.
This whole process really starts with the design, which, as we've covered, boils down to a few key decisions.
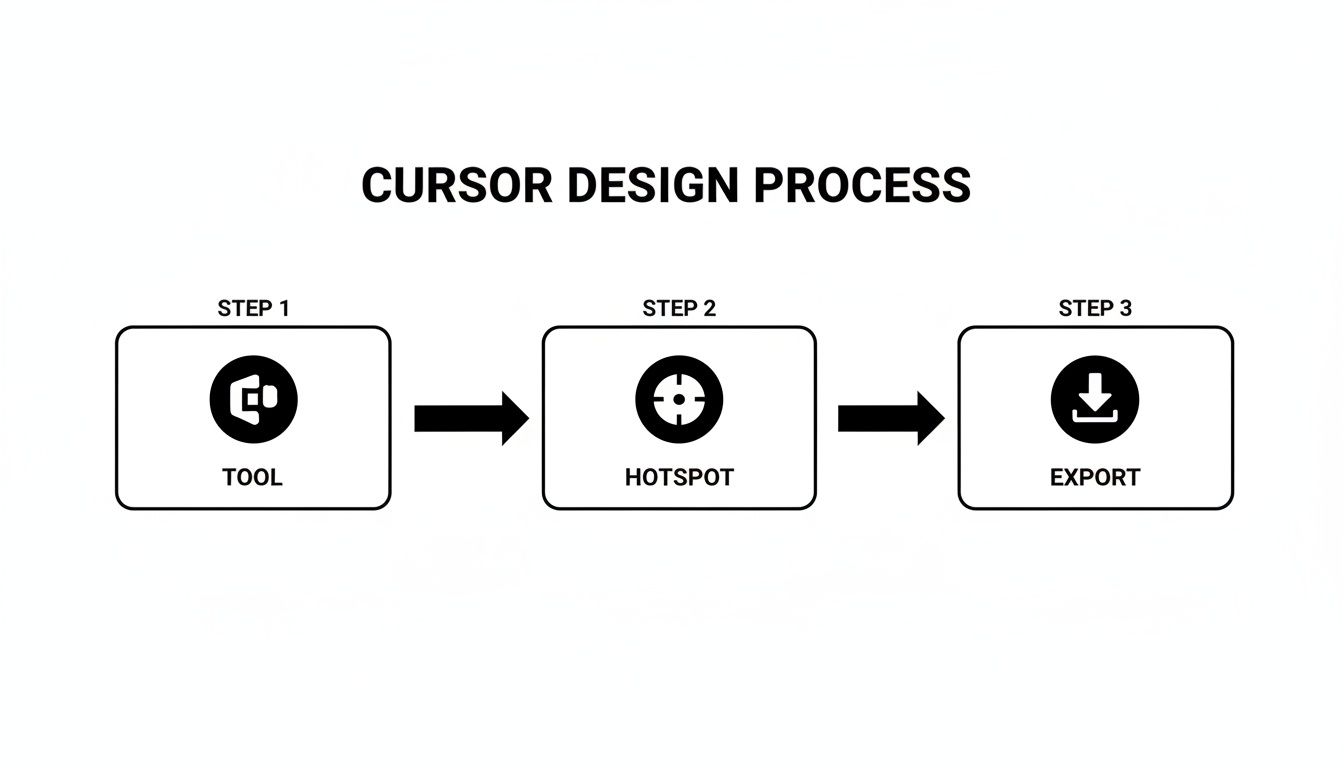
Think of it as a simple three-step flow: pick your design tool, nail the hotspot placement, and export your files correctly. Getting that part right makes everything else a breeze.
Importing and Activating Your Cursor
Once you're inside Screen Charm, you'll see an "Add" or "Import" option. This is where you'll upload all the PNG files you created for the different cursor states—your main pointer, the little hand for links, the text I-beam, and so on.
A really handy feature in Screen Charm is the ability to group these cursors into a single "pack." This keeps everything tidy, especially if you start designing multiple themes. For example, you could have a sleek, professional pack for work and a completely different, creative one for personal projects.
After you've imported your files and bundled them into a pack, activating them is just a matter of clicking a button. You can set your new cursor theme to work everywhere on your Mac. Even better, you can assign cursors to specific apps. This is a game-changer if you want a high-precision crosshair for Figma but prefer the standard macOS pointer for everything else.
Managing and Tweaking Your Cursors
This is where an app like Screen Charm really shines. You're not stuck with one choice forever. You can swap between entire cursor packs on the fly without having to mess with system files or complicated settings.
The interface lays out all your collections visually, making it incredibly easy to see what you have and switch between them whenever you feel like a change.
It's not just about turning them on and off, either. You can fine-tune things like cursor size directly within the app. This is a huge win for both accessibility and just getting the feel right. If that 64x64 pixel cursor you designed feels a little too big in practice, you can scale it down instantly without going back to your design file.
What makes a tool like Screen Charm so valuable is its flexibility. It takes the task to create a custom cursor from a geeky, technical challenge and turns it into a simple act of personalization. You can change the entire feel of your Mac as easily as you change your desktop wallpaper.
Adding Your Custom Cursor to a Website
So, you've personalized your macOS desktop, and now you're thinking about bringing that same custom feel to your website. Smart move. A custom cursor is one of those subtle but powerful details that can make a site feel more interactive and lock in your branding. And the best part? All it takes is a little bit of CSS.
The magic happens with the cursor property in CSS. It lets you point to your cursor image file and, just as importantly, set a fallback. This fallback is your safety net—it tells the browser what cursor to show if your custom one fails to load, so you never leave users with a broken experience.

This isn't just a niche trick anymore; it’s becoming a common practice in modern web design. Browser support is solid across the board, with most Chromium-based browsers and Firefox handling .cur, .png, and .svg files without any issues. Data even shows that roughly 18–25% of modern product teams are using custom cursors in some way. That number jumps to 30–45% for creative web-based tools where a unique user experience is a top priority. You can dive deeper into these cursor adoption trends and their impact on user experience if you're curious.
Implementing Your Cursor with CSS
Ready to get started? The simplest way to add a custom cursor is to apply it to your entire website by targeting the body element in your stylesheet.
Here's the basic code you'll need:
body { cursor: url('path/to/your-cursor.png'), auto; }
With this snippet, the browser will first try to load your-cursor.png. If something goes wrong—maybe the file path is broken or the image is too large—it will simply fall back to the auto cursor, which is the user's default arrow. No harm, no foul.
Applying Cursors to Specific Elements
This is where you can get really creative. Instead of a site-wide cursor, you can change the pointer only when a user hovers over specific interactive elements, like buttons or links. This gives users instant visual feedback that they're about to click on something important.
For instance, maybe you want a special hand icon to pop up when someone mouses over your navigation links.
- For navigation links: You can use a class selector to target them directly.
- For action buttons: A completely different cursor could signal a primary call to action.
The CSS for that might look something like this:
.nav-link:hover { cursor: url('path/to/hand-pointer.svg'), pointer; }
.primary-button { cursor: url('path/to/action-cursor.png'), pointer; }
The key is to enhance, not distract. A subtle change on hover can guide the user and make interactions feel more intuitive, but an overly complex or large cursor can quickly become annoying and hurt usability.
Optimizing Cursors for the Web
When you’re working with cursors on a live website, performance is everything. A heavy image file can add to your site's load time, which is never a good thing. That's why SVGs are usually the best choice for web cursors—they’re incredibly lightweight and scale perfectly without getting pixelated.
Another pro tip is to encode your image directly into the CSS using Base64. This technique embeds the image data right into the stylesheet, which means one less HTTP request for the browser to make. For a tiny file like a cursor, this can give you a nice little performance bump. If you haven't done this before, don't worry—you can use an online tool like our handy a Base64 encoder/decoder (many free ones are available online) to make it easy.
Avoiding Common Cursor Design Pitfalls
A custom cursor should make your Mac feel more like yours, but it's easy to get carried away with the creative side and completely forget about usability. I’ve seen it happen countless times: a beautiful design that's a total nightmare in practice.
One of the most common mistakes is creating a cursor that vanishes against certain backgrounds. You end up playing a frustrating game of "find the pointer" every time you switch from a light window to a dark one.
The fix is surprisingly simple. From the very start of your design process, think about visibility. A thin, high-contrast outline—black for a light cursor, white for a dark one—makes a world of difference. It’s a tiny detail that ensures your pointer stands out no matter what's on the screen.
Another classic pitfall is an unclear click point. If you can't tell exactly where the "hotspot" is, every click becomes a shot in the dark. Your design needs to have an obvious focal point that tells the user, "This is the spot."
Balancing Creativity with Usability
Look, I get the appeal of a highly artistic or complex cursor. But in practice, intricate designs often just turn into an unrecognizable smudge at normal sizes. The same goes for oversized cursors; they might look cool, but they constantly get in the way, covering up buttons and text you're trying to interact with.
You have to strike a balance between a cool design and something you can actually use all day.
My advice? Stick to standard dimensions like 32x32 or 64x64 pixels. This size range is the sweet spot for maintaining clarity. And please, test your design at its actual size while you're working on it, not just zoomed in. You'll quickly see what works and what doesn't.
A great custom cursor doesn’t just look good; it feels intuitive and transparent in its function. The ultimate goal is to create a design that is both personal and perfectly practical, enhancing your workflow without ever getting in the way.
Don't just take my word for it. Accessibility audits show that a shocking 42% of sites with custom cursors fail basic usability checks for things like poor contrast or improper sizing. If you want to dive deeper and make sure your cursor is truly accessible, checking out some website accessibility best practices is a great place to start.
Performance and Optimization on macOS
Finally, let’s talk performance. A custom cursor should never, ever slow your Mac down.
If you're using a static PNG file, you have nothing to worry about. The performance impact is basically zero. Animated cursors, however, are a completely different beast. A poorly optimized animation or a massive file can create a noticeable input lag, making your whole system feel sluggish.
This problem gets even worse when your Mac is already working hard. In fact, studies show that 27% of lower-spec devices experience a measurable performance hit from large animated cursor files. While web teams often use fallbacks to ensure a consistent user experience across devices, on macOS, the simplest solution is the best one: stick to optimized PNGs for a smooth, lag-free experience.
Common Questions About Custom Cursors
So, you're ready to dive into custom cursors? It's a fun way to personalize your Mac, but a few questions usually pop up right at the start. Getting these details sorted out first will save you a ton of headaches later.
Let's walk through some of the most common things people ask when creating a custom cursor for macOS. Getting this right from the beginning means your new cursor won't just look cool, but it'll actually work perfectly.
What File Format Is Best for a Mac Cursor?
For macOS, your best bet is PNG. Hands down, it's the most reliable and straightforward format for this job.
The big reason is its support for transparency. This is what lets you create a custom shape without having a clunky white or black box floating around it. While you might see people talking about SVG for web stuff (and it's great for that), native Mac apps like Screen Charm are built to work seamlessly with PNG files. A good PNG will look crisp on any display, Retina included.
Will a Custom Cursor Slow Down My Mac?
Honestly, no. A well-made custom cursor will have zero noticeable impact on your Mac's performance.
Think about it: a small, static PNG file is tiny. The resources needed to render it are practically nothing. Lightweight apps designed for this, like Screen Charm, are engineered to be super efficient and stay out of your way. The only time you'd ever run into a performance hiccup is with a really complex, poorly optimized animation, but that's not something you'd typically use for your main system pointer anyway. Stick to a static PNG, and you'll never even know it's there—performance-wise, at least.
The goal is a seamless experience. A good custom cursor should enhance your interaction with your Mac, not hinder it. Efficiency in both design and implementation is key to achieving this.
How Can I Make Sure My Cursor Is Easy to See?
This is probably the most important question. A cursor that looks great but disappears on half your screen is just frustrating. Visibility is everything.
The single best trick is to give your cursor a high-contrast outline. A thin black border around a light cursor, or a white one around a dark cursor, works wonders. This simple addition makes it pop against virtually any background.
I also recommend sticking close to a standard size. Designing on a 32x32 pixel canvas is a great starting point. Most importantly, make sure the "hotspot"—the single pixel that does the clicking—is clear. For an arrow, it's the very tip. For a crosshair, it's the dead center. Don't make people guess where they're clicking.
Ready to create a custom cursor that makes your Mac uniquely yours? Screen Charm gives you all the tools you need to design, import, and manage your personalized cursors with ease. Download it today and transform your desktop experience. https://screencharm.com