The initial experience a user has with your macOS application is more than just a welcome screen; it's the foundation for long-term loyalty and engagement. In the sophisticated and design-conscious macOS ecosystem, a clunky, confusing, or generic onboarding process can lead to instant uninstalls. Users expect intuitive, seamless, and valuable introductions that respect their time and intelligence. A strong first impression is critical. To delve deeper into creating an impactful first impression and setting the foundation for long-term user satisfaction, explore comprehensive guidance on customer onboarding best practices.
This article moves beyond generic advice to provide a deep dive into seven powerful user onboarding best practices specifically tailored for the macOS environment. We will explore actionable strategies to not only guide new users but to delight them, ensuring they quickly grasp your app's core value and become advocates for your product.
You will learn how to implement techniques that feel native to macOS, including:
- Progressive disclosure that respects the clean macOS aesthetic.
- Interactive tours that leverage the platform's unique capabilities.
- Personalized welcomes that make users feel seen.
- Delivering quick wins to demonstrate immediate value.
These practices are essential for any developer looking to reduce churn and build a dedicated user base on macOS.
1. Progressive Disclosure
Progressive disclosure is a cornerstone of effective user onboarding best practices, especially on a platform like macOS where simplicity and clarity are paramount. Popularized by usability experts like Jakob Nielsen, this technique involves revealing information and features in carefully sequenced layers. Instead of flooding new users with every option at once—cluttering the clean interface they expect—you show them only what they need to get started, preventing cognitive overload and guiding them toward their "aha!" moment.
This approach is about managing complexity. It respects the user's learning curve by introducing new functionality gradually, often triggered by their actions or progress. This creates a more focused and less intimidating initial experience, allowing users to build confidence and master your macOS app at their own pace.
How Progressive Disclosure Works
The core principle is simple: Start with the essentials and unveil complexity later. For example, a new macOS application might initially hide advanced settings in a separate "Advanced" pane within its Preferences window, a familiar pattern for Mac users. As users become more familiar with the core functions, they can explore these advanced options when they are ready, rather than being confronted with them on first launch.
A great example within the macOS ecosystem is Final Cut Pro. New users are presented with a streamlined interface for basic editing tasks like trimming and arranging clips. Advanced features like multicam editing, complex color grading, and audio mixing are tucked away in specific workspaces and inspector panels, accessible only when a user actively seeks them out. This sequencing ensures users can produce a simple video first before diving into professional-grade features.
This infographic illustrates the typical flow of a progressive disclosure strategy.
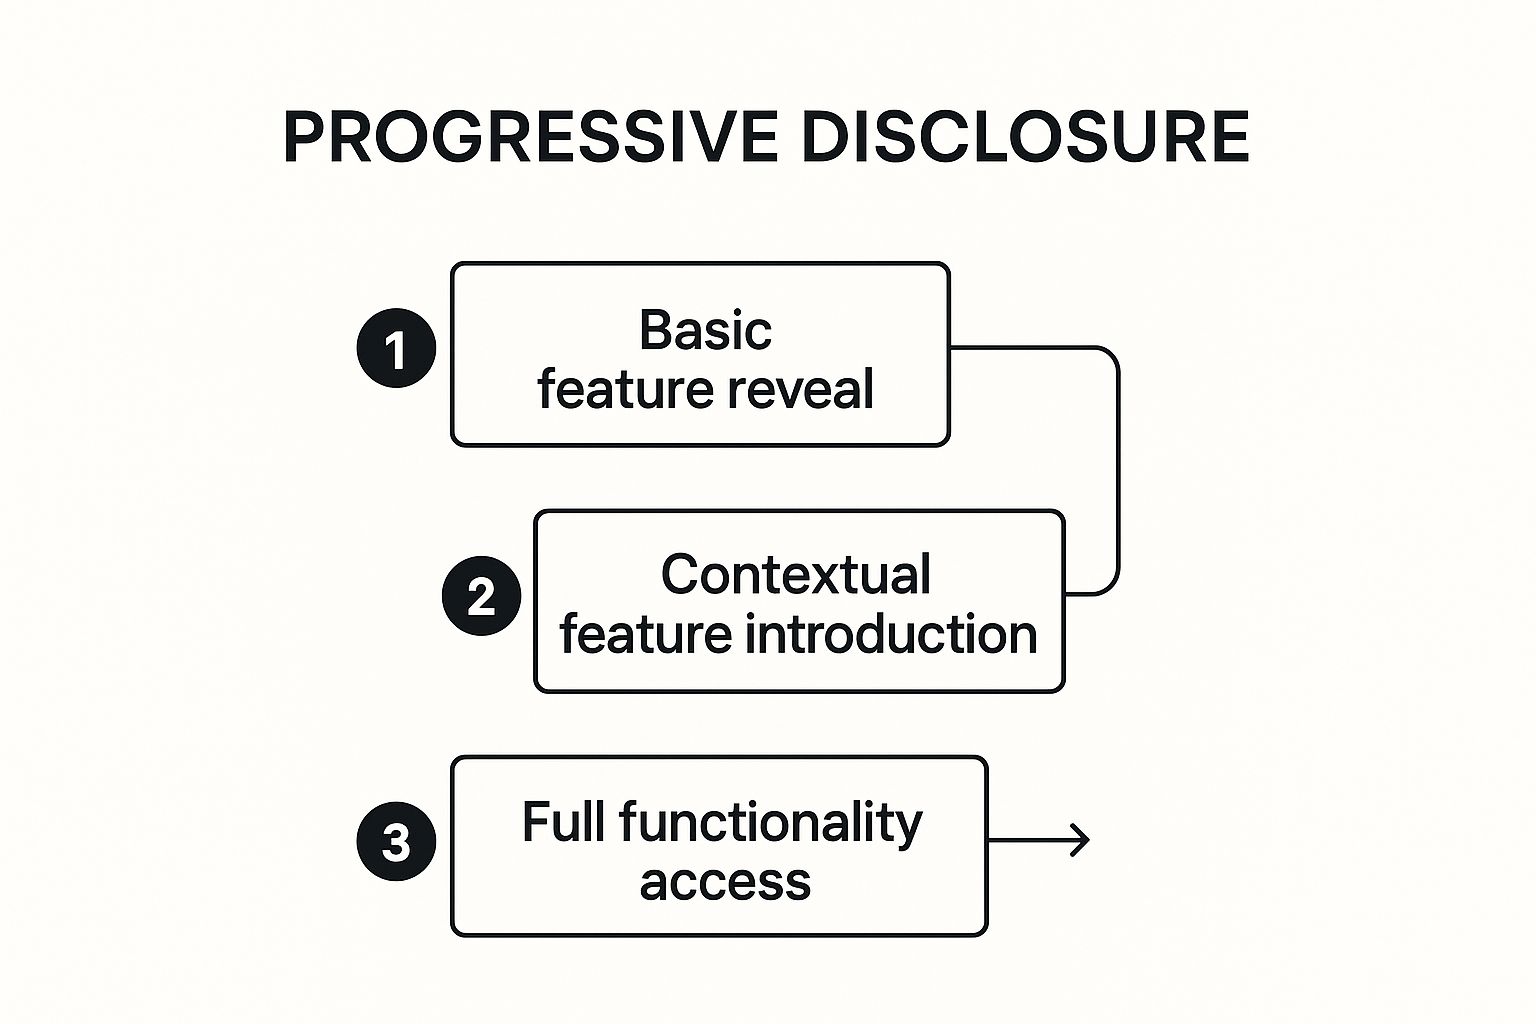
This structured flow ensures that users build a solid foundation of understanding before more complex features are introduced contextually.
Implementation Tips
To apply this user onboarding best practice effectively for your macOS app, follow these actionable steps:
- Map the User Journey: Before designing, outline the key stages a new user goes through, from novice to expert. Identify the core actions they must take to see value in your Mac app.
- Use Analytics: Track user behavior to pinpoint the ideal moments for introducing new features. For instance, after a user has successfully used a core tool five times, you might trigger a tooltip highlighting a related, more advanced feature or keyboard shortcut.
- Provide an Escape Hatch: Always allow experienced users to skip introductory flows or access all features immediately. A "Skip Tutorial" button or an easily accessible "All Settings" view is crucial for not frustrating power users who are already familiar with similar macOS software.
Sponsored by the makers
Tired of boring screen recordings?
Try Screen Charm.
Auto-zoom, motion blur, camera overlay, and background music. All built in. Record once, export a polished video.
See what it does2. Interactive Product Tours
Interactive product tours are a powerful user onboarding best practice that moves beyond passive viewing. Instead of making users watch a video or click through static screens, this method guides them through hands-on activities within your live macOS application. By combining contextual tooltips, modals, and task-driven steps, users learn by doing, which builds muscle memory and a much deeper understanding of the app’s value from the very first session.
This "learning by doing" approach is highly effective because it directly connects instruction to action. It empowers users to achieve a quick win within the macOS environment, cementing the product's core functionality in their minds and building the confidence needed to explore further on their own.
How Interactive Product Tours Work
The guiding principle is: Show, don't just tell. An interactive tour prompts users to complete a core workflow step-by-step. For instance, a new user in a macOS design application like Sketch isn't just told where the shape tool is; they are actively guided to click the tool, draw a rectangle on the canvas, and then apply a color using the inspector panel. This immediate, tangible result is far more memorable than a passive demonstration.
Things, the popular macOS to-do app, does this subtly. When you first launch it, it contains a pre-populated "Sample Project" that walks you through creating tasks, adding notes, and scheduling deadlines. By interacting with this demo content, you learn the app's core mechanics in a practical, hands-on way.
This method often involves a mix of media. For a complex macOS application, a product tour could be the hands-on part of a larger onboarding strategy. A crucial part of this is often making compelling explainer videos to set the stage before the user dives into the interactive elements, providing a high-level overview of what they're about to accomplish.
Implementation Tips
To implement this user onboarding best practice effectively, focus on creating a seamless and rewarding experience:
- Focus on Core Actions: Design your tour around the one or two "must-do" tasks that deliver the most value and will be repeated frequently by users of your Mac app. Avoid covering every single feature.
- Allow User Control: Always include options to skip, pause, or restart the tour. Forcing users through a rigid process can lead to frustration, especially for those who prefer to explore freely.
- Use Relevant Data: Populate the tour with realistic, context-aware sample data instead of generic "Lorem Ipsum" text. For a Mac email client, this could be a demo inbox from "Apple." This makes the experience feel more authentic and immediately applicable to the user's goals. Learn more about creating high-quality instructional content in our guide to online course video production on screencharm.com.
- Build Adaptive Paths: A great tour anticipates user mistakes. If a user clicks the wrong button, provide gentle redirection instead of letting the tour break. This creates a more forgiving and supportive learning environment.
3. Personalized Welcome Experiences
Personalized welcome experiences are a powerful user onboarding best practice that tailors the initial user journey based on specific user attributes. Instead of a one-size-fits-all approach, this method uses data like a user's role, industry, or stated goals to present the most relevant features and content first. For a macOS app, this ensures users immediately see how the product solves their unique problems, dramatically increasing the speed to value and boosting long-term retention.
This strategy makes the user feel seen and understood from the very first launch. By filtering out irrelevant information, you reduce friction and guide users directly to the functionality that will make them successful. It transforms the onboarding from a generic product tour into a consultative, personalized setup process that feels premium and thoughtful, in line with macOS user expectations.

This targeted approach ensures that from the moment they launch the app, users are on a path designed specifically for their needs.
How Personalized Welcome Experiences Work
The core principle is to customize the onboarding path based on user segmentation. This often begins with a simple question during signup or on the first launch. For instance, a macOS project management app might ask, "What kind of projects will you manage?" and offer options like "Software Development," "Creative Projects," or "Personal Tasks." The user's choice then determines which templates, integrations (like Xcode or Figma), and tutorial tips are shown.
Ulysses, a popular writing app for Mac, does this well. On first launch, it asks about the user's primary writing goal (e.g., "Blogging," "Writing a Novel," "Academic Papers"). Based on the selection, it tailors the sample content and highlights relevant features, such as goal setting for novelists or export formats for bloggers. This immediate customization makes the app feel instantly relevant.
Implementation Tips
To effectively implement this user onboarding best practice, consider these actionable steps:
- Start with Broad Segments: Don't try to personalize for dozens of personas at once. Begin with 2-3 of your most common user segments. A macOS developer tool, for example, could start by differentiating between "Front-End Web Devs," "iOS/macOS Devs," and "Backend Devs."
- Use Progressive Profiling: You don't need to ask everything upfront. Gather initial data on first launch, then collect more information contextually over time. After a user saves their first file, you could ask what type of project it is to further refine their experience.
- Provide an Escape Hatch: Always allow users to change their selected path or explore other options. A user who initially chose a "Personal" path might later want to use the app for "Business." Make it easy to switch or access all features from the app's Preferences.
- A/B Test Your Flows: Validate the impact of personalization. Run tests comparing your personalized onboarding flows against a generic one to measure key metrics like activation rate, feature adoption, and retention on your macOS user base.
4. Quick Wins and Early Value Delivery
One of the most critical user onboarding best practices is to deliver immediate value. This strategy focuses on guiding new users to a meaningful, positive outcome within their first few moments with your macOS app. It's about engineering a "quick win" that demonstrates the core value proposition and solidifies the user's decision to invest their time.
By identifying the shortest path to success, you can design an onboarding flow that moves users directly to their "aha!" moment. This initial positive reinforcement is powerful; it builds momentum, reduces churn, and provides a clear reason for the user to continue exploring. This is especially vital for macOS apps, where users expect a seamless and intuitive first-run experience.

This celebratory moment reinforces the value the user just experienced and encourages them to take the next step.
How Quick Wins Work
The principle is to find the smallest action that delivers the biggest impact. For a macOS productivity app, instead of a lengthy tour of every menu item, the quick win might be creating and saving a single document using a pre-filled template. This single action proves the app works and delivers on its promise.
The macOS screen recording app, CleanShot X, exemplifies this. On first launch, it guides you to take a single screenshot. The app immediately presents its powerful annotation tools and cloud-sharing options on that first capture. The user instantly sees the value over the native macOS screenshot tool, achieving a "quick win" in seconds.
Implementation Tips
To effectively integrate this user onboarding best practice, consider these actionable steps:
- Define the "Aha!" Moment: Pinpoint the single action or outcome that makes users truly understand your Mac app's value. Is it capturing a screen, converting a file, or creating a task? Build the onboarding around achieving this first.
- Use Pre-Populated States: Provide sample data, templates, or a demo environment. This allows users to start interacting and seeing results immediately, rather than facing an intimidating blank canvas.
- Celebrate the Win: Acknowledge the user's first successful action with positive feedback. A simple "Well done!" message, a subtle animation, or a progress checkmark can make the experience feel rewarding and validating.
- Connect to Long-Term Value: After the initial win, briefly show how that small action connects to the product's broader capabilities. For instance, after a user records their first clip, you can show them how easy it is to edit and share. Creating high-quality tutorials is key, and you can learn more about how to produce them with the right screen recording and editing software.
5. Progress Indicators and Gamification
Another powerful user onboarding best practice is integrating progress indicators and gamification. This strategy leverages innate human desires for completion, achievement, and recognition to motivate users through the initial setup and learning phases of your macOS app. By framing onboarding as a series of achievable goals with visible rewards, you can transform a potentially tedious process into an engaging and satisfying experience.
This method keeps users invested by showing them exactly how far they've come and what's next. Elements like progress bars, checklists, and badges provide clear feedback and a sense of accomplishment. This visual confirmation of progress reduces uncertainty and encourages users to complete the entire onboarding flow, ensuring they discover your app's full value.
How Progress Indicators and Gamification Work
The core principle is to motivate action by visualizing progress and rewarding completion. For a new macOS productivity app, this could manifest as a setup checklist that grays out or gets checked off as a user connects their calendar, imports files, or configures their first project. Each completed step inches a progress bar closer to 100%, providing a powerful psychological pull to finish.
Fantastical, a popular calendar app for macOS, uses a checklist to guide users through its initial setup. It prompts you to connect your calendar accounts, enable notifications, and install the menu bar icon. As you complete each step, the list updates, providing a clear sense of accomplishment and ensuring you've configured the app for the best experience.
Implementation Tips
To effectively use this user onboarding best practice, consider these actionable steps:
- Align Rewards with Value: Ensure gamified elements guide users toward core actions that deliver real value in your Mac app. Award badges for setting up a key integration or completing a first major task, not for trivial actions like clicking a button.
- Keep Progress Visible: Don't hide the progress indicator. Whether it's a checklist in a popover or a subtle meter in the app's toolbar, users should always be able to see their status. This constant visibility serves as a persistent reminder and motivator.
- Offer Diverse Achievements: Cater to different user motivations. Some users are driven by completion (checklists), others by status (badges), and some by competition (leaderboards). A mix of these elements can appeal to a broader audience. For instance, a macOS design tool could offer a "Pixel Perfect" badge for using alignment guides for the first time.
6. Multi-Channel Onboarding Support
A single channel is no longer enough to create a truly effective user onboarding experience. Multi-channel onboarding support is a holistic strategy that engages users across various platforms and touchpoints. For a macOS app, this approach might combine in-app messages, email sequences, a comprehensive help book (accessible via the Help menu, as is standard on macOS), video tutorials, and even personalized outreach.
This method recognizes that users learn and seek help in different ways. By providing multiple avenues for guidance, you create a safety net that prevents users from getting stuck and abandoning your product. It’s one of the most robust user onboarding best practices because it meets users where they are, ensuring consistent messaging and timely assistance throughout their initial days with your application.
How Multi-Channel Onboarding Support Works
The core principle is to create a coordinated communication strategy that guides, educates, and supports users through their preferred channels. For a new macOS application, this might mean a user first sees an in-app welcome tour, then receives a "Getting Started" email the next day with a link to a video tutorial. If they get stuck, they can access the built-in Help Book for detailed instructions.
Many successful macOS apps, like 1Password, master this. They provide excellent in-app guidance, follow up with email tips for new users, maintain an extensive online support database, and have an active user forum. This creates a seamless flow of information that reinforces learning and boosts engagement.
Implementation Tips
To implement a powerful multi-channel strategy, consider these actionable steps:
- Map Communication to Behavior: Trigger communications based on user actions or inactions. If a user of your macOS app has not activated a key feature within three days, send a targeted email with a short guide or a helpful tip.
- Ensure Consistency: Your brand voice, messaging, and visual identity must be consistent across all channels. The advice in your email should perfectly match the information in your in-app tooltips and Help Book.
- Leverage Video Content: Create short, focused video tutorials to explain complex features. For example, using a screen recorder with voice narration can help you produce clear, engaging walkthroughs that demonstrate a feature's value far better than text alone. You can learn more about creating effective tutorials to enhance your onboarding.
- Optimize Your Channel Mix: Use analytics to determine which channels are most effective for your Mac user base. If you find that users engage more with in-app messages than emails for certain tips, adjust your strategy to prioritize the more impactful channel.
7. Social Proof and Community Integration
Social proof and community integration are powerful user onboarding best practices that build trust and reduce friction for new users. This strategy leverages the psychological principle that people conform to the actions of others under the assumption that those actions are correct. By showcasing success stories, user-generated content, and community activity, you demonstrate that others have found value in your macOS app, making new users more confident in their decision to invest their time.
This approach transforms onboarding from a solitary task into a shared experience. It reassures users that they are not alone and that a support system exists, comprised of both the company and fellow users. Integrating these elements directly into the onboarding flow can significantly boost motivation and adoption by providing tangible evidence of the product's value and a clear path to success.
How Social Proof and Community Integration Work
The core principle is to validate the user's choice and guide them with peer-endorsed examples. For instance, a new user signing up for a macOS design application might feel overwhelmed. However, if the welcome screen features a gallery of stunning projects created by other users, it immediately showcases the app's potential and provides inspiration. This is a common and effective technique used by top-tier creative software like Pixelmator Pro.
Sketch, a pillar of the macOS design community, excels at this. From within the app, users can browse and install a vast library of plugins and templates created by other designers. Seeing what's popular and being able to use a community-vetted template to get started quickly not only flattens the learning curve but also instills a sense of belonging and collaborative potential from day one.
Implementation Tips
To effectively integrate social proof into your user onboarding best practices, consider these actionable steps:
- Curate Relevant Examples: Don't just show any user-generated content. Showcase testimonials, templates, or success stories that align with the new user's declared goals or profile. A user of a Mac writing app should see templates for novels or screenplays, not corporate reports.
- Highlight Achievable Success: Feature stories and examples that feel relatable and achievable for a novice. Showcasing hyper-advanced, complex projects can be intimidating. Instead, spotlight users who recently achieved their first "win" with your product.
- Make Community Discoverable, Not Mandatory: Integrate community elements seamlessly within the UI, but never force participation. A "Trending in the Community" widget or a contextual link to a relevant forum discussion is more effective than a mandatory "Join our Forum" step.
- Moderate and Maintain Positivity: If you integrate a community space, ensure it is actively moderated. A welcoming, helpful, and positive environment is crucial for encouraging new users to ask questions and engage.
User Onboarding Best Practices Comparison
| Onboarding Technique | Implementation Complexity 🔄 | Resource Requirements ⚡ | Expected Outcomes 📊 | Ideal Use Cases 💡 | Key Advantages ⭐ |
|---|---|---|---|---|---|
| Progressive Disclosure | Medium - requires careful sequence mapping and UX planning | Moderate - design and testing resources | Reduces user overwhelm; improves completion rates | macOS apps with layered complexity or hidden power-user features | Reduces cognitive load; allows gradual learning |
| Interactive Product Tours | High - close design-engineering collaboration; maintenance intensive | High - integration with live product interface | Immediate hands-on experience; higher retention | Complex macOS apps needing hands-on learning (e.g., creative/dev tools) | Builds confidence through practice; reduces support needs |
| Personalized Welcome Experiences | High - requires dynamic content and segmentation logic | High - development of multiple flows | Better engagement and conversion; faster time-to-value | macOS apps with distinct user roles or industries | Increases relevance; improves feature adoption |
| Quick Wins and Early Value Delivery | Low to Medium - needs clear identification of fast value paths | Low to Moderate - depends on product complexity | Increases retention and confidence; reduces abandonment | All macOS apps, especially those focused on fast user success and activation | Builds momentum; creates positive emotional connections |
| Progress Indicators and Gamification | Medium - ongoing management of rewards and content | Moderate - design and content upkeep | Higher completion rates; sustained motivation | Onboarding processes with multiple steps or longer duration | Creates engagement loops; clear sense of achievement |
| Multi-Channel Onboarding Support | High - complex coordination across multiple platforms | High - content creation & channel management | Accommodates diverse preferences; proactive support | macOS apps requiring diverse communication methods (e.g., in-app, email, Help Book) | Multiple touchpoints; personalized communication |
| Social Proof and Community Integration | Medium - requires active community management | Moderate to High - content curation & moderation | Builds trust; reduces anxiety; fosters belonging | macOS apps benefiting from strong communities (e.g., design, writing, coding) | Peer validation; ongoing support beyond onboarding |
From Onboarding to Advocacy: Building a Lasting User Relationship
We've explored a comprehensive suite of user onboarding best practices, from the nuanced dance of progressive disclosure to the engaging power of gamified progress bars. Each strategy, whether it’s crafting interactive product tours or delivering quick wins, serves a singular, powerful purpose: to transform a user's initial curiosity into lasting engagement. The journey from a first-time user to a loyal advocate is not accidental; it is meticulously designed.
The core takeaway is that effective onboarding is a conversation, not a monologue. It listens before it speaks, personalizing the welcome experience and anticipating user needs. For developers building for the discerning macOS audience, this principle is paramount. Your onboarding must feel as intuitive, polished, and respectful of the user’s time as the macOS ecosystem itself. It’s about building trust from the very first interaction and reinforcing that trust with every feature they discover. By integrating social proof and offering multi-channel support, you're not just guiding them through an interface; you are welcoming them into a community.
Your Actionable Path Forward
Mastering these user onboarding best practices requires an iterative, data-driven mindset. Your work isn't finished once the initial flow is launched. Instead, view it as the beginning of an ongoing process of refinement. Here are your next steps:
- Audit Your Current Flow: Use the seven practices discussed in this article as a checklist. Where are the gaps? Are you delivering value within the first minute? Is your onboarding a one-size-fits-all experience or is it personalized? Identify one or two key areas for immediate improvement.
- Gather User Feedback: Actively seek input from your newest users. Use in-app surveys, feedback forms, or even direct interviews to understand their pain points and "aha!" moments. This qualitative data is invaluable for pinpointing exactly where your onboarding is succeeding or failing.
- Analyze the Data: Dive into your product analytics to track key activation and retention metrics. Are users completing the interactive tour? Where do they drop off? Use this quantitative data to validate your assumptions and measure the impact of your changes.
The ultimate goal extends beyond simple user retention. It’s about creating an experience so positive and empowering that your users become your most effective marketers. To truly understand this dynamic, exploring a variety of client advocacy examples can provide powerful inspiration for nurturing those crucial long-term relationships. By implementing these strategies, you build a foundation of trust and value that not only keeps users around but encourages them to champion your product to others. This continuous cycle of improvement and user-centric design is the true hallmark of exceptional onboarding.
Ready to create the crystal-clear video tutorials and product demos that power a world-class onboarding experience? Screen Charm is a native macOS screen recorder designed for precisely that, helping you produce stunning, professional-quality videos with ease. Elevate your onboarding and show your users exactly why your app is essential by downloading Screen Charm today.
For a deeper look at creating onboarding and demo videos on Mac: How to make product demo videos | Mac screen recorder for SaaS demos