Think of interactive demo software as a way to give your users a hands-on, self-guided tour of your product. Instead of just watching a video, a potential customer gets to click around, explore features, and really understand how your app works—all within a safe, simulated environment. It's a perfect match for the intuitive feel of the macOS ecosystem.
Why Interactive Demos Are a Game Changer for macOS Creators
If you're creating for macOS, whether you're an indie developer or part of a larger software company, you know how critical it is to show off your app's unique value. For years, screen recordings were the go-to method, but they have one massive downside: they’re completely passive. It’s like trying to describe a beautiful painting instead of just letting someone see it with their own eyes.
An interactive demo, however, is like handing over the keys for a virtual test drive. It turns a one-way presentation into a two-way conversation, bridging the gap between just showing your macOS product and letting a user truly experience its magic.
The Shift from Passive to Hands-On
The macOS crowd is used to top-notch design and intuitive experiences. They expect software to be polished, responsive, and easy to figure out. This is exactly where long, old-school video tutorials tend to fail. They take forever to create and can be even more tedious for a potential customer to sit through.
Interactive demo software flips the script. It lets you build engaging, bite-sized product tours that respect the user's time and intelligence. Forget the 10-minute-long video; you can create a guided, hands-on walkthrough that shows off your best features in just a few clicks.
This approach lines up perfectly with what modern software buyers want. It gives them the freedom to learn at their own speed and zero in on the features that they actually care about.
A Market Driven by Engagement
This move toward more immersive product showcases isn't just a passing trend—it's a major market shift. The demand for tools that create better customer experiences is booming. In fact, a recent market analysis valued the global interactive demo software market at $1.5 billion in 2023 and projects it will hit $6.8 billion by 2032. That kind of explosive growth highlights just how badly more engaging sales and marketing tools are needed. You can find more insights on the demo automation software market and where it's headed.
An interactive demo moves beyond simple demonstration. It fosters a sense of ownership and understanding before a user ever installs your application, making it an indispensable tool for any macOS creator looking to make a lasting impression.
Essential Features for a Flawless macOS Demo Workflow
If you're creating a product tour on a Mac, a simple screen recorder just won't cut it. The best interactive demo software is built from the ground up for the macOS workflow, packing in specialized tools that transform a painful editing chore into a fast, creative sprint. It's all about having a single toolkit that feels native to your machine.
These platforms do a lot more than just capture your screen; they have features specifically designed to guide your audience's attention with a bit of style. Think of it as software that knows exactly where your viewers need to look, saving you hours of tedious post-production work. This is where having the right features really shines, letting you build polished, professional demos without the headache.
Automated and Intelligent Zoom
One of the most game-changing features is dynamic auto-zoom. Forget manually setting keyframes to zoom in on a menu or button. This software is smart enough to follow your cursor and automatically zooms in on the action as it happens.
So, when you click a button tucked away in the corner, the frame smoothly pans and zooms right to it. Your audience won't miss a thing. This one feature alone cuts out one of the most boring and time-consuming parts of making a demo, especially for those detailed macOS apps we all know and love.
Precision Cursor Controls
Guiding a viewer’s eye is an art form, and your cursor is the star of the show. While standard screen recorders give you a one-size-fits-all pointer, the best demo tools hand you the creative controls.
- Custom Styles: You can change the cursor’s look to match your brand colors or add a bright, high-contrast ring so it stands out against any background.
- Size Adjustments: Need to make a point? Just make the cursor bigger. It becomes impossible to miss, even on a high-res screen.
- Movement Smoothing: Some of the more advanced tools can even smooth out your shaky mouse movements, making every action look deliberate and professional.
A well-controlled cursor acts as a silent narrator, guiding your audience through your application’s story. It transforms a simple recording into an intuitive, easy-to-follow journey.
A Unified Creative Suite
The whole point of modern interactive demo software for macOS is to keep you in one place. Bouncing between a recording app, a webcam tool, and a separate video editor is a surefire way to kill your creative flow. It’s just plain inefficient.
A great solution for macOS brings everything you need under one roof:
- Integrated Webcam: Easily record your face alongside your screen to put a human touch on your tutorials.
- Custom Backgrounds: Instantly swap out your messy office for a branded image or a simple, clean color.
- Built-in Editor: Need to trim a clip, adjust the timing on a zoom, or tweak a transition? You can do it all without ever leaving the app.
This all-in-one approach is what it's all about. When your tools just work together, you can stay focused on the story you’re telling, not on managing a dozen different files. Put together, these features are the foundation for creating great software documentation tools and demos that actually get the point across. You’ll also find this level of detail in highly specific fields, like those that require technical 3D animation for industrial applications, where clarity is everything.
Sponsored by the makers
Tired of boring screen recordings?
Try Screen Charm.
Auto-zoom, motion blur, camera overlay, and background music. All built in. Record once, export a polished video.
See what it doesHow Interactive Demos Can Reshape Your Workflows
Interactive demo software isn't just another screen recorder. Think of it as a complete toolkit for creating guided experiences, which is a game-changer for anyone building for macOS. Whether you're trying to launch a new app, onboard a fresh user, or teach a complex skill, these demos turn passive watching into active doing.
This simple shift from showing to guiding delivers real results. It takes what might be a confusing process and breaks it down into simple, manageable steps. Let's look at three common scenarios where this approach makes a huge difference, especially for those in the Mac ecosystem.
Creating Product Demos That Actually Sell
Picture this: you're an indie developer, and your new productivity app is finally ready for the Mac App Store. Your app is beautiful and fits the macOS aesthetic perfectly, but its best features aren't immediately obvious. A few static screenshots just won't cut it, and a long video risks losing potential customers before they ever see that "aha!" moment.
This is exactly where interactive demo software becomes your best marketing tool. You can build a quick, guided tour that lets people experience your app's magic firsthand, right on your website.
- Show, Don't Just Tell: Let users click through a core workflow, like creating their first project. They'll grasp the value immediately.
- Get Them Hooked: When people can click, type, and interact, they start building a connection with your macOS app before they've even downloaded it.
Giving someone a "test drive" in a controlled, guided environment is incredibly powerful. It removes their hesitation and makes them far more likely to hit that "Buy" button. A hands-on experience is always more convincing than a block of text.
Building User Onboarding That People Won't Skip
Okay, so someone bought your app. Now what? They open it to a blank screen, and you have one chance to make a great first impression. Great onboarding is crucial for keeping users around—in fact, a confusing first experience is one of the biggest reasons people abandon new software. The goal is to get them to their first small win, fast.
Instead of sending them off to a clunky knowledge base or a generic welcome video, you can embed an interactive tutorial right inside your macOS app or welcome email.
For a Mac user, this feels seamless. You can create a series of short, pop-up guides that point out key parts of the interface or walk them through their very first task. This kind of proactive help slashes user frustration, cuts down on support tickets, and proves your product's value from the get-go.
Producing Educational Tutorials That Are Crystal Clear
Now, let's think about an educator teaching a complex design tool like Sketch or Figma on a Mac. Students need to follow intricate steps where every click matters. A standard screen recording just doesn't work well here—the cursor zips around, and it's easy to miss a critical step.
With an interactive demo, an instructor can create step-by-step lessons that students can move through at their own pace.
- Learn by Doing: Build modules where students have to click the right menu or use the correct tool to proceed. This reinforces muscle memory.
- Leave No Room for Doubt: Features like auto-zoom on click and highlighted cursors make every single action impossible to miss.
This approach flips learning from a passive chore into an active, engaging process, which makes a world of difference for anyone trying to master new software on their Mac.
Interactive Demos vs Traditional Video Tutorials
When you're trying to explain a process, you typically have two main options: a standard video or an interactive demo. While videos are familiar, they often fall short where interactive demos shine.
Here’s a quick breakdown of how they stack up.
| Aspect | Traditional Video Tutorial | Interactive Demo Software |
|---|---|---|
| User Engagement | Passive viewing. Easy for users to get distracted or lose focus. | Active participation. Users click and type, keeping them engaged. |
| Pacing | One-size-fits-all. Users must pause/rewind to keep up. | Self-paced. Users advance only when they complete a step. |
| Clarity | Can be hard to follow fast cursor movements or small clicks. | Actions are highlighted with zooms and effects for perfect clarity. |
| Retention | Lower knowledge retention from just watching. | Higher retention and muscle memory from hands-on practice. |
| Updating | The entire video must be re-recorded for a small UI change. | Easily edit individual steps without redoing the whole demo. |
Ultimately, while a video can show someone how to do something, an interactive demo teaches them by letting them do it themselves. This hands-on method is simply a more effective way to ensure your message gets across, whether you're selling, onboarding, or educating.
The Real Impact on User Engagement and Conversion
Having a slick set of features is one thing, but the true test of interactive demo software for macOS is the real-world results it delivers. When you shift from passive videos to hands-on experiences, you fundamentally change how people connect with your product. This has a direct and measurable impact on engagement, adoption, and—most critically—conversions, which is a huge deal for macOS developers and small teams looking to grow.
The psychology here is pretty straightforward. When someone can actually click, drag, and explore your app's interface for themselves, even in a simulated environment, it creates a feeling of ownership. They're not just being told how great your product is; they're figuring it out on their own. That personal discovery builds trust and confidence far more effectively than any polished video ever could.
Driving Meaningful Business Growth
The numbers don't lie. This hands-on approach delivers some seriously impressive results. According to one study, prospects who went through an interactive demo converted on websites at a rate of 24.35%. Compare that to the 3.05% conversion rate for traditional methods, and you're looking at a 7.9x improvement in turning visitors into potential customers.
It doesn't stop there. The same study found that deal conversions jumped by 3.2x, showing that these experiences are powerful all the way through the sales cycle. You can dig into the full report from getcontrast.io on how interactive demos boost conversions.
This infographic breaks down the key areas where interactive demos really shine, from the initial product tour to user onboarding and ongoing training.
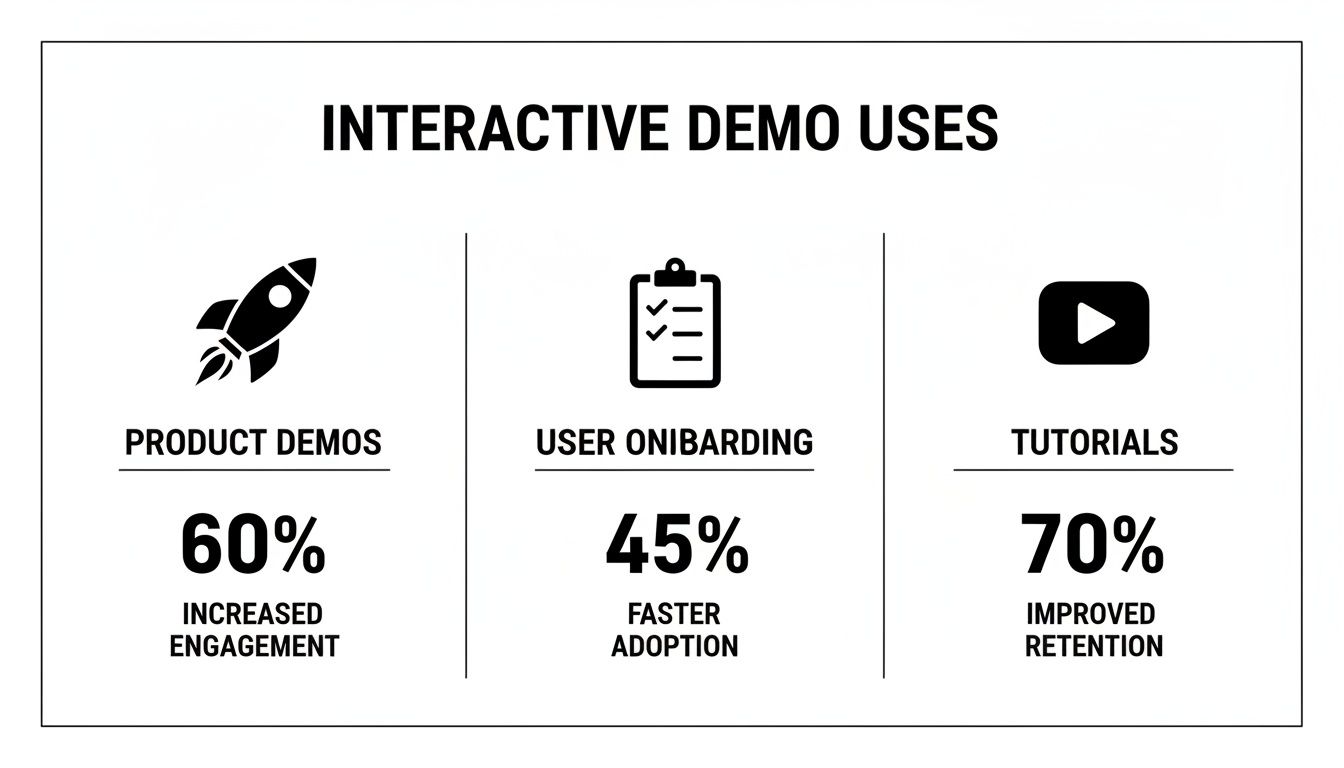
As you can see, each application targets a different, vital stage of the customer journey, making this technology an incredibly versatile tool for growth.
The core benefit is clear: interactive demos shorten the path from initial curiosity to genuine product adoption. By empowering users to learn by doing, you remove friction and make the value of your macOS application immediately obvious.
Making Enterprise-Level Results Accessible
Not too long ago, getting these kinds of engagement numbers meant having an enterprise-sized budget and a big marketing team to match. That's all changed. Modern interactive demo software designed for macOS puts this power right into the hands of solo developers and small teams. You no longer need a complicated and expensive tech stack to create compelling, hands-on product experiences.
This opens the door for you to tie your technology directly to your growth goals, whether you’re launching a brand-new app or trying to get more users to stick around. For a deeper look into creating compelling showcases, check out our guide on making effective video product demos for your macOS app. By focusing on interaction, you're not just showing off features; you're building a stronger, more engaged user base from the very first click.
Choosing the Right Demo Software for Your Mac
Picking the right interactive demo software for your Mac isn't about ticking off the most features on a comparison chart. It's about finding a tool that feels like it belongs on macOS—fast, intuitive, and perfectly in sync with your workflow. A great Mac app should feel like an extension of your own creative process, not some clunky, cross-platform afterthought that just gets in the way.
Choosing poorly can be a huge source of frustration. You end up wrestling with a steep learning curve, sluggish performance, and a final demo that just doesn't meet the high design standards Mac users are accustomed to. You want software that helps you create, not hinders you.
Insist on Native macOS Performance
On a Mac, performance is king. An application built from the ground up for macOS will always run circles around a generic web app or a ported tool. This translates to smoother screen recording, faster editing, and quicker exports, all without bringing your machine to a crawl.
You should be looking for software that feels snappy and responsive the second you open it. A truly native app leverages all the hardware and software optimizations Apple bakes into its ecosystem, so you can create beautiful, high-resolution demos without worrying about lag or random crashes.
A true Mac application respects the ecosystem it lives in. It should complement your workflow with efficiency and reliability, making the creation process feel effortless rather than a technical chore. This native advantage is a non-negotiable for serious creators.
Prioritize an Intuitive User Interface
The whole macOS experience is built on clean, user-friendly design. The demo software you pick should follow that same philosophy. If you find yourself hunting through confusing menus or watching hours of tutorials just to perform basic tasks, it’s the wrong tool. Period.
A great interface lets you focus on telling your story, not on figuring out the software. Here’s what that looks like in practice:
- Minimal Learning Curve: You should be able to jump right in and start putting together a simple demo almost immediately.
- Clear and Logical Layout: Tools and settings are exactly where you’d expect to find them, following familiar macOS design patterns.
- Streamlined Workflow: Moving from recording to editing to sharing should feel like a single, smooth journey within one application.
Key Evaluation Criteria for Mac Users
When you're comparing different options, look past the marketing fluff and focus on what will actually affect your day-to-day work and the final quality of your demo. Creating a truly impressive demo requires a specific set of capabilities; you can dive deeper into this in our guide on what makes a great product demo video maker.
Here’s a practical checklist to help you make the right call:
- 4K Export Quality: Your demos need to look sharp and professional on modern, high-resolution screens. Settling for anything less than 4K UHD export is a compromise you shouldn’t have to make.
- Fair Pricing Model: Steer clear of complicated subscription plans with hidden fees or restrictive user limits. A straightforward, one-time purchase is often a much better and more cost-effective deal, especially for solo creators and small teams.
- Dedicated macOS Support: Make sure the software is actively maintained and updated for the latest versions of macOS. This gives you stability and the peace of mind that it won’t break after the next system update.
Your First Polished Demo in Five Simple Steps
You don’t need a film crew or a degree in video editing to create a stunning product demo on your Mac. With the right interactive demo software, what used to be a project that could take days is now something you can knock out in just a few minutes. This simple workflow proves that anyone can create a professional-level showcase.
The trick is to break the process down into small, manageable chunks. Each step, from planning your story to hitting export, builds on the one before it, which guarantees a polished and effective result. It’s a method that completely removes the technical anxiety that often comes with video production.
A Step-by-Step Production Guide
Here’s a straightforward, five-step workflow you can follow to produce your first interactive demo on macOS:
-
Plan Your Core Message: Before you even think about hitting record, figure out the key "aha!" moment you want your audience to have. Having a foundational understanding of design can also be a huge help here. For example, knowing about High-Fidelity Wireframes for Better UI Designs will give you a better eye for what makes the product you're showcasing look great on screen.
-
Set Up Your Environment: Get your Mac ready for its close-up. Close any apps you don't need and make sure your desktop background is clean and professional. It’s also a good idea to turn on your webcam—seeing your face helps build a real connection with your viewers.
-
Record Your Screen: Now, it’s time to capture your workflow. Let the software do the hard work for you. Features like auto-zoom will automatically highlight where you click, drawing the viewer's eye to the most important parts of the interface without you having to do a thing.
-
Refine in the Editor: Once you’ve got your recording, jump into the editor. This is where you can trim your clips, tweak the timing of the zooms, and get the pacing just right. Think of it as turning your raw footage into a compelling story.
-
Export in Stunning 4K: With your edits locked in, export the final demo in a crisp 4K resolution. This makes sure your product looks absolutely fantastic, no matter what kind of modern screen it's being viewed on.
This five-step process takes all the mystery out of creating a great demo. It puts the focus back where it should be—on clear storytelling—so your product's true value can shine through.
Frequently Asked Questions
Jumping into new software always comes with questions, especially when you're a Mac user trying to find the right tool for the job. Let's clear up some of the most common things people ask about creating interactive demos on macOS.
How Is This Different from Loom or QuickTime?
It’s a great question. You might be thinking, "I already use Loom or QuickTime, isn't that enough?" While those are fantastic for quick screen recordings, they’re fundamentally video capture tools. Think of them as taking a simple video of your screen, warts and all.
Specialized interactive demo software for macOS is something else entirely. It’s more like a mini production studio built to create a perfect, guided experience.
Here’s where you’ll feel the difference:
- Automatic Zoom: The software intelligently zooms in on important actions, so you don't have to do it manually in post-production.
- Advanced Cursor Effects: You can customize the cursor’s appearance to draw your audience's eye exactly where you want it.
- Integrated Editing: Everything you need to go from a raw recording to a polished demo is right there in one seamless workflow.
Do I Need Video Editing Skills to Use This Software?
Absolutely not. In fact, that's one of the main reasons these tools exist. They’re designed to handle the tedious, technical parts of video creation for you.
Forget the steep learning curve of professional video editors like Final Cut Pro or Adobe Premiere Pro. The software automatically adds smooth zooms, highlights clicks, and handles transitions, letting you produce a slick, professional-looking demo without ever touching a complex timeline. The whole point is to empower you to create great content, not force you to become a video editor.
Can My MacBook Handle Creating High-Quality 4K Demos?
Yes, it almost certainly can. This is a huge advantage of using a native macOS application—it’s built from the ground up to work in harmony with Apple's hardware. These apps are highly optimized to run efficiently and make the most of your Mac's power.
Because the software is native, you get incredibly smooth performance. This means you can count on reliable 4K exports even if you don't have the latest, top-of-the-line MacBook. It just works, letting you focus on making an amazing demo instead of worrying if your computer can keep up.
Ready to create stunning, professional demos on your Mac in minutes? Screen Charm gives you the power of auto-zoom, custom cursors, and an all-in-one editor with a simple, one-time purchase. Start creating your first demo today.
Evaluating Screen Charm against alternatives? Read Screen Charm vs Loom or Screen Charm vs Screen Studio.