Your Guide to Video Screen Grabber Mac Tools
Nov 20, 2025
Before you ever hit record, the real work begins. A truly great educational video isn't born from fancy equipment or slick editing—it starts with a rock-solid plan. This upfront effort is what separates a clear, effective tutorial from a confusing one that leaves viewers frustrated.
Building Your Video's Foundation
Think of this pre-production phase as laying the groundwork for a house. Without a proper foundation, everything you build on top of it will be shaky. Taking the time to map out your content ensures your message is sharp, your delivery is confident, and the final video looks and sounds professional.
This isn't just about making things look good; it's about making them effective. Educational videos are a powerhouse for learning. In fact, a staggering 88% of educators and students agree that videos improve student achievement, and 76% confirm they help with knowledge retention. The investment can range from a modest $150 per minute for a simple "talking head" style video to over $2,700 per minute for highly interactive content. You can get a deeper breakdown of production costs and their drivers at BlueCarrot.io.
Define Your Audience and Learning Goals
First things first: who is this video for? You can't teach effectively if you don't know your student. The way you'd explain a new API to a seasoned software developer is completely different from how you'd walk a total beginner through a new macOS app. Get granular. What do they already know? What's their biggest pain point?
With your audience in mind, you can set a single, crystal-clear learning objective. Vague goals like "show them the app" lead to rambling, unfocused videos. You need something concrete and actionable.
Good Objective: "By the end of this video, the viewer will be able to create and save their first project in our macOS app."
Bad Objective: "This video is an overview of our app's features."
When you focus on one core outcome, your video becomes tight, focused, and leaves the viewer with a real sense of accomplishment.
A video that tries to teach everything often teaches nothing. Your goal is to solve one specific problem or teach one specific skill, making the information digestible and immediately useful for your Mac-using audience.
Scripting for a Natural Flow
Now that you know your destination, it's time to draw the map: your script. Even a simple outline is a lifesaver, preventing you from going off on tangents. When thinking about your script's structure, it helps to consider the broader principles of how to create training materials that resonate with learners.
This isn't an academic paper, so don't write it like one. You're aiming for a conversational tone. I always read my scripts out loud a few times to catch any clunky phrasing. A great script should feel like a helpful friend is walking you through a process, not a robot reading a user manual. A simple two-column format—narration on one side, on-screen action on the other—is a fantastic way to keep everything synchronized.
Prepare Your macOS Recording Space
Finally, let's get your recording environment—both physical and digital—ready for action. You don't need a professional studio, but a few small tweaks on your Mac can make a world of difference.
Audio is King: I can't stress this enough. Your Mac’s built-in mic is fine for a quick call, but for a polished video, an external USB microphone is the single best investment you can make. It delivers a massive leap in audio clarity. Find a quiet room, preferably one with soft surfaces like carpets or curtains, to cut down on that distracting echo.
Simple Lighting Works: No need for a complex, three-point lighting kit. The best light is often free—just sit facing a window. The natural, soft light is incredibly flattering. If that’s not an option, a basic desk lamp placed behind your Mac's camera can do the trick. The goal is just to light your face evenly and avoid harsh shadows.
Digital Declutter: Tidy up your Mac's desktop! Nothing screams "unprofessional" like a screen full of random files and folders. Close any apps you don't need, and most importantly, turn on "Do Not Disturb" in your macOS settings. A stray notification can completely derail a perfect take. A clean screen keeps your viewer focused on the lesson.
Before you jump into recording, a quick checklist can save you from common headaches and ensure you have everything you need for a smooth session.
Essential Pre-Production Checklist
Phase | Task | Key Consideration |
|---|---|---|
Planning | Define Target Audience | Who are they? What is their current skill level with macOS? |
Planning | Set One Learning Objective | What is the single, measurable thing the viewer will be able to do? |
Content | Write/Outline Script | Does it sound natural when read aloud? Is it conversational? |
Content | Prepare On-Screen Assets | Gather any files, images, or websites you'll need to show. |
Setup | Test Your Microphone | Is the audio clear and at a good level? No background noise? |
Setup | Check Your Lighting | Is your face evenly lit without harsh shadows? |
Setup | Clean Your Digital Workspace | Close unused apps, hide desktop icons, and enable "Do Not Disturb." |
Running through these steps might seem tedious, but I promise it's the secret to a stress-free recording process and a much better final video.
Recording Your Screen and Webcam on a Mac
You’ve done the hard work of planning and scripting, and now it's time for the fun part: bringing your video to life. This is where your ideas finally hit the screen, and as a Mac user, you’re in luck. You have some great tools right at your fingertips, from built-in utilities to specialized apps designed to make your tutorials shine.
The real trick is picking the right tool for the job. For a quick, no-frills recording—maybe showing a colleague a fast workflow—your Mac's built-in QuickTime Player is surprisingly effective. It’s perfect for those simple demos where you just need to get the point across without any fancy editing.
But when you're creating an educational video that needs to feel polished and keep your audience glued to the screen, a dedicated macOS app like Screen Charm is a game-changer. These tools are built from the ground up to create clear, professional-looking tutorials and can save you a ton of time.
Getting Started with Built-in macOS Tools
Every Mac comes with QuickTime Player, which hides a pretty decent screen recorder. Getting started is easy: just open the app from your Applications folder and head to File > New Screen Recording. A small control panel pops up, letting you choose between recording your entire screen or dragging a box around a specific area.
This is perfect for straightforward tasks. For instance, if you're just showing someone how to find a specific setting in System Settings, a quick QuickTime recording is all you really need. The limitations start to show, however, when you need more control over what your audience is looking at.
The Power of a Dedicated macOS Recording App
While QuickTime gets the basic job done, it's missing the smart features that make educational content truly effective. This is where an app specifically designed for creating macOS tutorials makes all the difference.
Here’s what you gain by switching to a specialized tool:
Picture-in-Picture Recording: Recording your webcam and your screen at the same time adds a crucial human touch. People connect with a presenter they can see, which builds trust and keeps them from tuning out.
Dynamic Zoom and Focus: Imagine the app automatically zooming in on your cursor as you click a button or type in a text field. Tools like Screen Charm do this for you, guiding the viewer’s eye exactly where it needs to be without you ever touching an editing timeline.
Enhanced Cursor Highlighting: Making the cursor bigger, adding a colorful circle around it, or showing a visual effect on every click might seem small, but it’s a massive help for clarity. Your audience will never lose track of what you’re doing.
If you want to dive deeper into the options, we’ve put together a full guide on the best Mac screen recording software to help you find the perfect fit.
Your goal isn't just to show your screen; it's to guide your audience's attention. A dedicated macOS app turns a passive screen capture into an active, focused lesson.
Pro Tips for a Flawless Recording Session
Before you even think about hitting that record button, taking a few minutes to prep your Mac can save you from the headache of re-recording. A smooth take is almost always the result of a little planning.
The infographic below really nails down the ideal workflow, showing how defining your goals and scripting your content lays the foundation for a great recording.
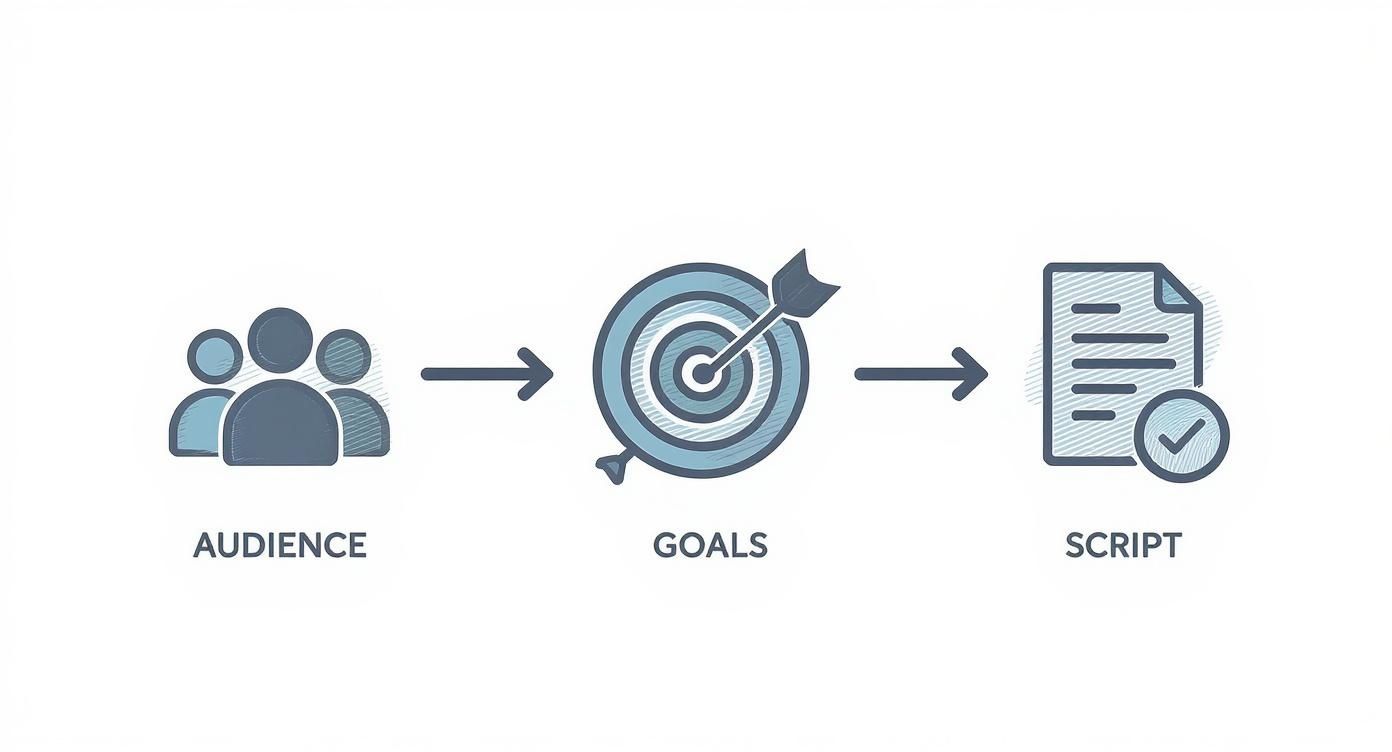
When your plan is solid, the recording part becomes much more straightforward because you know exactly what you need to capture.
Now, let's get your Mac ready. Creating a clean, distraction-free digital space is key to a professional-looking video.
Activate "Do Not Disturb" Mode. This one is non-negotiable. Go to System Settings > Focus and flip on Do Not Disturb. Trust me, a single iMessage notification popping up mid-sentence can ruin a perfect take.
Clean Your Desktop. Nobody wants to see a desktop cluttered with random files and folders. It looks messy and distracts from your content. Just create a temporary folder and sweep everything into it. Even better, use a clean, neutral wallpaper.
Check Your Audio Levels. Open System Settings > Sound > Input. Speak into your mic at a normal talking volume. You want to see the input meter bouncing into the upper half without ever hitting the red zone. Red means distortion, and that’s a quick way to get viewers to click away.
Close Unnecessary Applications. Quit every app you don't need for the tutorial. This does two things: it frees up your Mac's resources (preventing slowdowns) and reduces the chance of the fan kicking on, which your microphone will definitely pick up.
Spending just five minutes on this checklist ensures your recording is crisp, clear, and completely focused on your lesson. It's a simple step that bypasses the most common amateur mistakes and makes the editing process so much easier down the line.
Bringing Your Video to Life with Smart Features
Your raw footage is a great start, but it's not the finished product. The real transformation from a simple screen recording into an engaging educational video happens when you use smart tools to direct your viewer's attention. Thankfully, on a Mac, you can skip the hours of manual editing and let intelligent features create a polished, focused learning experience for you.
There’s a reason creators are flocking to these more efficient workflows. The global online learning market is massive—valued at $314.03 billion in 2024 and expected to jump another 13% next year. This audience, a mix of students and professionals, has high expectations. They want clarity and engagement, and as these e-learning video market trends show, generic content just doesn't cut it anymore.
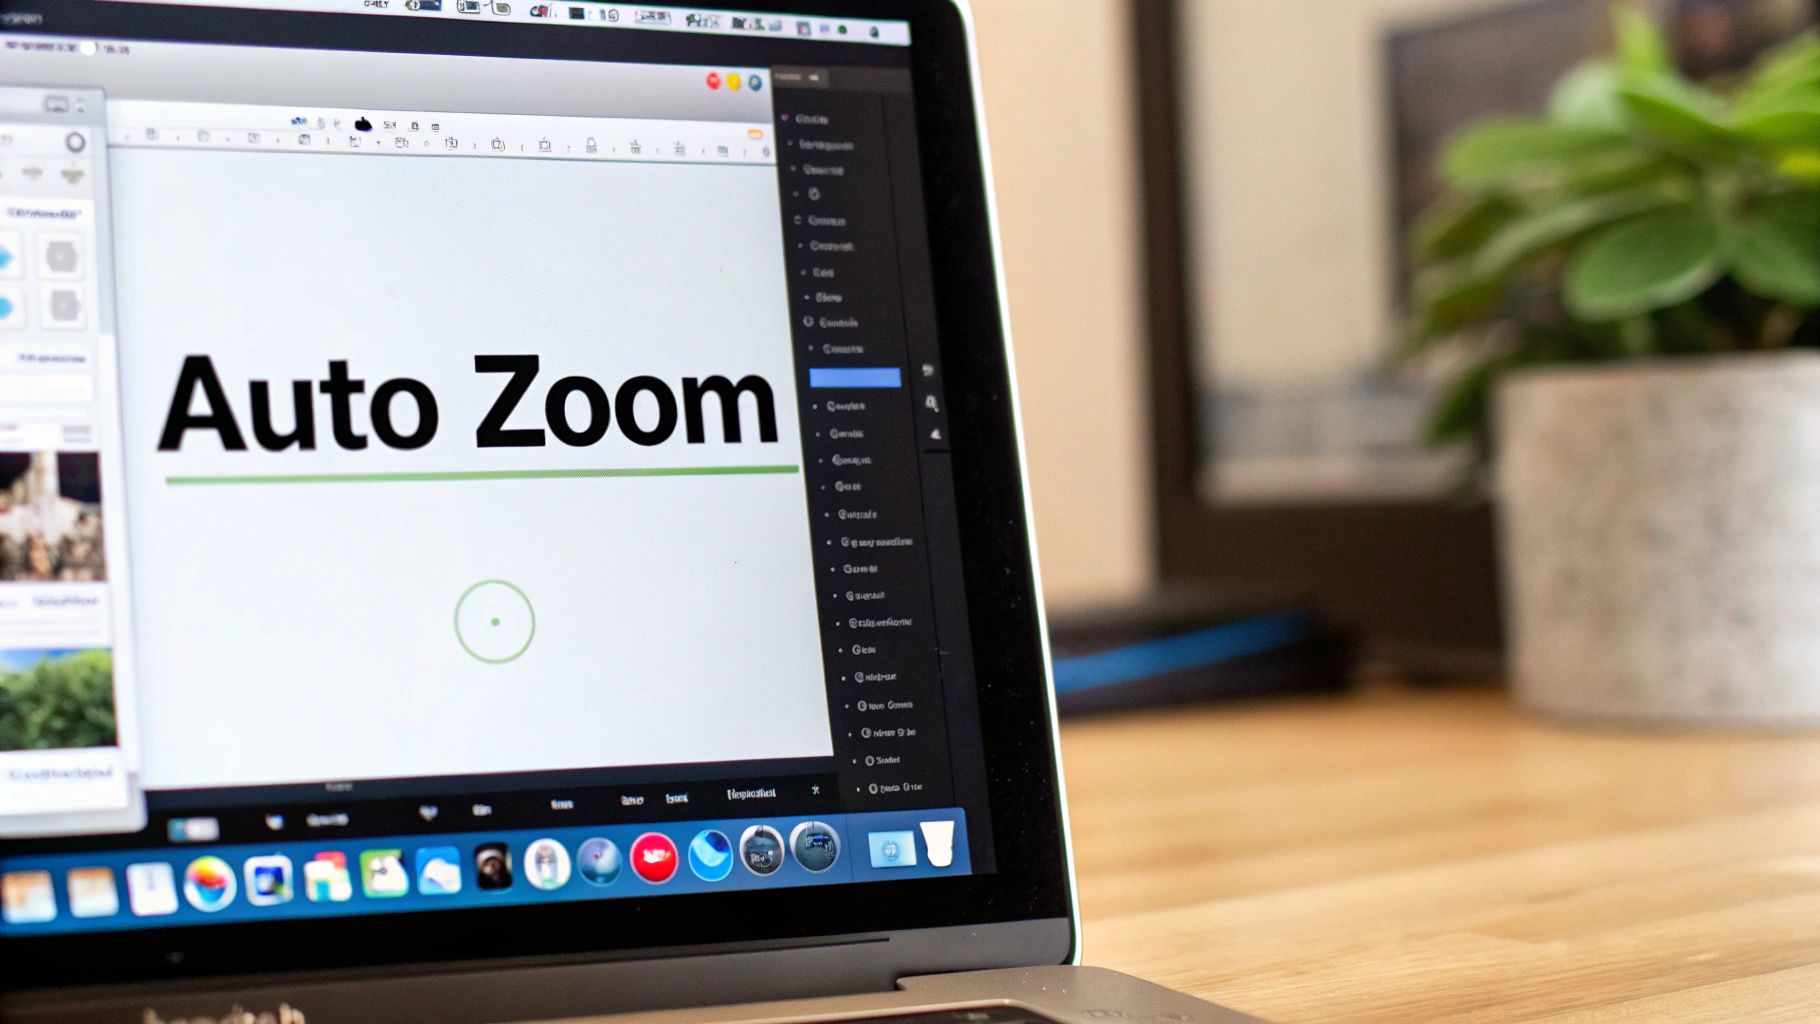
Let Auto-Zoom Do the Heavy Lifting
One of the most tedious parts of video editing is making sure your audience can actually see what you're clicking on. Manually adding all those zoom and pan effects is a time-sink. This is exactly where AI-powered macOS tools completely change the game.
Picture this: you’re recording a walkthrough of macOS System Settings. As you move your mouse toward the "Display" icon, the screen automatically zooms in to frame it perfectly. Your viewer sees exactly where you're going without you having to do a thing in post-production. That's auto-zoom in action.
This feature is smart enough to track your cursor, anticipate your next move, and create smooth, natural-looking camera work on the fly. It takes all the guesswork and tedious keyframing out of the equation, saving you a ton of time while making your video infinitely easier to follow.
Make Your Cursor the Star of the Show
In any macOS tutorial, your cursor is the guide. If it’s hard to track or jitters across the screen, your audience will get lost. Smart recording tools solve this problem with a few brilliant touches.
Automatic Highlighting: A simple colored circle or spotlight effect makes your cursor impossible to miss, no matter what’s happening on screen.
Visual Click Effects: Don’t just tell them you clicked—show them. A quick ripple or color flash provides instant visual feedback, reinforcing the action for the learner.
Cursor Smoothing: Let's be honest, our natural mouse movements can be a bit shaky. Smoothing technology cleans this up in real-time, resulting in a steady, confident cursor that looks far more professional.
These aren't just minor tweaks; they dramatically improve the learning experience by cutting down on confusion and keeping the focus right where it needs to be.
Think of it this way: your goal is to remove every possible point of friction for the learner. A highlighted, smoothed cursor isn't just for looks—it’s a powerful clarity tool that ensures no one ever has to rewind and ask, "Wait, where did they just click?"
Customize Your Look for a Polished, Branded Feel
Beyond making things clearer, smart macOS features also let you inject your own personality and brand into your videos. This is key for creating a consistent, professional look that builds trust, whether you're making internal training videos or a public-facing online course.
For instance, why stick with the standard arrow? You could swap it out for a custom cursor that uses your company's logo. You can also play with your webcam feed, adding a branded virtual background or cropping it into a circle for a clean, modern picture-in-picture effect.
These options help you move past the generic screen recording and develop a signature style. It’s what makes your content instantly recognizable and gives it a professional polish that tells your audience you're a credible expert. By combining automated focus with thoughtful branding, you can efficiently create high-impact educational videos right from your Mac.
Editing and Exporting Your Final Video
https://www.youtube.com/embed/Uv7jH68Ppi8
Okay, you've captured all your footage. That's a huge step, but the real magic happens in post-production. This is where you transform those raw recordings into a polished, professional lesson that’s a pleasure to watch.
For anyone on a Mac, the editing process is thankfully pretty intuitive. Your goal here isn't to add a bunch of flashy Hollywood effects; it’s all about clarity. You want to trim the fat, remove any distractions, and guide your viewer’s attention exactly where it needs to be. The best edits are invisible—the final video just flows.
Mastering the Editing Essentials on Your Mac
With your screen and webcam clips ready, it's time to dive in. I always start with what's called a "rough cut." It's the process of getting rid of the obvious junk: the false starts, the long, awkward pauses, and the moments you stumbled over your words. Think of it as clearing the clutter before you start arranging the furniture.
Your main tasks at this point are pretty straightforward:
Trimming and Splicing: Snip out all the "ums," "ahs," and duplicate takes. Most editors on a Mac make this easy—you just grab the edge of a clip and drag to shorten it.
Arranging Your Story: Drag and drop your clips on the timeline to create a logical narrative. If you recorded your intro separately from the main screen demo, this is where you’ll pop it right at the beginning.
Adding Supporting Visuals: This is where you can layer in extra context. Think B-roll footage, simple graphics, or text callouts that highlight important info. For instance, if you mention a keyboard shortcut, throw a quick text overlay on the screen to show the exact keys.
If you're just getting your feet wet with this, we put together a handy guide on simple video editing for Mac that breaks down these core skills.
Polishing Your Audio for a Professional Sound
Here’s a hard truth I learned early on: viewers will forgive slightly grainy video, but bad audio is a dealbreaker. If they can’t hear you clearly, they’ll be gone in a flash. Making your sound clean and consistent is non-negotiable.
Most of the time, audio cleanup on a Mac involves just a couple of steps. Start with a noise reduction filter. Many apps have a one-click feature that can listen for and remove consistent background sounds, like the hum from your computer fan or an air conditioner. After that, focus on leveling your volume. You don't want your voice jumping from a whisper to a shout. A normalization or compression tool will smooth out those peaks and valleys for a much better listening experience.
Audio isn’t just about the words; it’s about the feeling. Adding a touch of quiet, royalty-free background music can set the tone and keep viewers engaged, but be sure to keep the volume low enough that it never overpowers your voice.
Exporting Your Video with the Right Settings
After all that hard work, the last step is to export your masterpiece. Getting these settings right is crucial. It's what ensures your video looks just as sharp on YouTube or Vimeo as it does on your computer.
The big three settings you'll encounter are resolution, frame rate, and bitrate. These work together to determine the final quality and file size. A higher bitrate, for example, means better quality but also a much larger file. Thankfully, you don't need a degree in video engineering. Most modern Mac editors have built-in presets like "YouTube 1080p" that handle all the technical details for you.
To give you a head start, here’s a quick-reference table for the most common platforms.
Recommended Export Settings for Popular Platforms
Getting your export settings dialed in ensures your video looks its best, no matter where you post it. Using these recommended values helps avoid compression issues and guarantees a crisp, clean playback for your audience.
Platform | Resolution | Frame Rate (fps) | Recommended Bitrate (Mbps) |
|---|---|---|---|
YouTube | 1920x1080 (1080p) | 24, 30, or 60 | 8-12 Mbps (SDR) |
Vimeo | 1920x1080 (1080p) | 24, 30, or 60 | 10-20 Mbps |
Social Media | 1080x1080 (Square) | 30 | 5-8 Mbps |
By taking the time to nail these final steps, you’re not just sharing information—you’re delivering a high-quality experience that reflects your expertise and respects your viewer's time.
Boosting Engagement and Accessibility
Okay, you've recorded and edited your video. It looks sharp. But the job isn't quite done. A technically perfect video is only half the battle—now it's time for the final touches that make people actually want to watch it and ensure everyone can learn from it. This is where a good recording becomes a great educational resource.
These final steps are what separate amateur tutorials from professional-grade content. To really connect with your audience and keep them hooked, you need to master the art of creating engaging online course videos. It’s less about the information itself and more about how you package and present it.
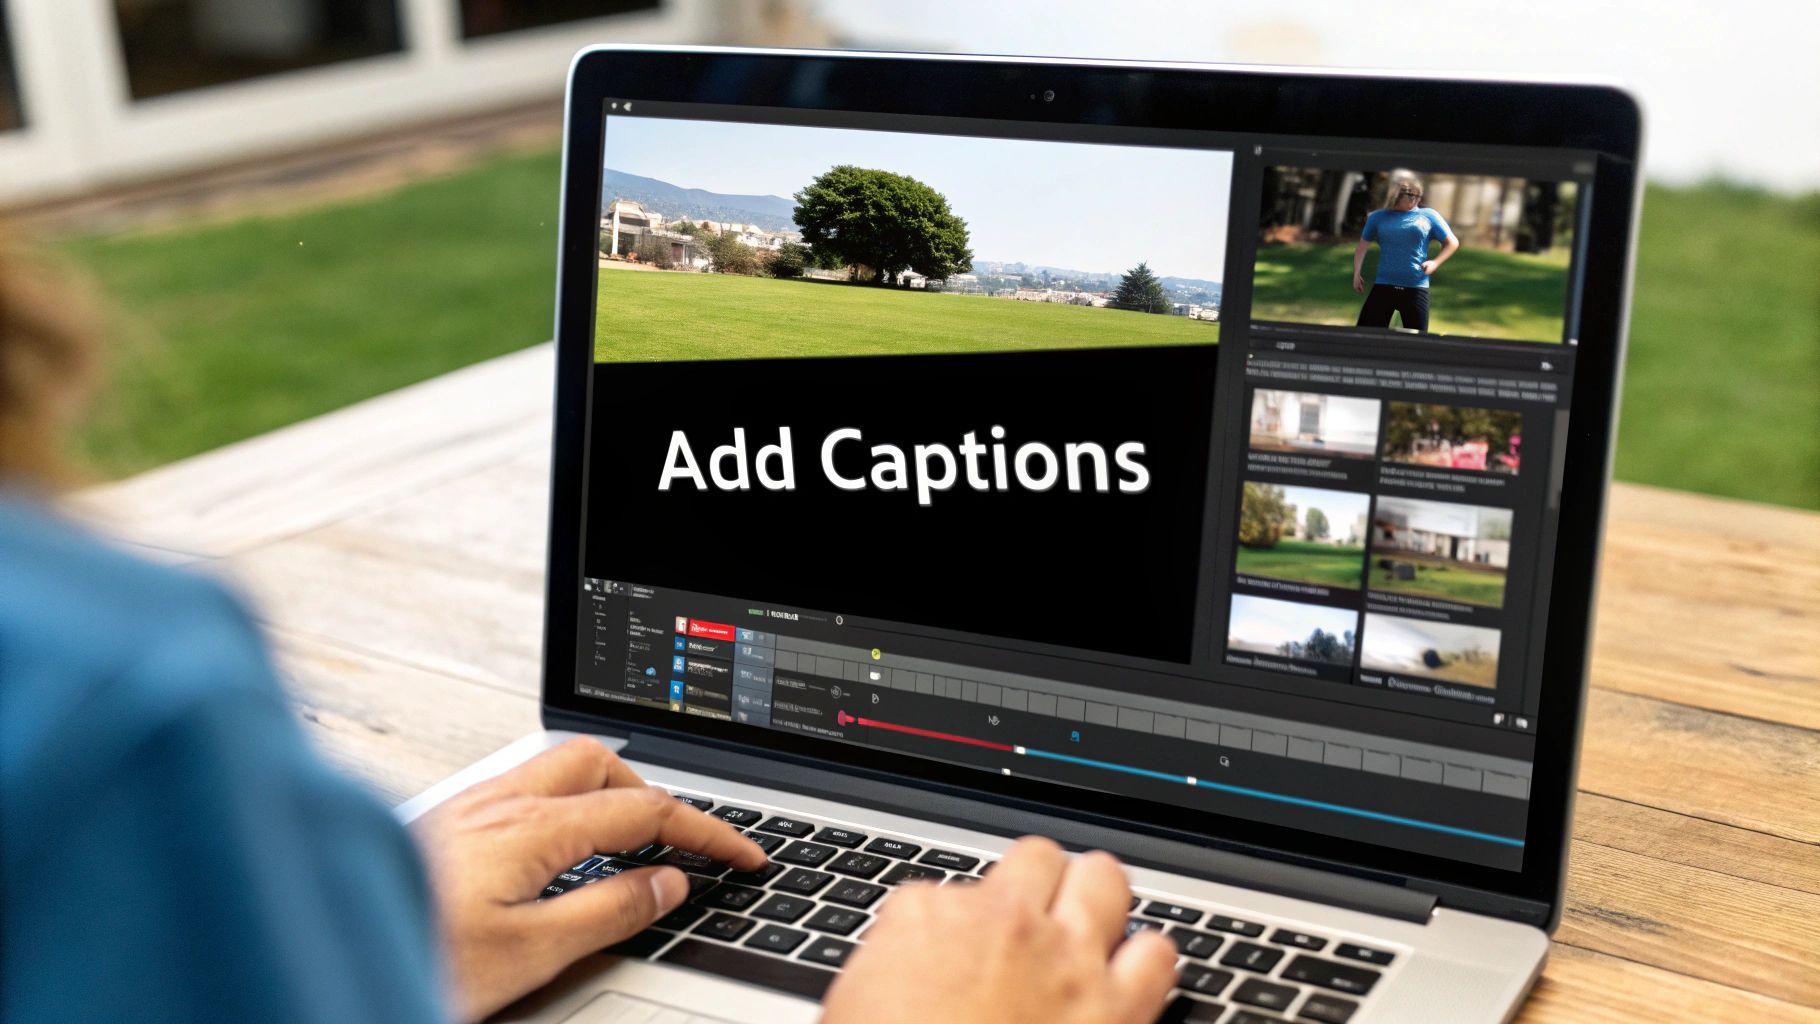
Add Captions to Make Your Content Accessible
I can't stress this enough: add captions. It's not just a nice-to-have, it's essential. Think about how many people watch videos on their phones in public with the sound off. Captions also open your content up to viewers with hearing impairments. Taking this one extra step massively expands your reach and boosts comprehension for everyone.
Getting this done on a Mac is pretty simple. You have a couple of solid options:
YouTube's Auto-Captioning: Once you upload your video to YouTube, its system can automatically generate a transcript. It's a fantastic starting point, but always—always—proofread it. The AI can mishear technical terms or names, so a quick human review is a must.
Create Your Own SRT File: For total precision, you can make a SubRip Subtitle (.srt) file yourself. You don't need fancy software; even TextEdit on your Mac works. You just write out the dialogue and add timestamps to sync it with your video's audio.
An accessible video is an effective video. Captions are your secret weapon for making sure your message lands, no matter who is watching or where they're watching from.
Design Thumbnails That Earn the Click
Your thumbnail is your video's billboard. It’s often the single deciding factor for whether someone clicks play or keeps scrolling. A powerful thumbnail grabs attention and promises value. On a Mac, you can easily knock out a professional-looking design using tools like Keynote or get more advanced with Pixelmator Pro.
A winning thumbnail usually has three key ingredients:
A clean, high-quality image that gives a clear visual clue about the video’s topic.
Big, bold, easy-to-read text that highlights the core benefit or title.
Consistent branding, like your logo or a specific color palette, to build brand recognition over time.
Craft Titles That Actually Get Seen
Finally, let's talk titles and descriptions. These are your best friends when it comes to SEO and discoverability. A great title needs to be clear, concise, and packed with the keywords your audience is actually searching for.
Put yourself in their shoes. What problem are you solving? Instead of something bland like "App Tutorial," go for something specific and benefit-driven like "How to Set Up Your First Project in [App Name] on a Mac (in Under 10 Minutes)."
Pairing a strong title with a compelling thumbnail is the one-two punch for getting views. This focus on engagement directly ties into how well people learn from you. If you want to dive deeper into that connection, we have a whole guide on powerful knowledge retention strategies. When you combine smart promotion with inclusive practices like captions, your videos won't just be seen—they'll make a real impact.
You’ve put in the work and exported a polished video. That’s a huge win, but don’t close your laptop just yet. The next, equally important phase is getting that content in front of the right people. A solid promotion strategy is what turns a great video into an impactful one.
It all starts with knowing where your audience hangs out. And these days, the appetite for educational video is absolutely massive. In 2024, the numbers are staggering: 86% of U.S. viewers regularly turn to YouTube to learn something new. What's more, 62% of all web traffic now comes from mobile devices, which means discoverability on phones and tablets is non-negotiable. You can dig deeper into these trends in this e-learning video statistics report from Yumyumvideos.com.
Optimize for Search on Key Platforms
For most of us, YouTube is the go-to platform. The trick is to stop thinking of it as just a video site and start treating it like what it is: the second-biggest search engine in the world. Getting found here is all about mastering your metadata.
Titles that Solve Problems: Your title is everything for SEO. A generic "macOS Tutorial" is going to get lost. Instead, be specific. Something like "How to Animate a Logo in Keynote on Mac (Beginner's Guide)" tells both the algorithm and the viewer exactly what they're getting.
Descriptions that Deliver: Use the description box to expand on what your video covers. Make sure your main keywords appear in the first couple of lines. This is also the perfect spot for chapter timestamps, links to resources you mentioned, and a quick summary.
Tags that Target: Think like your viewer. What would they search for? Use a mix of broad and specific tags. For a tutorial on Screen Charm, you might use tags like "macOS screen recorder," "how to make educational videos," and "product demo tips."
Use the Channels You Already Have
Your current followers are your launch crew. Don't just upload your video and cross your fingers. You need to actively push it out across every channel you own to build that crucial initial momentum.
The first 24 hours after you hit "publish" are make-or-break. YouTube’s algorithm pays close attention to early engagement signals like views, watch time, and shares. A strong start from your existing community can convince the platform to show your video to a much wider audience.
Find Your Niche and Share With Purpose
Once you've rallied your base, it's time to find new audiences. Look for the digital water coolers where your ideal viewers congregate. This could be a subreddit for Mac power users, a Slack community for developers, or a professional forum for online educators.
The key here is to avoid the dreaded "link drop." Nobody likes a drive-by promoter. Instead, find a relevant conversation where your video genuinely adds value. Frame it as a helpful resource that solves a specific problem someone is asking about. This approach doesn't just drive clicks; it builds trust and brings in viewers who are actually invested in what you have to say.
Got Questions About Making Videos on a Mac?
When you first dive into making educational videos, a few practical questions almost always come up. I've heard them countless times. Nailing down the answers early on can save you a world of headache and let you focus on what really matters: creating great content.
Is the Built-in Mic on My Mac Good Enough?
Honestly, for a quick, internal-only video, your Mac's built-in microphone will get the job done. But here’s the thing—viewers will tolerate a slightly blurry video, but they absolutely will not sit through bad audio.
Investing in a decent external USB microphone is the single best upgrade you can make. It's a game-changer. Clear, crisp audio instantly makes you sound more professional and credible, and it's key to keeping your audience from hitting the back button.
Do I Really Need to Buy Expensive Editing Software?
Absolutely not. Especially not when you're just getting started.
Your Mac already has a fantastic tool built right in: iMovie. It's free and more than capable of handling the essentials like trimming clips, adding titles, and cleaning up your audio. For tutorial-style videos, an app like Screen Charm can simplify things even further by automating those smooth zooms and cursor effects, which often means you don't even need to open a separate, complex editor.
The best tool is the one you'll actually use to get your video made and published. Don't get paralyzed by the thought of mastering a pro-level program. Start simple. You can always level up your toolkit later.
What About Video File Sizes? They Seem Huge!
This one trips up a lot of new creators. High-quality screen recordings, particularly if you’re capturing in 4K, can devour your Mac’s storage space in a hurry. A simple five-minute recording at 1080p can easily be a few hundred megabytes.
Here are a few quick tips I’ve learned for managing storage on a Mac:
Work off an external SSD: Recording directly to an external solid-state drive is a lifesaver. It keeps your Mac's internal drive from getting clogged up.
Be smart about export settings: You don't always need the absolute max quality setting. Most online platforms compress video anyway, so exporting at a slightly lower bitrate can save tons of space without a noticeable drop in quality.
Ditch the raw footage: Once your final video is exported and backed up, be ruthless. Delete those massive, unedited source files.
Ready to create polished educational videos on your Mac, without the steep learning curve? Screen Charm packs all the tools you need—from automatic zoom to custom branding—into one intuitive app. Start making professional-looking tutorials today at https://screencharm.com.
