All those repetitive clicks and keystrokes? They're quiet productivity killers, but you can fight back by learning how to automate repetitive tasks and get your day back. The best part is, the solution is already baked into your Mac. We'll be using native apps like Shortcuts for daily routines and Automator for heavy-duty file work, making all that tedious manual labor a distant memory.
Why You Should Automate Repetitive Tasks on Your Mac

Think about the little things you do on your Mac without even thinking. Resizing a folder full of images, one by one. Periodically clearing out your Downloads folder. Kicking off your day by launching the exact same apps and browser tabs. Each action might only take a few minutes, but add it all up over weeks and months, and you're losing a significant chunk of your time and mental bandwidth.
This isn’t just a personal pet peeve; it’s a massive issue for businesses, too. A stunning 94% of companies are bogged down by repetitive, time-sucking tasks. The good news is that automation is already making a huge impact. In fact, 90% of knowledge workers say automation makes their job better, and two-thirds confirm it directly boosts their productivity.
Reclaim Your Focus and Slash Errors
Automating these processes on your Mac is about more than just saving a few minutes. It frees up your brainpower, letting you concentrate on the high-value work that actually requires your creativity and strategic thinking. When you set up an automation, you're essentially building a personal assistant that handles the grunt work for you, perfectly, every single time.
That brings us to another huge win: consistency. We’re all human, and mistakes are bound to happen, especially when we’re bored or doing the same thing over and over. An automated workflow, on the other hand, will execute the task flawlessly whether it’s renaming 10 files or 1,000.
Automation fundamentally changes your relationship with your Mac. Instead of you serving the machine with endless clicks, the machine starts serving you, anticipating your needs and carrying out commands with precision.
To get a feel for how powerful this can be, it's worth checking out various workflow automation examples to see how it's applied in different business contexts.
The Power Already Built Into Your Mac
You don't need to go out and buy expensive, complicated software to get started. Your Mac already has some seriously powerful and surprisingly user-friendly tools ready to go.
Before we dive into building our own, it's helpful to know which tool is right for the job. Each has its own strengths.
Choosing Your macOS Automation Tool
Here's a quick comparison of the main built-in automation tools on your Mac. This table should help you pick the best one for what you're trying to accomplish.
| Tool | Best For | Skill Level | Example Use Case |
|---|---|---|---|
| Shortcuts | App-based workflows and system settings | Beginner | Launching your morning apps and websites with one click |
| Automator | File and folder-based tasks | Beginner to Intermediate | Creating a right-click action to resize a batch of images |
| AppleScript | Complex, multi-app interactions | Intermediate to Advanced | Extracting data from one app and formatting it in another |
For our purposes in this guide, we'll be focusing mostly on Shortcuts and Automator. They offer the perfect blend of power and accessibility, letting you build some incredibly useful automations without needing to write a single line of code.
By the time we're done, you’ll see that automation isn't some complex programming challenge. It's a practical, accessible way to make your Mac work smarter, not harder.
Sponsored by the makers
Tired of boring screen recordings?
Try Screen Charm.
Auto-zoom, motion blur, camera overlay, and background music. All built in. Record once, export a polished video.
See what it doesBuilding Your First Automation with macOS Shortcuts
Getting started with automation on your Mac is surprisingly straightforward, and the built-in Shortcuts app is the perfect entry point. You don't need to know a single line of code. It's all based on a drag-and-drop system that feels natural right away, letting you string together actions from different apps and system functions into a single command.
Let's build something practical that you can use every day: a custom 'Focus Mode' to get your Mac ready for deep work. Think about it—one click that launches your go-to apps, kills notifications, and even puts on your favorite focus playlist. This is a classic example of automating a series of small, repetitive steps you probably already do manually.
Creating Your 'Focus Mode' Shortcut
Ready to build it? Pop open the Shortcuts app. You'll find it in your Applications folder, or you can just use Spotlight search. Once you're in, hit the + icon to start a new, empty shortcut. We'll add our actions from the panel on the right.
Our goal is to create a specific sequence:
- Activate 'Do Not Disturb' to eliminate distractions.
- Open the essential apps for our work session.
- Start a specific playlist to help us concentrate.
First up, let's handle the notifications. In the right-hand panel, search for the Set Focus action and drag it over. You can leave it as "Turn Do Not Disturb on" or get more specific, like having it turn on for 1 hour.
Next, we need our applications. Look for the Open App action and drag it underneath the first one. Click the faded "App" placeholder and pick an app you always open, like your code editor or Notes. Want to open more? Just drag in another Open App action for each one—maybe for Slack or your to-do list app.
Finally, the soundtrack. Find the Play Music action and drop it at the bottom. This is where you can tell it to play a specific playlist or album from your Apple Music library. Click the "Music" placeholder, make your choice, and that's it! You've just created a powerful, multi-step automation from scratch.
The real beauty of Shortcuts is how it breaks down the barriers between different apps and system settings. You're essentially creating a personalized control panel for your own unique workflows, combining actions that would normally live in separate digital worlds.
So, how do you decide what’s worth automating? This flowchart is a great mental model.
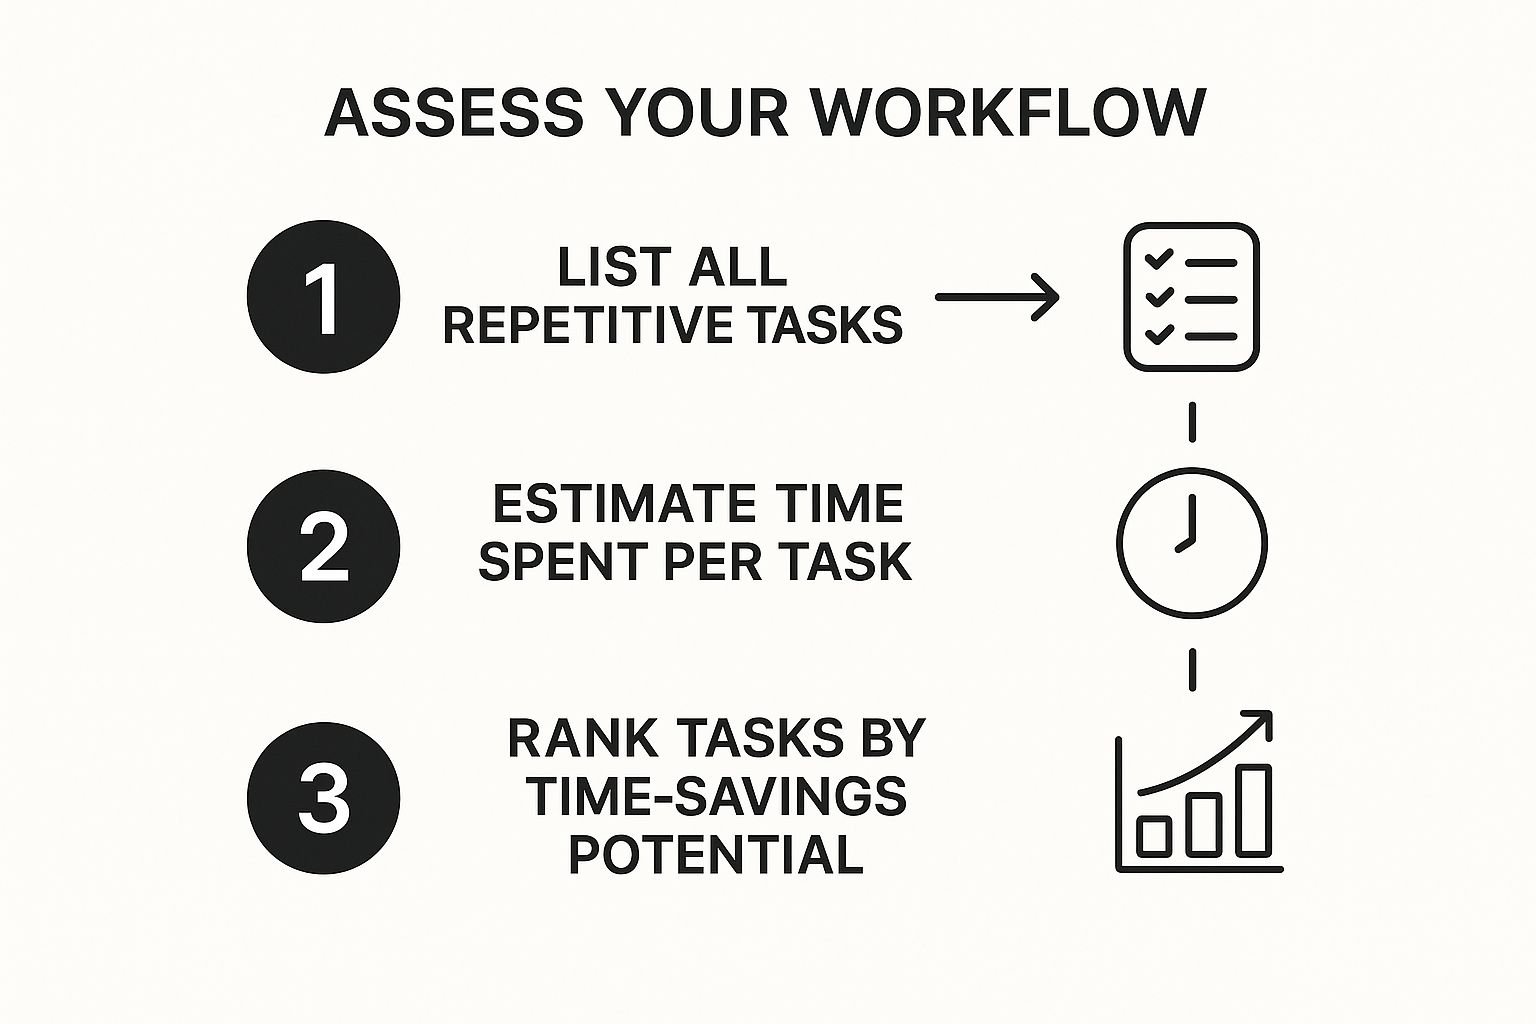
As you can see, the sweet spot for automation is any task that you do frequently and that eats up a noticeable amount of time.
Putting Your Automation into Action
Now that your shortcut is built, give it a clear name like "Start Focus Session." The final piece of the puzzle is figuring out the easiest way to run it. Thankfully, Shortcuts gives you plenty of options, so you can pick whatever fits your style.
Here are a few of the most common ways:
- Menu Bar: My personal favorite. Click the 'i' icon in your shortcut's settings and check "Pin in Menu Bar." Now your automation is always just a click away at the top of your screen.
- Spotlight Search: Just hit
Command + Spacebar, type the name of your shortcut, and press Enter. It's incredibly fast. - Siri: You can also just say, "Hey Siri, run 'Start Focus Session'."
Getting that immediate, useful result is what makes learning how to automate repetitive tasks so satisfying. You've successfully turned a clunky, multi-step manual process into a single, effortless command, saving yourself a little bit of time and mental friction every single day.
Master Your Files with Automator
If your day involves wrangling big batches of files, you need to get familiar with Automator, one of the most underrated tools on macOS. While Shortcuts is fantastic for app-based workflows, Automator is a true workhorse for anything involving files and folders. Its magic lies in creating 'Quick Actions' that you can access right from your right-click menu, ready to handle tedious Finder tasks in a single click.
Think about this scenario: you've just wrapped up a photoshoot and have 50 high-resolution images you need to prep for a website. The old way involves opening each one, resizing it, and saving it out. With Automator, you can build a workflow to do all of that at once. This is the kind of practical automation that saves creators, marketers, and really anyone who works with files on their Mac a ton of time.
Building a Go-To Quick Action
Let's walk through a classic, incredibly useful Quick Action: a batch image resizer. This little tool will take any images you select, scale them down to a web-friendly width, and save the new versions without touching your originals.
First things first, open Automator from your Applications folder. When it asks what type of document you want to create, choose Quick Action. This is the key step that gets your workflow to show up in the right-click menu inside Finder.
At the top of the new workflow window, you'll see a couple of dropdowns. Change "Workflow receives current" to image files and set the location "in" to Finder. This tells your action what kind of files to look for.
Now, let's build the action. Find the Create Duplicate Finder Items action in the library on the left and drag it into the main workflow panel. This is a critical safety net—it makes sure you’re always working on a copy, so your original high-res files stay safe and sound.
Next, add the Scale Images action, dragging it right below the first one. You might see a pop-up asking to add a "Copy Finder Items" step. Since we already handled that by duplicating the files, you can just click "Don't Add." Inside the Scale Images action, set a specific pixel width. Something like 1280 is a great starting point for web use.
Your Automator window should now look something like this, with the actions stacked neatly in order.
The visual layout makes it really easy to see how your files flow through the process, from being selected to being scaled.
Expanding Your Automation Toolkit
Go ahead and save your workflow with a clear name like "Resize for Web." Now, try it out! Head over to Finder, select a few images, right-click, and you’ll find your brand-new command under the "Quick Actions" menu.
The real beauty of Automator is this "set it and forget it" power. You invest a few minutes building the workflow, and in return, you get a custom-built tool that will save you countless hours down the road.
You can use this same exact method for all sorts of other file-based chores. I’ve built quick actions for:
- Converting HEIC to JPG: Use the "Change Type of Images" action to make modern iPhone photos compatible with everything.
- Merging PDFs: The "Combine PDF Pages" action is perfect for pulling multiple documents into a single, organized file.
- Renaming in Batches: Use the "Rename Finder Items" action to add a date or a sequence number to a whole folder of files instantly.
For video creators, automating the prep work for assets like thumbnails or background images frees you up to focus on the creative side of things. If you're looking to streamline your video workflow even more, check out our guide on the best screen recording and editing software.
An Automated Workflow for Video Creators
If you create videos on a Mac—especially tutorials, product demos, or marketing content—you know how much time gets lost in repetitive, manual tasks. Every minute spent closing apps, renaming files, or organizing folders is a minute you could have spent on the creative work. The good news is, you can build a surprisingly powerful system that takes care of the grunt work for you.
This isn't about automating a single click here or there. We're talking about building a connected pipeline that handles everything from setting up your recording environment to processing the final video file. Your Mac can prepare itself for a recording session and then wrap everything up afterward, all with very little input from you.
Designing a Pre-Recording Automation
Think about your pre-recording ritual. You probably close distracting apps, pull up your script, and then launch your screen recorder. It’s a routine ripe for automation, and macOS Shortcuts is the perfect tool for the job.
You can build a single "Record Mode" shortcut that does it all in one click:
- Kills distractions: It can automatically quit Mail, Slack, or any other app that might send notifications.
- Pulls up your tools: Have it open your notes app right to your script, then launch your screen recorder like Screen Charm.
- Sets the stage: It could even adjust your system volume or switch to a clean desktop background.
Creating this in the Shortcuts app is a simple matter of dragging and dropping actions like "Quit App" and "Open App." By stringing them together, you get a perfectly consistent, distraction-free setup every single time you’re ready to record.
Creating a Smart Post-Production Workflow
This is where the real magic happens. After you've finished recording and editing, you can use a powerful tool called Automator to build a "Folder Action." It’s basically a watchman that monitors a specific folder for new files and then runs a series of tasks on them the moment they appear.
Imagine you export your final video into a folder on your desktop called "Ready for Upload." The second that file lands in the folder, your automation gets to work.
This approach flips the script on your post-production checklist. Instead of you manually working through a list of chores, your Mac does the administrative cleanup in the background. Your only job is to drop the video in the right place.
Let's walk through a real-world example. You export a video named final_cut.mov into your watched folder. Here’s what Automator can do instantly:
- Rename the File: It can add the date and a project name, turning
final_cut.movinto2024-10-26-New-Feature-Demo.mov. - Move It to the Project Folder: The newly named file is then shuttled over to your main video editing project folder, keeping everything tidy.
- Create a To-Do Item: It can even add a new task to your Reminders or Things app, reminding you to "Design thumbnail for New Feature Demo video."
This kind of connected workflow is a game-changer for anyone producing educational videos on a Mac. If you want to dive deeper into structuring these projects, our guide on online course video production has a lot more strategies for staying organized.
Beyond just file management, post-production often involves creating other assets. For creators who want to repurpose their content, services for automating YouTube transcript generation are incredibly useful for turning spoken words into text. When you combine these pre- and post-production automations, you're not just saving a few minutes—you're building a truly efficient content machine.
Unlocking More Power with Simple Scripts

While the drag-and-drop interfaces of Shortcuts and Automator are fantastic for most things, you’ll eventually hit a wall. Sooner or later, you'll need to do something very specific that just doesn't have a pre-built block. This is where a little bit of scripting becomes your secret weapon for learning how to automate repetitive tasks on a whole new level.
Don't let the word "scripting" scare you off. You don't need to be a developer. The trick is to think of scripts less as code you write from scratch and more as powerful commands you can find and tweak. By plugging these into your Automator workflows, you can solve those nagging, unique problems and build truly custom solutions on your Mac.
Tapping into AppleScript and Shell Commands
Buried inside Automator are two incredibly powerful actions that open the door to this deeper level of automation: Run AppleScript and Run Shell Script. These actions let you drop small, focused snippets of code right into your visual workflows, giving you practically limitless capabilities.
It’s all about finding the right tool for a specific job. For instance, imagine you're a video editor who needs to eject all connected external drives before packing up for the day. There’s no standard Automator action for that, but a simple one-line AppleScript handles it beautifully.
Think of these script actions as custom-made puzzle pieces. When the standard pieces don't fit your workflow, you can create the exact one you need to complete the automation and make it work perfectly for you.
Here are a couple of real-world macOS scenarios where a simple script is the perfect fit:
- Eject All Disks: A quick AppleScript can tell the Finder to eject every mounted drive, saving you a few clicks every single time.
- Archive Old Downloads: A shell script can sift through your Downloads folder, find everything older than 30 days, and neatly move it to an archive folder.
This kind of targeted automation makes a huge difference. Studies show that workflow automation can slash the time spent on repetitive tasks by 60% to 95%. Adding scripts to your macOS toolkit just amplifies those benefits.
Finding and Adapting Your First Scripts
Here's the best part: you almost never have to write these scripts yourself. The Mac community has been sharing AppleScripts and shell commands for decades. A quick search for "AppleScript to eject all disks" will almost certainly turn up a ready-to-use snippet you can copy and paste directly into Automator's "Run AppleScript" action.
This same approach applies to video production tasks, like scripting a niche file conversion not covered by default actions—a concept that pairs perfectly with using the best video editing tools.
Of course, the world of automation extends far beyond your Mac. If you're a developer, you might explore how to create reusable Github Actions to manage complex coding workflows. The core principle is always the same: find a repetitive process and build a system to do it for you. By combining visual tools with simple scripts, you move beyond the limitations of standard actions and start creating automations that are perfectly suited to your unique needs on macOS.
Your macOS Automation Questions, Answered
Getting into automation on your Mac is exciting, but it's completely normal to have a few questions pop up as you get started. I've been there. Let's walk through some of the most common things people ask, so you can start building your own workflows with confidence.
Automator vs. Shortcuts: Which One Should I Use?
This is the big one, and the honest answer is: it really depends on what you're trying to accomplish. Think of them less as competitors and more as specialized tools in your toolkit.
-
Shortcuts is your go-to for modern, app-centric automation. It excels at stringing together actions across different applications and system settings. Want to create a custom "Deep Work" mode that opens specific apps, starts a playlist, and silences notifications? Shortcuts is built for exactly that. It’s visual, intuitive, and integrates beautifully with Siri.
-
Automator, on the other hand, is the seasoned veteran of file management. Its power lies in its deep integration with the Finder. If your tasks involve files—like batch renaming 100 photos, converting document formats, or automatically sorting downloads—Automator's "Quick Actions" are still unbeatable.
My personal rule of thumb is simple: for controlling apps and the system, I start with Shortcuts. For heavy-duty file manipulation, I turn to Automator. The real magic happens when you realize they can even trigger each other for incredibly powerful workflows.
Don't get stuck on picking just one. The smartest approach is to learn where each one shines and use them together. That's how you build a truly personalized and efficient system on your Mac.
Can I Accidentally Break My Mac with an Automation?
This is a common fear, but you can relax. It's extremely unlikely you'll cause any real harm to your Mac. macOS has plenty of built-in protections that stop user-level automations from messing with critical system files.
The most likely mishap is an automation that runs perfectly, but on the wrong things. You might accidentally rename an entire folder of client files or move your documents to a random location. It’s frustrating for sure, but it’s not going to damage your computer.
Here’s the pro tip: Always test your automations on a dedicated "Test Folder" first. Copy a few sample files into it and run your new workflow. Watch what it does. Once you've confirmed it works exactly as you expect, then you can unleash it on your real files.
Do I Really Need to Learn to Code for This?
Absolutely not. The idea that automation requires programming is one of the biggest myths out there. For 95% of what you'll likely want to do, you won't touch a single line of code.
Both Shortcuts and Automator are designed around a visual, drag-and-drop system. You’re essentially snapping together pre-built action blocks, like building with digital LEGOs. Advanced scripting languages like AppleScript are available if you want to tackle highly specific edge cases, but they are completely optional. You can become an automation powerhouse just by using the amazing code-free tools Apple already gave you.
Ready to create stunning product demos and tutorials with zero fuss? Screen Charm simplifies video creation with its auto-zoom feature that follows your cursor, making every step clear. Skip the complex editing software and produce polished, professional videos in minutes.