Your Guide to Video Screen Grabber Mac Tools
Nov 9, 2025

If you’ve ever tried to record your Mac’s screen and ended up with a silent video, you’ve run into one of macOS’s most frustrating quirks. Capturing the sound playing from your computer—what we call internal or system audio—isn’t possible out of the box. The good news is there's a reliable workaround: using a free virtual audio driver like BlackHole. It creates a special output that a screen recorder, like QuickTime Player, can latch onto as an audio source.
Why Capturing System Audio on a Mac Is a Challenge
That dead-silent screen recording isn't a bug. It's actually an intentional design choice by Apple, built around privacy and security.
macOS has a very specific audio architecture that keeps sound channels isolated from each other. Think of it like a one-way street: audio flows from an app (like Spotify or Chrome) out to your speakers or headphones. There's no built-in ramp for other applications to intercept or "listen in" on that audio stream. While this is great for preventing apps from secretly snooping on each other, it creates a real headache for anyone needing to record what they hear on their Mac.
This becomes a major roadblock if you're trying to record a software tutorial, save a clip from a livestream, or create a product demo with sound. The very thing you need to capture is locked away by the operating system itself.
The Input vs. Output Dilemma
At its core, the problem is about how your Mac thinks about audio inputs and outputs.
Audio Inputs are sources sending sound into your computer. Your built-in mic or a USB microphone are perfect examples.
Audio Outputs are destinations where your computer sends sound out. This includes your MacBook speakers, AirPods, or connected headphones.
The sound from a YouTube video, a game, or your music app is strictly an output. Recording software on your Mac, whether it's QuickTime or Screen Charm, is built to listen to inputs. Without some kind of bridge connecting the two, your recording app simply has nothing to listen to. You can dig deeper into this in our guide on whether screen recording captures audio.
Why Virtual Audio Drivers Are Essential on macOS
This is exactly where tools like BlackHole or Soundflower save the day. They act like a digital patch cable, creating a new, virtual "input" device that you can route your system's audio through.
You're essentially tricking macOS into thinking its own sound output is a microphone. This gives your screen recorder an audio source it can finally "hear" and capture.
This technical hurdle is a well-known part of the Mac experience. It's been a hot topic in Apple communities for years, and it's telling that an estimated 60-70% of Mac users who create content rely on third-party tools for this exact purpose. You can find countless discussions about it on Apple's forums.
Understanding this fundamental split between audio channels is the first step. It explains why a simple screen recording on your Mac is so often silent and makes it clear why setting up a virtual audio device isn't just an optional tweak—it's the key to getting the job done right.
Choosing Your Go-To Tool for Mac Audio Capture
To record your Mac’s internal audio, you need what’s called a virtual audio driver. The simplest way to think about it is like a digital patch cable. It creates an invisible bridge that takes the sound coming out of your Mac and routes it back in as a microphone source for your recording software.
A few key players dominate this space for macOS, and picking the right one really comes down to your budget and how complex your recording needs are. Let’s break down the three main options you'll encounter: BlackHole, Soundflower, and Loopback.
Comparing macOS Virtual Audio Drivers
To get a clearer picture, here’s a side-by-side look at what each tool brings to the table for Mac users.
Feature | BlackHole | Soundflower | Loopback |
|---|---|---|---|
Best For | General screen recording, tutorials, simple audio capture | Users on very old macOS versions | Podcasters, streamers, complex multi-app recordings |
Ease of Use | Moderate (requires initial setup in Audio MIDI Setup) | Moderate (similar setup, but less reliable today) | Easy (visual, drag-and-drop interface) |
Key Feature | Stable and reliable system audio passthrough | The original free solution (now legacy) | Route audio from individual apps; combine sources |
macOS Support | Actively maintained for modern macOS | Not updated; compatibility issues are common | Excellent; updated for the latest macOS versions |
Price | Free (Open Source) | Free (Legacy) | Premium (Paid) |
For most Mac users, the choice is pretty clear. But for those who need more, the investment in a premium tool is often well worth it.
BlackHole: The Modern, Free Standard for Mac
For just about everyone on a Mac, BlackHole is the answer. It’s a modern, open-source driver that’s actively maintained, meaning it plays nice with the latest versions of macOS. It does one job and does it well: it creates a virtual device that funnels your system audio into a clean input source.
Once you get it configured, it just works quietly in the background. If all you need to do is record everything you hear on your Mac—whether for a software tutorial, a gameplay clip, or a webinar—BlackHole is the perfect no-cost solution.
Soundflower: The Legacy Option
Before BlackHole came along, Soundflower was the name of the game. For years, it was the way to get system audio recorded on a Mac. But times have changed. It's now legacy software that hasn't been updated in a long time, which means you're likely to run into compatibility and stability problems on modern Macs.
You might still see it mentioned in older macOS tutorials, and if you’re running an ancient version of macOS, it could still do the trick. But for anyone else, BlackHole is a much more stable and future-proof choice.
Loopback: The Premium Powerhouse for Mac
While the free tools are great for basic capture, Loopback from Rogue Amoeba is on another level entirely. Instead of just grabbing all your system audio in one big stream, Loopback lets you cherry-pick sound from specific applications and mix them together.
Think about recording a Zoom call, piping in background music from Spotify, and adding a sound effect from your browser—all as separate, controllable inputs. That’s what Loopback does, right on your Mac.
Loopback’s power is in its visual, drag-and-drop interface. You can build surprisingly sophisticated audio setups in seconds, something that would otherwise require deep technical know-how. For podcasters, musicians, and serious content creators on macOS, it easily pays for itself by saving hours of post-production headaches.
This level of precision is definitely overkill for a quick screen recording. But for more advanced work, like producing a polished podcast or using software for YouTube live streaming, it's a game-changer.
The reality is, most Mac users gravitate toward what's free and functional. In fact, some reports show that around 30% of users still rely on the QuickTime-plus-virtual-driver combo precisely because it costs nothing.
So, here’s the bottom line. For reliable and free internal audio capture on your Mac, BlackHole is the clear winner. If you're a creator who needs granular control over multiple audio sources, Loopback's power justifies its price tag. To see how these tools work with actual recording apps, take a look at our roundup of the best screen recording software for Mac.
Your Guide to Setting Up BlackHole
Alright, now that you've got the theory down, let's get our hands dirty. We're going to walk through the setup for BlackHole, which is the go-to free recommendation for anyone needing to capture Mac audio. This isn't just theory; it's the practical, step-by-step process for macOS, and it all happens inside a powerful little utility called Audio MIDI Setup.
The magic trick here is creating what’s called a 'Multi-Output Device.' Think of it as a digital audio splitter. It takes your Mac's system sound and sends it to two places at once: your headphones, so you can hear what's happening, and the BlackHole virtual device, so your recording software can grab it. Simple, but incredibly effective.
Installing BlackHole the Right Way
First things first, you need to get BlackHole on your system. It's really important to download it directly from the developers to avoid any sketchy, tampered-with files.
Head over to the official website: existential.audio/blackhole/.
Grab the latest installer. You'll see options for 2ch, 16ch, and 64ch versions. For just about everyone, the 16ch version is the sweet spot—plenty of flexibility without being overwhelming.
Run the
.pkgfile and follow the prompts. You’ll likely need to punch in your Mac password to give it permission to install.
Once it's done, don't go looking for a new app icon in your Dock. BlackHole is a background utility; it installs itself as a new audio device that macOS can see, which is exactly what we need for the next part.
Getting to Know Audio MIDI Setup
Now, we need to open a tool that most Mac users don't even know exists: Audio MIDI Setup. This is the macOS control panel for every single audio input and output connected to your Mac.
The easiest way to find it is with Spotlight (Cmd + Space), but you can also navigate to Applications > Utilities in Finder and open it from there.
When you launch it, you'll see a list of your audio hardware—built-in speakers, any microphones you have plugged in, and now, "BlackHole 16ch." This is where we'll build our custom audio routing setup.
This infographic gives you a great visual overview of how these virtual audio tools fit into the macOS sound system.
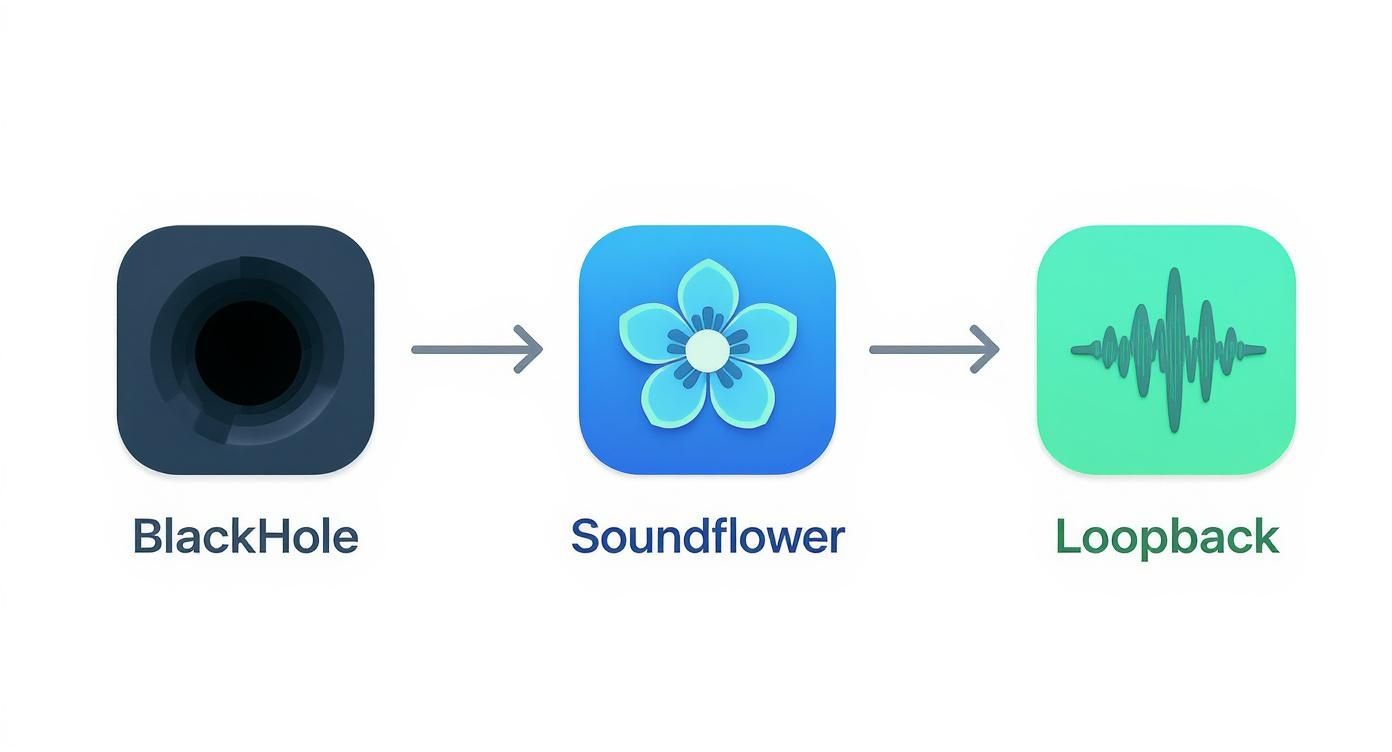
As you can see, tools like BlackHole act as a bridge, catching the audio and redirecting it where you need it to go.
Creating Your Multi-Output Device
Our main goal is to create a new "device" that bundles two outputs together. This lets you listen to your audio in real-time while a perfect copy is sent to BlackHole for your recording app to capture.
Look for the little plus (+) icon in the bottom-left corner of the Audio MIDI Setup window. Click it and choose Create Multi-Output Device.
A new device will pop up in the list. Do yourself a favor and rename it to something you'll recognize later, like "Recording Output" or "System Audio + Headphones." Just click the name to edit it.
Now, you have to tell this new virtual device what to do. On the right-hand side, you'll see a checklist of all your available audio outputs.
Check the box for your main listening device first—this could be "MacBook Pro Speakers" or your external headphones. This becomes the Master Device.
Next, check the box for BlackHole.
This simple action routes your Mac's audio to both places simultaneously.
Don't Skip Drift Correction
This is probably the single most important (and most often missed) step. Over time, the digital "clocks" of different audio devices can fall slightly out of sync. This creates an annoying echo or drift in long recordings, making your audio and video misaligned.
Drift Correction is a macOS feature that actively prevents this by keeping all audio streams perfectly locked together. Forgetting this is the #1 cause of bad captures.
In your Multi-Output Device settings, you must check the Drift Correction box for every device in the list except your Master Device. In most cases, this means you'll be checking the box for BlackHole.
Making It Your Default Sound Output
The final step is to tell your Mac to actually use this new setup for all system sounds.
Open System Settings (or System Preferences on older macOS versions).
Head to the Sound section.
In the Output tab, select the Multi-Output Device you just created (e.g., "Recording Output").
That's it! Your Mac's audio is now being routed through your custom setup. You should still hear everything normally through your headphones or speakers, but now a clean, silent copy is also being piped directly into BlackHole, waiting for an application like QuickTime or Screen Charm to record it.
Play a quick YouTube video to test it. If you can hear it, you're good to go. You've successfully configured your Mac to capture internal audio.
Capturing Audio with QuickTime and Screen Recorders
Alright, you’ve done the heavy lifting and configured your virtual audio device. The bridge is built; now it's time to actually record your Mac’s internal audio.
We’ll walk through two common macOS workflows. The first uses QuickTime Player, which is already on your Mac and perfectly fine for simple jobs. The second involves a dedicated screen recorder like Screen Charm, a much more powerful and streamlined approach for when you need better quality and more control.
Using QuickTime Player for Basic Audio Capture
This is where most people get tripped up. They get BlackHole installed, fire up QuickTime, hit record, and... silence. The resulting video has no system audio.
The reason is simple: you never told QuickTime where to listen. By default, it’s still trying to use your Mac's built-in microphone, completely ignoring the clever virtual setup you just created.
Getting it right is just one extra step. Here’s what to do:
Open QuickTime Player.
Navigate to File > New Screen Recording (or just use the
Shift + Command + 5shortcut).A small control panel will pop up. Find and click the Options menu.
Under the Microphone section, select the Multi-Output Device you created earlier—whatever you named it, like "Recording Output."
That’s it. That’s the magic step. By pointing QuickTime to your custom device, you’re telling it to record the audio stream you're piping through BlackHole. Now, your screen recordings will capture system sound perfectly.
This method is fantastic for quick, no-frills recordings. If you just need to grab a clip of a software bug or record a short demo with sound, the QuickTime and BlackHole combination is a reliable, built-in solution that gets the job done without extra software costs.
Why a Dedicated Screen Recorder is Often Better
While QuickTime works, it has its limits. At its heart, it’s a video player with recording features tacked on—not a purpose-built tool for Mac content creation. If you’re creating polished tutorials, product demos, or any kind of professional content, a dedicated app like Screen Charm is a game-changer.
The biggest difference comes down to control and quality. Specialized recorders are designed to handle tricky audio situations on macOS effortlessly, usually with a much cleaner interface and a higher-quality final product.
Streamlining Your Workflow with Screen Charm
A tool built for the job simplifies the entire process. Instead of bouncing between Audio MIDI Setup and QuickTime's hidden menus, you can manage everything from one place.
Integrated Audio Selection: Screen Charm lets you pick your audio sources—system audio, an external microphone, or both—right from the main recording panel. No digging required.
Simultaneous Mic and System Audio: This is a huge one. Trying to record your voiceover while system audio is playing can be a real headache with aggregate devices. A good recorder makes it a one-click process. You just enable both sources, and the app handles the mixing.
Higher Quality Output: Professional tools give you far more control over export settings like resolution, frame rate, and video codecs. This is critical for making your final video look sharp and professional. For instance, Screen Charm offers unlimited 4K UHD exports, ensuring your recordings are crystal clear.
A Quick Note on Audio Quality
It’s worth knowing about a little quirk with the macOS audio routing APIs that both BlackHole and Loopback depend on. Technical deep-dives have shown that audio routed through these virtual devices can undergo a tiny bit of degradation, sometimes getting resampled to a different rate (like 44.1 kHz) behind the scenes.
For 99% of use cases—tutorials, demos, casual recordings—this is completely imperceptible. But if you’re an audio purist or professional, just know the signal isn't truly "lossless." This isn't a bug in the tools themselves but a limitation within macOS.
Ultimately, the audio you capture will still be clean, clear, and perfectly suited for almost any project. For a quick grab, QuickTime is fine. For anyone serious about creating polished, professional-looking videos on their Mac, a dedicated tool like Screen Charm will save you time, headaches, and deliver a much better result.
Troubleshooting Common Mac Audio Recording Issues
https://www.youtube.com/embed/7BOExoIxbeU
Even after you've perfectly configured your virtual audio device, you can still run into trouble. It's incredibly frustrating to finish a recording only to discover it's completely silent, the audio drifts out of sync, or the sound is only coming from one speaker. Don't worry, these are common hiccups for Mac users.
Think of this as your field guide for diagnosing and fixing the usual suspects when capturing internal audio on a Mac. The good news is that most of these problems are easily solved with a quick trip back to the Audio MIDI Setup utility.
Let's walk through the most frequent issues and get your recordings sounding perfect.
The Dreaded Silent Recording
You hit record, capture a great take, and press play... only to hear absolutely nothing. This is, by far, the most common problem people face on a Mac, and it almost always points to one of two simple mistakes.
First, check that your recording app is actually listening to the right source. In an app like QuickTime or Screen Charm, you have to explicitly select your custom "Multi-Output Device" from the microphone dropdown menu. If you miss this step, the app is probably still trying to use your Mac's built-in mic, which won't pick up any internal system sound.
Second, make sure you've actually set that same Multi-Output Device as your Mac's main sound output in System Settings > Sound. If your Mac is still sending audio directly to your speakers or headphones, there's simply nothing for your virtual device (like BlackHole) to intercept and record. For a deeper dive, our guide on no sound on your screen recording has more detailed solutions.
Solving Audio Drift and Sync Issues
Ever recorded a long tutorial or gameplay session and found the audio slowly falls out of sync with the video? It's a maddening issue known as audio drift. It happens because the internal digital "clocks" of your different audio devices—say, your headphones and the BlackHole virtual device—aren't perfectly aligned. Over time, that tiny mismatch adds up.
Luckily, the fix is built right into macOS.
Open Audio MIDI Setup and select your Multi-Output Device. In the device list, make sure the Drift Correction box is checked for every single device except for the one you've set as the "Master Device."
This little checkbox is a lifesaver. It tells macOS to actively keep all the audio streams synchronized, completely eliminating drift. Forgetting to enable it is the number one reason for sync problems in recordings longer than a few minutes.
Dealing with One-Sided or Distorted Audio
Another classic issue is recording audio that only plays back through the left or right speaker. This usually happens when your virtual device and physical output have mismatched channel settings. Dive back into Audio MIDI Setup and ensure both devices are set to a stereo configuration, like 2ch-24bit Integer, to maintain a proper stereo image.
Sometimes you'll get unexpected crackling, static, or distortion. This can be caused by a sample rate mismatch between devices or your Mac's processor being overloaded. If you're running into these kinds of artifacts, learning why the sound is distorted and how to fix it can give you a solid framework for troubleshooting.
Advanced Setup: Creating an Aggregate Device
So far, we've focused on Multi-Output Devices, which are for sending one audio source to multiple destinations. But what if you need to combine multiple inputs into a single track? That's where an Aggregate Device comes in on macOS.
Imagine you're recording a podcast or a complex tutorial and need to capture all of these at once:
Your Mac’s system audio (via BlackHole)
Your voice from a separate USB microphone
Music from another app routed through Loopback
An Aggregate Device lets you bundle all those inputs into a single, unified source that your recording software can see.
Here's how to set it up:
In Audio MIDI Setup, click the small plus (+) button at the bottom-left corner and select Create Aggregate Device.
In the new window, check the boxes for all the input sources you want to combine. This might include your USB mic and the BlackHole device.
Now, in your recording software, select this new "Aggregate Device" as your microphone.
This is a seriously powerful technique for anyone doing more than basic screen recording. It turns your Mac into a mini-mixing board, letting you capture multiple distinct audio sources simultaneously.
Common Questions About Capturing Audio on a Mac
Getting into the weeds of internal audio capture on a Mac can feel a bit technical at first. It's totally normal to have questions, especially when you're installing new drivers and tinkering with system settings. Let's clear up some of the most common ones I hear from Mac users.
Are Virtual Audio Drivers Like BlackHole Safe to Install?
Absolutely, as long as you stick to the source. A tool like BlackHole is safe because it's a well-regarded, open-source project. The key is to download it directly from the official developer’s GitHub page. Steer clear of third-party download sites, as you can never be sure what you're actually getting.
It helps to think of these drivers as digital plumbing, not spyware. They don't touch your personal data. They just create a new, safe pathway for audio to flow from one part of your Mac to another, completely separate from your files.
Can I Just Record the Audio from a Single App?
You can, but it requires a bit more firepower than the free tools provide. BlackHole is fantastic, but it's an all-or-nothing solution—it grabs all the sound your Mac is making.
If you need to isolate audio from a specific application, say, just from Chrome without capturing your Slack notifications, you'll want to look at a premium tool. The go-to for this on macOS is Loopback by Rogue Amoeba. It gives you that fine-grained control to build virtual devices that target individual apps.
Help! My Recorded Audio is Choppy or Distorted!
This is a classic problem, and thankfully, the fix is usually pretty simple. Nine times out of ten, it's a sync issue.
Head back into the Audio MIDI Setup app on your Mac.
Look at your Multi-Output Device. Make sure the Drift Correction box is checked for every device in that list except for your main clock source (which is usually BlackHole). This little checkbox is a lifesaver for keeping different audio signals aligned.
If that doesn't solve it, the next culprit is often a mismatched sample rate. Most gear and software play nicely at 44.1 kHz or 48 kHz. Just double-check that this setting is the same across your virtual driver, your actual output (like your speakers or headphones), and in the project settings of your recording software. Consistency is key.
And when all else fails? The oldest trick in the IT book often works: just restart your Mac. It can clear out temporary glitches that cause all sorts of audio weirdness.
Ready to skip the hassle and create polished, professional-looking product demos and tutorials? Screen Charm takes the complexity out of the equation, letting you easily record your screen, webcam, and audio in crisp 4K. Its auto-zoom feature is brilliant for keeping viewers focused, and the built-in editor makes polishing your final video a snap. Give Screen Charm a try and see just how easy it is to make videos that truly stand out.
