When you need to record a video on your Mac, the best approach is almost always to use a dedicated app. Sure, built-in tools like QuickTime are fine for a quick, one-off capture, but they just don't have the horsepower or features for anything more serious, like a polished tutorial, a professional presentation, or a slick product demo.
Why Your Mac's Built-in Recorder Just Doesn't Cut It
Let's be real—QuickTime is handy for a simple screen grab. A couple of keyboard shortcuts, and boom, you have a video. But the second you need to do anything more than just point and shoot, you'll start to feel its limitations. This is the exact point where a lot of creators on macOS get stuck.
Ever tried to record a software walkthrough and ended up with a gigantic, uncompressed MOV file that’s a pain to upload or share? Or maybe you needed to record your microphone and the audio coming from an application at the same time? With the built-in macOS tools, that simple task can turn into a frustrating technical puzzle.
Common Headaches with Basic Mac Recorders
Most macOS users quickly learn that "free" and "easy" often come with some major trade-offs. The initial convenience of macOS's native tools can quickly turn into a series of frustrating dead ends.
- No Editing on the Fly: With QuickTime, the recording is what it is. If you cough, a dog barks, or you fumble your words, that mistake is baked in unless you drag the file into a separate editor like iMovie. It just adds more work.
- Audio is a Nightmare on macOS: Getting clean audio from more than one source is notoriously difficult. Capturing your voice from a mic while also grabbing your Mac's internal audio is often impossible without clunky, third-party workarounds. For a full breakdown, check out our guide on how to capture system audio on your Mac.
- Huge, Unwieldy Files: The default recording formats often create massive files. This makes them a pain to store, a nightmare to upload, and nearly impossible to send over email.
The real problem boils down to a lack of control. A basic recorder just captures pixels. A professional tool empowers you to create, refine, and perfect your content all in one place.
Ultimately, if you want to record high-quality video on your Mac, you have to move past the basic, built-in options. For creating polished tutorials, engaging presentations, or crisp gameplay videos, a dedicated app like Screen Charm is the way to go. It's the difference between a simple screen grab and professional content creation.
Sponsored by the makers
Tired of boring screen recordings?
Try Screen Charm.
Auto-zoom, motion blur, camera overlay, and background music. All built in. Record once, export a polished video.
See what it doesSetting Up for a Flawless Screen Recording on Your Mac
The secret to a professional-looking video isn't just in the editing—it starts long before you ever hit the record button. Taking a few minutes to get your Mac set up properly will make a world of difference, saving you a ton of headaches later. This initial prep is really the best way to record video on mac without having to fix a bunch of problems in post-production.
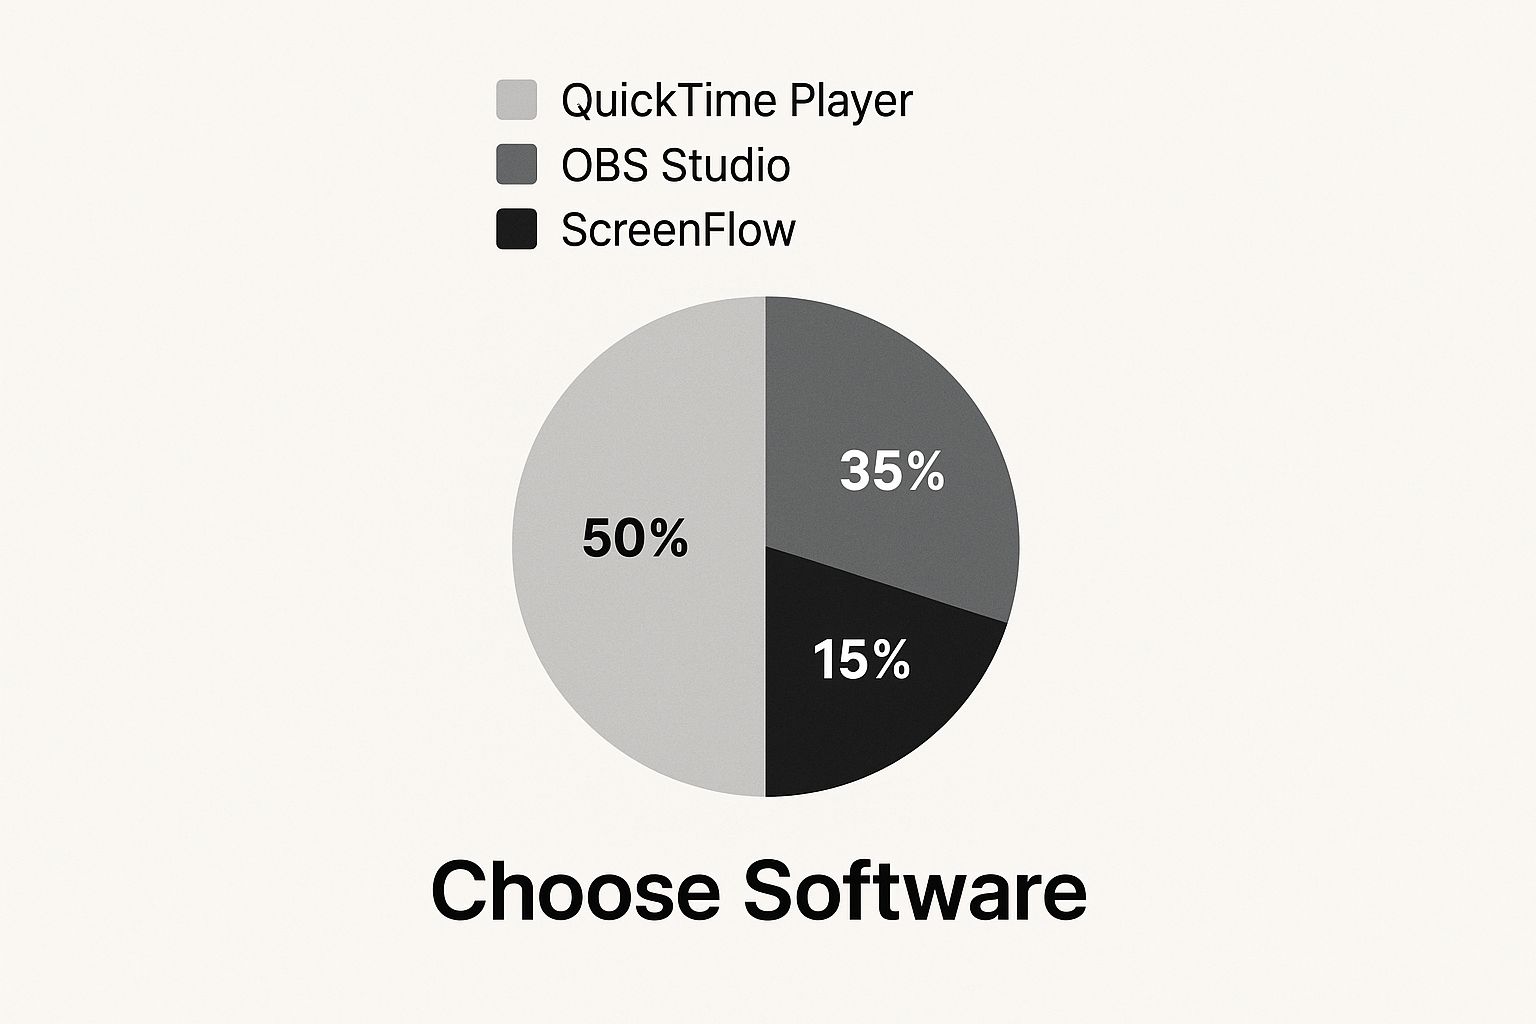
Choosing your software is ground zero. The global market for video recording tools was already valued at USD 5.78 billion in 2023 and is expected to rocket to USD 12.5 billion by 2032. That explosion tells you everything you need to know about the demand for powerful, reliable software, especially for macOS users who demand a top-notch experience. You can even dig into the full market research if you're curious.
Think of it like this: having a dedicated, professional tool ready to go in your Mac's Dock is the foundation you build your entire project on.
Dialing in Your Video Settings
With your software fired up, the next step is to think about your audience. Where will they be watching this video? The answer to that question will guide your technical choices and make sure your video looks sharp and polished exactly where it counts.
Here's how I think about it:
- Product tutorials for YouTube? 1080p (1920x1080) is your best friend. It’s the gold standard for crisp, high-definition video that still loads quickly for viewers.
- A detailed software demo for a developer conference? If it’s going on a big, high-res screen, recording in 4K is the way to go. It’ll capture every tiny icon and line of text with perfect clarity.
Then, you have to consider motion. For a standard webinar or a slide-based presentation, 30 frames per second (FPS) is more than enough. It looks smooth and keeps your file sizes from getting out of control. But if you’re recording slick UI animations or fast-paced gameplay, you absolutely need 60 FPS to avoid a choppy, unprofessional result.
To make this easier, here's a quick cheat sheet I use to decide on settings for different projects.
Recommended Recording Settings for Common Mac Video Projects
This table is a great starting point for dialing in the perfect settings in Screen Charm, helping you balance quality with file size based on what you're creating.
| Project Type | Recommended Resolution | Ideal Frame Rate (FPS) | Audio Source |
|---|---|---|---|
| Software Tutorial (for YouTube) | 1080p (1920x1080) | 30 FPS | Microphone + System Audio |
| High-Fidelity UI Demo | 4K (3840x2160) | 60 FPS | System Audio Only |
| Webinar or Presentation | 1080p (1920x1080) | 30 FPS | Microphone Only |
| Gameplay Recording | 1440p or 4K | 60 FPS | Microphone + System Audio |
Ultimately, the goal is to match your settings to your content's purpose. A higher resolution or frame rate isn’t always better—sometimes it just means a massive file that takes forever to upload.
Configuring Your Audio Sources
Let's be honest: amazing video with terrible audio is just a bad video. One of the classic hurdles on macOS is trying to record your microphone and your computer’s internal sounds at the same time. A lot of basic tools just can’t do it.
This is where a dedicated screen recorder shines. Before you start, make sure you’ve selected both your external microphone (please, don't use the built-in one!) and the "System Audio" option. This is non-negotiable for any tutorial where you need your voiceover plus the clicks, dings, and other sounds from the app you're demonstrating.
Here’s a pro tip I swear by: always do a quick, one-minute test recording. It lets you check your audio levels and make sure everything is coming through loud and clear before you sink an hour into the real thing. It’s a simple step that has saved me from re-recording entire sessions.
Mastering Your Capture Techniques
Once your settings are dialed in, it's time to focus on the art of the capture itself. This is where you graduate from simply hitting "record" and start thinking like a seasoned content creator. The real secret to recording great video on your Mac is planning your on-screen actions to make your life easier in post-production.
A simple but incredibly effective technique is to isolate exactly what you’re capturing. Instead of sharing your entire desktop—cluttered files and all—just record a specific application window. This one move instantly makes your video look cleaner and keeps your audience focused only on what matters.
Refining Your Recording Workflow
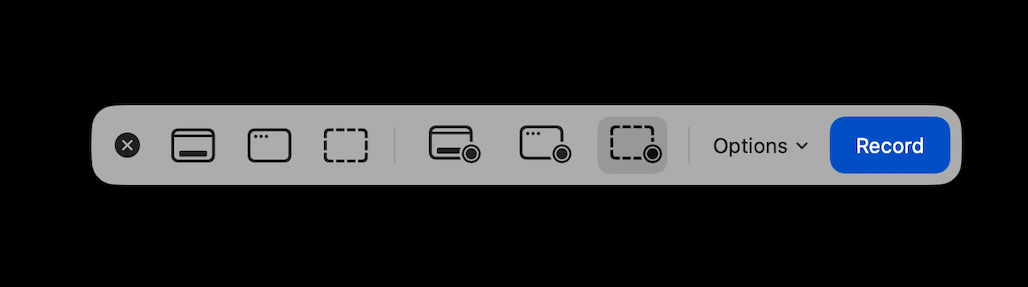
Another pro move is to select a custom region of your screen. This is perfect for when you need to zero in on a specific feature within a software interface or highlight a single paragraph on a webpage. By controlling the frame so precisely, you guide the viewer's eye exactly where you want it.
Here’s the clean interface you'll see in Screen Charm for selecting your recording area.
This level of control ensures your recording is polished and completely free of distractions right from the get-go.
To make your workflow even smoother, silencing notifications is non-negotiable. I can't tell you how many great takes I've seen ruined by a stray message or calendar alert. Just use your Mac’s built-in Focus modes to guarantee an uninterrupted session.
Also, take the time to master your keyboard shortcuts. It’s a total game-changer. Starting and stopping your recording without fumbling for a mouse click gives your final video a much more professional feel. To get up to speed, check out our dedicated guide on using a https://screencharm.com/blog/screen-record-mac-shortcut for a faster process.
The goal is to capture footage that's as close to the final product as possible. Every interruption you prevent and every action you plan during the recording phase is time saved during editing.
And these skills are more in demand than ever. The screen recording software market was valued at an impressive USD 1.5 billion in 2023 and is projected to skyrocket to USD 3.5 billion by 2033, all driven by the world's hunger for high-quality online content. If you want to dive deeper into the business side of things, check out the market insights from DataHorizzon Research.
For those looking to go beyond basic screen recording into more advanced capture and live streaming, learning how to effectively host webinars using OBS Studio is a fantastic next step.
Editing Your Footage Like a Pro
Raw footage is just the starting point—the real magic happens in the edit. This is where you take a basic screen capture and shape it into a polished, professional video. The secret to an efficient workflow is using a tool with an integrated editor, which keeps everything you need in one place.
Let's say you just recorded a software demo for a client. The first 10 seconds are you fumbling with windows, and halfway through, you coughed and had to repeat a sentence. With an integrated editor, you can instantly trim that awkward silence from the beginning and snip out the cough in just a couple of clicks. No need to waste time exporting and importing into a separate program.
Building Your Story in the Timeline
Once you've cleaned up the obvious mistakes, the next step is all about refining the viewing experience. This is less about fixing errors and more about making your video clear and compelling.
- Add Simple Transitions: A subtle cross-fade between clips feels much more professional than a jarring hard cut. It’s a small touch that keeps the viewer engaged, especially if you're combining several different takes.
- Layer in Text Overlays: Need to highlight a keyboard shortcut or display a website URL? Text overlays are perfect for adding important context without interrupting your narration.
- Balance Your Audio: If you have background music, use the editor to gently lower its volume whenever you speak. This is a classic audio trick that makes sure your voice always cuts through, loud and clear.
Your goal in the editing phase is to remove anything that might distract your viewer or make them lose interest. Every cut, transition, and audio tweak should help make your message more powerful.
This push for all-in-one tools is definitely a trend we're seeing across the board. The video software market in 2025 is showing major growth, with a huge demand for user-friendly apps that combine recording and editing, especially for Mac users. From the big names to newer cloud-based platforms, everyone is trying to deliver this seamless experience. You can see the data for yourself in this market analysis of video recording software.
By getting comfortable with these simple editing techniques, you can turn any screen capture into a valuable asset. If you're weighing your options, check out our deep dive on the best screen recording and editing software to see how the top tools compare. These are the skills that separate a quick, amateur recording from a professional video that gets your point across.
Getting Your Video Ready to Share
You’ve put in the work—capturing, editing, and polishing your screen recording. Now for the final, crucial step: getting it out of your project and into a format the rest of the world can see. This is where exporting comes in.
Exporting essentially "bakes" all your edits into a single, shareable video file. On a Mac, you'll often see two main options: MOV and MP4. While MOV files work great within the Apple ecosystem, MP4 is the universal language of video. It’s your best bet for compatibility pretty much everywhere—websites, social platforms, and any device you can think of. When in doubt, go with MP4.
Nailing the Export Settings
The real magic behind a great export is the codec, which is the technology used to compress your video. A good codec, like the widely used H.264, strikes a perfect balance between stunning visual quality and a manageable file size. You don't want a file so huge it takes forever to upload, but you also don't want to sacrifice all that crisp detail you worked hard to capture.
Luckily, you don't have to be a video engineer to get this right. Screen Charm takes the guesswork out of it with presets designed for specific destinations.
- YouTube Preset: This gives you a high-quality file optimized for 1080p or 4K, perfect for making sure your content looks sharp on YouTube's platform.
- Social Media Preset: Need something for Instagram or Twitter? This option creates a smaller, mobile-friendly video that will load quickly and look great on smaller screens.
- Presentation Preset: If you're sharing a slideshow or a software demo with a client, this setting prioritizes crisp, clear text and graphics.
Think of export settings as your final quality check. Using a preset built for your target platform is the easiest way to ensure your video looks professional and performs well, no matter where you post it.
With your video exported, you're ready to get it in front of your audience. If you're building a cross-platform strategy, you might be wondering how to post a YouTube video on Instagram effectively.
Here's a pro tip for staying organized on your Mac: get into the habit of creating an "Exports" folder inside every video project folder. It’s a simple trick that keeps your final, polished videos separate from your raw footage and project files, preventing any accidental mix-ups down the line. It's the final piece of the puzzle for mastering how to record great video on your Mac.
Answering Your Mac Recording Questions
If you're new to creating videos on your Mac, you've probably got some questions. Let's tackle a few of the most common ones that pop up, so you can skip the trial-and-error and get right to creating.
So, Why Not Just Use QuickTime?
Look, QuickTime Player is fine for a quick-and-dirty screen grab. We've all used it in a pinch. But that’s where its usefulness ends. It's like comparing a disposable camera to a DSLR; both take pictures, but the results are worlds apart.
A dedicated recording app like Screen Charm is a complete production suite. You get an integrated editor, the ability to record your Mac's audio and your microphone simultaneously (a huge pain point with QuickTime), and tools to draw on the screen while you're recording. It’s a full workflow, not just a capture button.
Can I Record My iPhone Screen on My Mac?
Yep, and it's surprisingly easy. This is a game-changer for anyone making app tutorials or mobile demos. Just plug your iPhone or iPad into your Mac with its regular charging cable. In your recording software, you'll see your device pop up as a video source. Select it, and you're capturing your mobile screen in high quality, right on your desktop.
The ability to seamlessly capture both desktop and mobile screens is a key feature that separates basic tools from professional-grade Mac recording software. This flexibility is essential for modern content creation.
What’s the Secret to Recording Internal Mac Audio?
Ah, the classic Mac recording headache. For years, this required clunky third-party audio drivers and confusing setups. It was a mess.
Thankfully, those days are over. Modern recorders solve this problem internally. You just check a box labeled "Record System Audio," and it just works. No more fiddling with complicated audio routing software. It's a simple toggle that saves a massive amount of time and frustration.
Ready to create stunning product demos and tutorials effortlessly on your Mac? Discover the power of auto-zoom and an integrated editor with Screen Charm. Get Screen Charm today!