Your Guide to Video Screen Grabber Mac Tools
Oct 17, 2025

Learning how to make an explainer video on your Mac isn't as daunting as it sounds. The whole process really boils down to three main phases: planning your message, recording your screen and yourself (we'll get into a great tool for this, Screen Charm), and then editing everything into a polished, shareable video. When you break it down like that, it becomes a series of manageable, creative steps.
Why Explainer Videos Are a Game Changer for Mac Users
Explainer videos aren't just a passing marketing trend; they're an essential communication tool, especially in a noisy digital world. If you're a creator, developer, or marketer working on a Mac, a well-made video is often the most direct and effective way to untangle complex ideas, demonstrate how your software works, or guide users through a process.
This guide is built from the ground up for the macOS ecosystem. I'll walk you through how to create professional-looking videos without getting bogged down by the steep learning curve that comes with a lot of high-end editing software.
The Power of Clarity and Connection
Before we jump into the "how-to," it’s worth taking a second to understand what an explainer video is and why it works so well. At its heart, an explainer video closes the gap between a potentially confusing product and a user who just wants it to make sense.
Imagine a developer launching a new Mac app. A detailed, text-heavy manual might be technically accurate, but it’s also a surefire way to overwhelm someone. An explainer video, on the other hand, can guide a new user through the entire setup in less than 90 seconds. That’s the difference between a frustrated customer and a fan.
This visual approach is fantastic for:
Simplifying Complexity: Breaking down intimidating software workflows into simple, easy-to-digest visual steps.
Improving Onboarding: Showing new customers the ropes, which cuts down on support tickets and helps people stick around.
Boosting Conversions: Actually showing potential customers how your product solves their problem is far more convincing than just telling them.
The numbers don't lie. A 2025 study found that a staggering 98% of people have watched an explainer video to learn about a product. Even more importantly, these videos drive action—up to 91% of viewers say a video convinced them to make a purchase or download an app. You can dig into more video marketing stats to see just how powerful they are.
Your Roadmap to Success on macOS
Throughout this guide, we’ll be using Screen Charm, an app built specifically for macOS that makes creating videos feel natural and quick. You don’t need any prior video production experience to follow along.
My goal here is to give you a practical roadmap. We’ll go from a rough idea all the way to a finished video you'll be excited to share, focusing on real-world examples that turn confused prospects into confident customers.
Crafting Your Message Before You Hit Record
A great explainer video is made long before you ever press the record button. Seriously. The planning you do upfront is what separates a clear, compelling video from one that just adds to the noise. Skipping this pre-production phase is a recipe for a rambling, unfocused final cut.
Think of it this way: getting your ideas sorted out on paper first makes the actual recording with a tool like Screen Charm a breeze. It’s no longer about figuring out what to say, but simply executing a solid plan.
Start With Your Audience and Goal
Before you even think about writing a script, you have to nail down two things: Who are you talking to, and what do you want them to do? Defining your audience is everything.
Are you making a video for savvy developers who live and breathe technical jargon, or for first-time users who need a super simple walkthrough of your Mac app? The language you use, the examples you show, and the overall tone will be completely different for each.
Once you know who you're talking to, lock in the video's main goal. Is it to:
Generate new leads by highlighting a killer feature on your homepage?
Help existing customers by showing them how to navigate a tricky workflow?
Onboard new hires with a tutorial on your internal software?
A video that tries to accomplish all three will probably fail at all of them. Pick one primary objective. Let that single goal drive every decision you make from here on out.
Define Your One Core Message
With your audience and goal clear, it's time to boil your entire video down to a single, core message. If your viewer remembers just one thing, what should it be? This isn't a clever tagline; it's the central idea that directly solves their biggest problem.
For example, if you're showing off a new productivity app for macOS, your core message might be: "This app brings all your scattered project files into one clean, searchable home." Every single part of your script should then serve to prove and reinforce that one idea.
The best explainer videos don’t try to show off every single feature. They zero in on the viewer’s biggest frustration and present a laser-focused solution. That kind of clarity is what turns a confused prospect into a paying customer.
This simple flowchart shows how these foundational steps build on each other, leading directly to a powerful script.
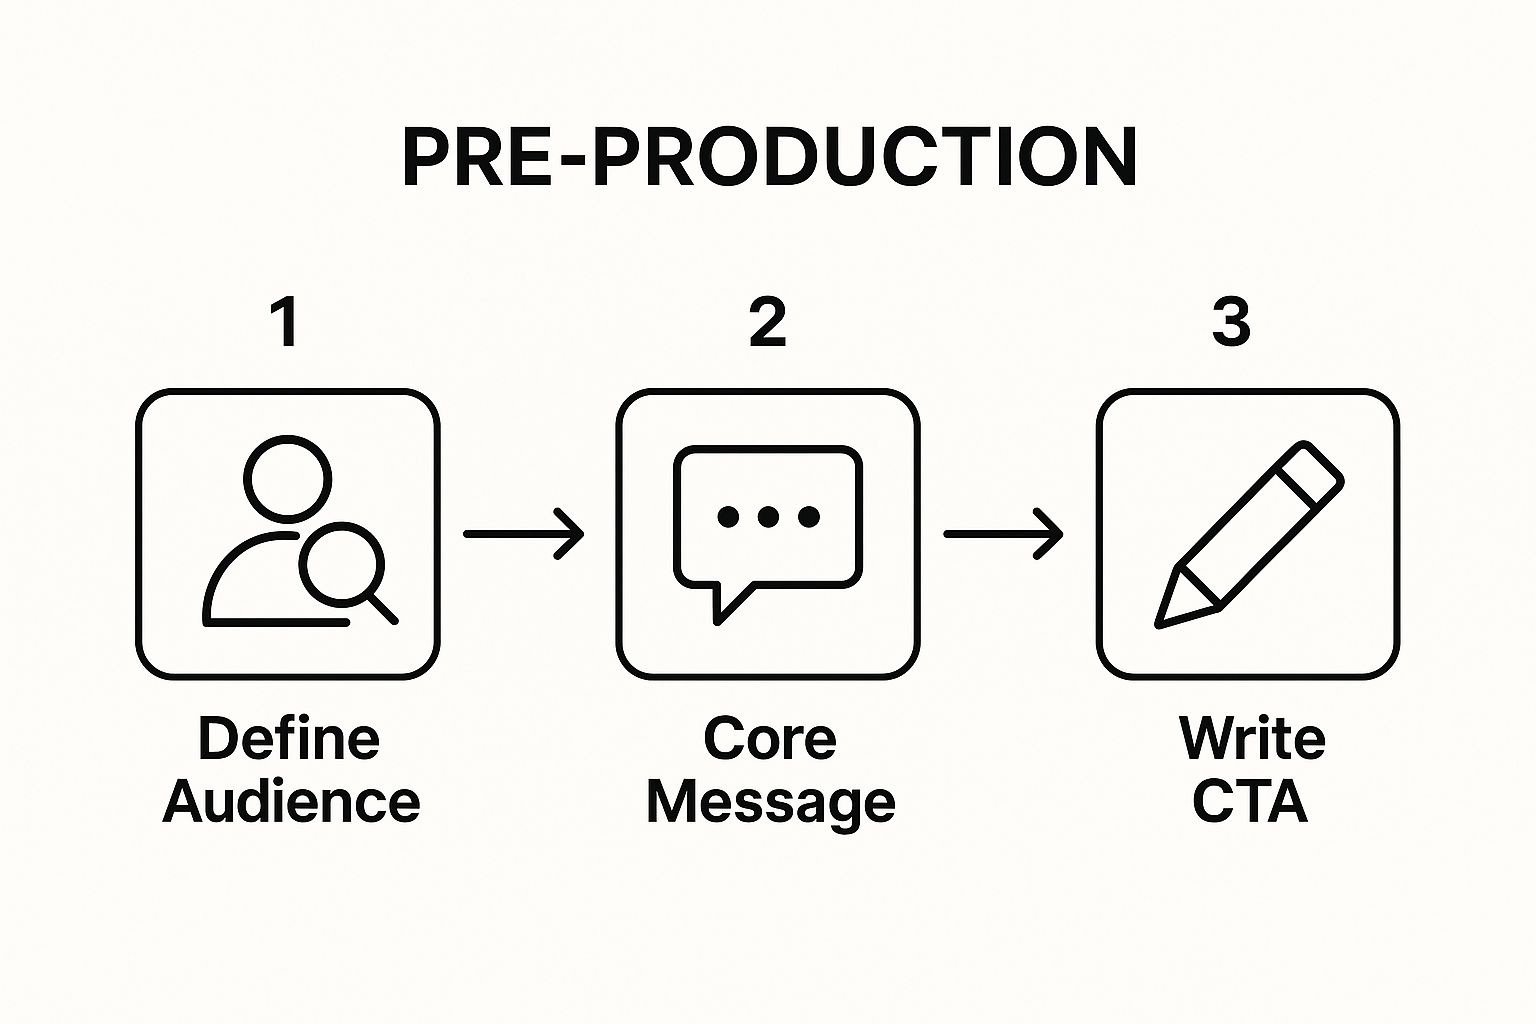
As you can see, a well-defined audience leads to a sharp core message, which then flows naturally into a strong call to action.
Scripting With a Simple Structure
Okay, now it’s time to actually write. You don't need to be a Hollywood screenwriter—just follow a simple, three-part structure that people intuitively understand. This approach is key to good visual storytelling and keeps your video on track.
The Problem: Start by describing a pain point your audience knows all too well. Twist the knife a little. Get them nodding along. For example, "Tired of juggling five different apps just to manage your client projects on your Mac?"
The Solution: This is where you introduce your app or service as the hero. Connect their problem directly to your core message. "Meet ProjectFlow, the all-in-one client management app built just for macOS."
The Call to Action (CTA): Finish with a crystal-clear instruction. Tell them exactly what to do next. No wishy-washy language here. "Click the link below to start your free 14-day trial and organize your first project today."
As you write, read your lines out loud. Does it sound like a robot? If so, rewrite it until it sounds like you're just talking to a friend. For inspiration, try creative approaches like turning frequently asked questions into engaging product demos. With this final script in hand, you’re ready for a focused, efficient recording session.
Time to Record: Bringing Your Explainer Video to Life
With your script ready, it’s time for the fun part: bringing your explainer video to life. This is where all that planning pays off as you start capturing the visuals on your Mac. Screen Charm is designed to make this step feel less like a technical chore and more like a creative process.
Instead of juggling a screen recorder, a separate audio app, and an editor, Screen Charm gives you a single, focused environment to create high-quality recordings. Let’s walk through how to get your setup dialed in for a polished, professional result.
Nail Your Recording Setup
The first thing you’ll do inside Screen Charm is decide what to record. You can capture your entire screen, focus on a specific application window, or even draw a custom-sized area. For most explainer videos, I find that recording a specific app window works best. It keeps the viewer’s attention exactly where you want it and avoids any distracting desktop icons or notifications.
Next up, and arguably more important, is your audio. Let’s be honest: bad audio can kill an otherwise great video. Screen Charm automatically finds any microphones connected to your Mac, so you can easily select your best one, whether it’s a dedicated USB mic or even your AirPods.
Here’s a quick pre-flight checklist I run through before hitting record:
Define Your Canvas: Choose the app window or screen area you’ll be demonstrating.
Check Your Mic: Make sure your best microphone is selected and do a quick sound check.
Silence the World: Flip on "Do Not Disturb" on your Mac. Trust me, you don’t want a notification popping up mid-take.
Close Extra Apps: Free up your Mac's resources by quitting anything you don't absolutely need for the recording.
This little bit of prep takes less than a minute but can save you a mountain of editing headaches later.
Let Auto-Zoom and Webcam Overlays Do the Heavy Lifting
This is where Screen Charm really shines. The app has some seriously smart features built right in that help you create a dynamic video without hours of manual editing.
The auto-zoom feature is a total game-changer. It intelligently follows your cursor, smoothly zooming in on buttons, text fields, or menus as you click on them. This movement naturally guides your viewer’s eye, making it incredibly easy for them to follow along with complex steps. It’s like having a tiny camera crew directing the shot for you.
Here's a peek at Screen Charm's clean interface where you can manage all these settings.
The whole point is to keep the controls simple so you can stay focused on your content.
Another great tool is the webcam overlay. Putting a human face to the voice creates a powerful connection and builds trust. You can place your webcam feed in any corner, and Screen Charm layers it right over your screen recording. This "picture-in-picture" look is perfect for your intro and outro, or anytime you want to speak directly to your audience.
My Favorite Pro Tip: Right when you start recording, take a beat, look directly into the webcam, and smile. It sounds simple, but it makes your intro feel so much more confident and welcoming. It's an easy way to connect with your audience before you even get into the meat of the content.
Getting That Crisp, Clear Audio
We can't say it enough: great audio is non-negotiable. People will forgive a video that’s a little grainy, but they will click away in a heartbeat if the audio is scratchy or hard to understand. Your voice is what carries the story. For a deeper look at this, check out our guide on finding the best screen recorder with voice capabilities for Mac.
Before you commit to a full take, always record a short test clip. Say a few lines from your script, then play it back.
Here’s what you should be listening for:
Clarity: Is your voice coming through clearly?
Volume: Is it too loud? Too quiet? Is the level consistent?
Background Noise: Are you picking up any hum from a fan, annoying keyboard clicks, or an echo from the room?
If you hear any issues, try moving a bit closer to your mic or finding a quieter room. These small tweaks make a world of difference. Getting this right is more important than ever, as the demand for effective video content keeps climbing. In fact, by 2025, 73% of marketers expect explainer videos to be their top format for breaking down complex topics. You can find more stats like this in these video marketing statistics on b2w.tv.
By following these steps, you'll be ready to record with confidence, creating a video that not only looks great but sounds fantastic, too.
From Raw Footage to Polished Final Cut
You’ve got your raw footage recorded, which is the hard part. Think of it as a lump of clay. Now comes the fun part: shaping it into a professional, engaging video that gets your point across clearly. This post-production phase can seem like a mountain to climb, but for Mac users, you already have some fantastic, intuitive tools right at your fingertips.
Whether you’re just starting out with iMovie (which comes free with every Mac) or you've leveled up to a more powerful editor like Final Cut Pro, the core goals of editing are always the same. Let’s break down the process into the essential edits that truly make a difference.
First Things First: Building Your Story on the Timeline
Your video editor’s timeline is your workbench. It’s where you'll assemble, trim, and piece together your clips to build a seamless story.
Get started by dragging all your recordings onto the timeline. Don't sweat the details just yet—the goal is simply to get all your materials in one place. Your first real task is to trim out the mistakes. We all make them. This means cutting out any long pauses, "ums" and "ahs," or any fumbled mouse clicks that don't serve the narrative. Just by slicing these out, your video will immediately feel tighter and more confident.
With the bloopers gone, you can start shuffling your clips into the order you mapped out in your script. This is where you really define the flow, making sure each point logically transitions to the next.
My Two Cents: A great edit is one the viewer never notices. Your goal is a viewing experience so smooth that the audience is completely focused on your content, not on the cuts. They should feel like you're effortlessly guiding them from start to finish.
Don't Neglect Your Audio—It's Half the Experience
I’ll say it again because it's that important: your audio quality is just as crucial as your visuals, maybe even more so. Nothing makes a viewer click away faster than jarring audio. One clip is too quiet and they're cranking the volume, and the next is booming, sending them scrambling to turn it down.
Thankfully, most Mac video editors make this easy. Look for an "auto-enhance" or "normalize" function. This feature automatically balances the volume across all your clips, creating a consistent level. For a bit more control, you can manually adjust the audio gain on individual clips to make sure your voiceover stays at a comfortable listening level throughout.
Adding That Extra Layer of Polish with Visuals
Once your story is in place and the audio is crystal clear, it’s time to add the finishing touches. These aren't about flashy, over-the-top effects; they're about functional enhancements that make your message easier to understand and more engaging.
A few simple additions can make a world of difference:
Text Overlays: Use these to highlight key terms, pop a statistic on screen, or summarize a critical point. A clean text overlay reinforces what you're saying and is a lifesaver for people watching with the sound off.
Simple Transitions: Instead of a hard, jarring jump cut between scenes, try a simple cross-dissolve or a quick fade. These subtle transitions help guide the viewer's eye from one thought to the next, keeping the flow silky smooth. My advice? Steer clear of distracting star wipes or page peels unless you’re going for a retro vibe.
Background Music: The right soundtrack can completely set the mood. Find a subtle, royalty-free track that fits your brand’s tone. Just remember, the music should support your voiceover, not fight it for attention. Make sure to lower its volume so it sits comfortably in the background.
A big part of this process is simply having the right tool for the job. If you're still figuring out what software is best for you, our guide to the best video editing software for beginners can point you in the right direction. You don’t have to be a seasoned pro to make an awesome explainer video on your Mac. Just focus on these fundamentals, and you’ll end up with a clean, clear, and engaging final product you can be proud of.
Getting Your Explainer Video Out There for Maximum Impact
You’ve done the hard work and created a fantastic explainer video. That's a huge win, but hitting the export button isn't the finish line. An amazing video has zero impact if no one ever sees it, right? Now it's all about getting your content in front of the right eyeballs and making sure it looks brilliant everywhere you post it.
This is where a little strategy goes a long way. Let's walk through how to launch your video for the best possible reach and results, from dialing in the right export settings on your Mac to crafting a title that actually gets clicked.
Nailing Your Export Settings
First things first: you need to export the video from your editor. The goal here is to find that perfect balance between high visual quality and a manageable file size. Trust me, a massive, uncompressed file will take ages to upload and will just buffer endlessly for your viewers—a surefire way to get them to click away.
Most modern video editors on macOS, like Final Cut Pro or even iMovie, come with presets for different platforms. These are a fantastic starting point.
But if you're going manual, here are a few rules of thumb I stick to:
Resolution: For most platforms like YouTube or your website, exporting in 1080p (1920x1080) is the gold standard. It looks sharp on just about any screen without creating a monstrous file.
Format: MP4 with an H.264 codec is the universal language of online video. It’s compatible with basically every device and platform out there.
Frame Rate: Just stick with the frame rate you recorded in. For most screen recordings, that’s going to be 30 frames per second (fps), which keeps the motion looking smooth.
Honestly, don't overthink it. For 99% of explainer videos, an H.264 MP4 file at 1080p and 30fps is the perfect setting. It delivers on quality and performance, ensuring a great experience for your audience.
To make it even easier, here's a quick reference guide for the most common spots you'll be sharing your video.
Optimal Export Settings for Popular Platforms
This quick reference guide will help you choose the right export settings to ensure your video looks great on different platforms.
Platform | Recommended Resolution | Recommended Format | Key Consideration |
|---|---|---|---|
YouTube | 1080p or 4K | MP4 (H.264/HEVC) | Higher resolution is rewarded. YouTube's compression is strong, so start with high quality. |
Website/Blog | 1080p | MP4 (H.264) | Balance quality and file size for fast load times. No one waits for a hero video to buffer. |
LinkedIn/X | 1080p (or 1:1 square) | MP4 (H.264) | Mobile-first viewing is key. Ensure any text is large and readable on small screens. |
N/A | GIF or static image with link | Don't embed the full video. Use a compelling thumbnail or GIF that links to the video page. |
Choosing the right settings from the start saves you the headache of re-exporting and re-uploading later.
Creating a Title and Thumbnail That People Actually Click
On platforms like YouTube, your title and thumbnail are everything. They're the gatekeepers deciding if someone clicks your video or just scrolls right on by. A boring, lazy title like "Product Demo" is a complete non-starter.
Your title needs to be benefit-driven. Instead of describing what the video is, tell people what it does for them. For instance, "New Feature Walkthrough" becomes "How to Organize Your Projects in Under 60 Seconds." See the difference? One is a statement; the other is a solution.
Your thumbnail is just as crucial. It should be bright, clear, and make someone pause their scroll. A great thumbnail usually has:
A high-quality, expressive shot from the video.
Bold, easy-to-read text that reinforces the video's promise.
A clean design that pops, even as a tiny icon on a phone.
Thinking Beyond Just YouTube
Uploading your video to YouTube is a great move, but don't let that be the end of your distribution strategy. Your explainer video is a powerful, versatile asset that you should use in multiple places.
Embedding the video right on your website's homepage or a key feature page can give your conversion rates a serious lift. After all, a video can explain your value proposition much more effectively than a wall of text.
You should also repurpose your video for social media. Chop it up into shorter, bite-sized clips for platforms like LinkedIn or X (formerly Twitter). The demand for clear, helpful video content is absolutely booming. In fact, the market for explainer video services is projected to more than double, growing from USD 1.5 billion in 2022 to USD 3.2 billion by 2030. That growth is fueled by their proven ability to boost engagement and conversions, as highlighted in this global market analysis on Research and Markets.
Finally, make sure you track your video’s performance. Keep an eye on metrics like view count, watch time, and click-through rate. This data is gold—it tells you what's working with your audience and gives you incredibly valuable feedback for the next video you create.
Got Questions About Making Explainer Videos on Mac?
Once you start creating explainer videos on your Mac, you'll inevitably run into a few common questions. I've been there. Let's walk through some of the most frequent ones I hear, with straightforward answers to help you get past the sticking points and back to creating.
So, How Long Should My Explainer Video Actually Be?
This is the big one, isn't it? Everyone wants to know the magic number. From my experience, the sweet spot for an explainer video is a brisk 60 to 90 seconds.
That short window is your best bet for capturing someone's attention and holding it long enough to get your point across. Push it past that, and you're fighting a losing battle. Data consistently shows engagement plummets after the two-minute mark. Your audience is busy, and your job is to respect their time.
Nail the essentials fast: "What is this?" and "Why do I need it?" As soon as you've answered those, it’s time for your call to action.
Is an Explainer Video Just Another Name for a Demo Video?
Nope, and it's a crucial distinction. While they're cousins, they have completely different jobs in your marketing strategy.
An Explainer Video is your hook. It's a high-level pitch designed to introduce a problem and position your product as the hero. Think of it as the conversation starter you'd have on your homepage or in an ad.
A Demo Video is the deep dive. It's for people who are already intrigued and want to see the nitty-gritty. This is where you show exactly how a feature works, walking them through the steps.
Basically, an explainer sells the "why," while a demo shows the "how."
The key is intent. An explainer creates initial interest and broad understanding. A demo caters to someone who's already on the hook and wants to see the engine up close.
What's the Best Software for This on a Mac?
The best tool is always the one that lets you work efficiently without wanting to throw your computer out the window. For Mac users creating screen recordings, a dedicated tool almost always beats a general, all-in-one video editor.
Sure, a beast like Final Cut Pro is incredibly powerful, but it’s often like using a sledgehammer to hang a picture frame when you just need a simple product explainer. This is where specialized macOS apps like Screen Charm really shine. They're built for this specific job.
Features like intelligent auto-zoom that follows your cursor or a simple drag-and-drop webcam overlay aren't just minor conveniences—they can save you hours of tedious manual editing. You get to stay focused on your message, not the software.
Do I Really Need to Hire a Professional for the Voiceover?
Honestly? Probably not. A polished, professional voiceover is nice, but authenticity often resonates more, especially for product explainers and tutorials. People actually like hearing from the person who built the thing or knows it inside and out.
If you're going the DIY route, just keep a few things in mind:
Script it out. Don't just wing it. A script ensures you stay on-point and don't ramble.
Get a decent mic. The one built into your Mac is fine in a pinch, but a simple external USB mic will make your audio quality 10x better.
Sound like a human. Read your script aloud a few times. Let it sound like a conversation, not like you're reading a legal document.
At the end of the day, your genuine passion and clear explanation will do more to build trust than a perfect "radio voice" ever could.
Ready to create polished, professional explainer videos on your Mac without the headache? Screen Charm gives you all the tools you need—from intelligent auto-zoom to seamless webcam overlays—in one easy-to-use app. Stop wrestling with complicated software and start making videos that captivate your audience.
